Last update : September 16, 2013
To upload photos or videos to the Synology Photostation, you can use five different tools. In all cases, thumbnails for photos and videos are created in several resolutions at the upload process.
Synology Assistant
The Uploader feature has been removed in version 4.3-4206, released on 27.8.2013.
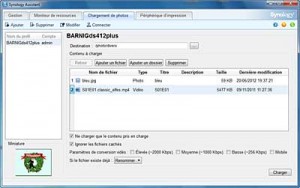
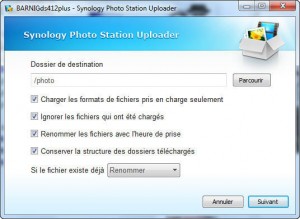
2. Synology Photostation Uploader
Synology Upload Tool
Version 1.0-038, released on 27.8.2013, only supports bulk uploads (source is a folder).
3. Photostation Album Charger
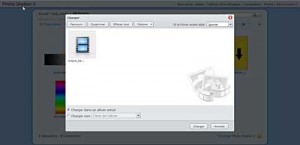
Synology Album Upload Tool
4. Synology Filestation Charger

Synology Filestation Charger
5. Windows Explorer in local network
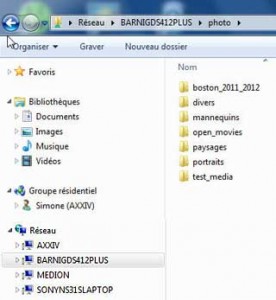
Windows File System
The two first tools (Synology Assistant and Photostation Uploader) are more efficient because the CPU of the computer is used to do the conversion and the thumbnail creation, whereas the CPU of the Synology Diskstation is used in the three other ways.
The free software ImageMagick is used by the Synology Diskstation to handle images and thumbnails.The Synology DMS 4.2 system (and later) create several thumbnails for each photo or video uploaded in the Photostation (shared system folder photo). These thumbnails are saved in a hidden folder named @eaDir, created in each album folder. Subfolders with the name of the photo or video, including the extension, are created inside the @eaDir folder. Such a subfolder contains the following thumbnails :
DMS 4.2 – Photo Station 5
Photos :
| Filename | Max width or height (pixels) |
| SYNOPHOTO:THUMB_B.jpg | 640 |
| SYNOPHOTO:THUMB_L.jpg | 800 |
| SYNOPHOTO:THUMB_M.jpg | 320 |
| SYNOPHOTO:THUMB_S.jpg | 120 |
| SYNOPHOTO:THUMB_XL.jpg | 1.280 |
Videos :
| Filename | Max width or height (pixels) |
| SYNOPHOTO:THUMB_B.jpg | 640 |
| SYNOPHOTO:THUMB_L.jpg | 800 |
| SYNOPHOTO:THUMB_M.jpg | 320 |
| SYNOPHOTO:THUMB_S.jpg | 120 |
| SYNOPHOTO:THUMB_XL.jpg | 1.280 |
| SYNOPHOTO:VIDEO_SCREENSHOT.jpg | video original |
DMS 4.3 – Photo Station 6
Photos :
| Filename | Max width or height (pixels) |
| SYNOPHOTO_THUMB_B.jpg | 640 |
| SYNOPHOTO_THUMB_M.jpg | 320 |
| SYNOPHOTO_THUMB_PREVIEW.jpg | 160 |
| SYNOPHOTO_THUMB_S.jpg | 120 |
| SYNOPHOTO_THUMB_XL.jpg | 1.280 |
Videos :
| Filename | Max width or height (pixels) |
| SYNOPHOTO:THUMB_M.jpg | 320 |
| SYNOPHOTO:THUMB_XL.jpg | video original |
| SYNOPHOTO:VIDEO_SCREENSHOT.jpg | video original |
Display of thumbnails
The short dimension of the thumbnail is calculated with the aspect ratio of the original photo or video. If the video is rotated (metadata Rotation=xx), for instance by using an iPhone, the thumbnails are also rotated and displayed as expected. Metadata are not saved to the thumbnails.
DMS 4.2 – Photo Station 5
The photo-thumbnails are displayed as follows :
| Application | Qualité | Mode simple | Mode détaillé | Info | Agrandissement | Vignette | Diaporama |
| PC | – | M | M | M | L | S | XL |
| DSphoto+ | Normal | S | S | S | L | S | L |
| DSphoto+ | High | M | M | M | XL | M | XL |
The video-thumbnails are displayed as follows :
| Application | Qualité | Mode simple | Mode détaillé | Info | Videocover | Vignette |
| PC | – | M | M | M | XL | S |
| DSphoto+ | Normal | S | S | S | L | S |
| DSphoto+ | High | M | M | M | XL | M |
DMS 4.3 – Photo Station 6
The photo-thumbnails are displayed in M-size in all list-, time-line-, mosaic- and info-views, independent of the quality setting (normal/high) in DSphoto+. The photos are displayed in XL-size in the enlarged- or slide-show-views. The sizes B and S are used in other Synology multimedia apps like the multimedia server. The video-thumbnails are also displayed in M-size for overviews and in the original size (XL) for viewing.
Replacement of thumbnails
Sometimes it’s necessary to replace the automatic generated thumbnails, for example if the thumbnail for a video is not representative. The replacement can be done with the Synology web console. One problem is the character : in PhotoStation 5 which is not supported in filenames in Windows systems. Thumbnails created before an update to Photo Station version 6 contain such characters. A temporary name for the uploaded file can be changed in the webconsole with the command
> mv old_name new_name
in the correspondent folder (mouse support in the web console). The change can also be done in the command line interface (CLI) with the Putty client. It’s necessary in this case to change the directory with the command
> cd ../volume1/photo/album_folder/@eaDir/image_folder

> dir

> mv old_name new_name
It’s important to check if the read-write properties of the changed files are set to 755, otherwise they should be modified with CHMOD.
The cover pictures for an album are located in the @eaDir folder at the same level as the album folder. Inside this folder are subfolders with the same album names, containing a file SYNOPHOTO:ALBUM.cover. It’s a text file with the filename of the cover photo, nothing else. If no cover photo is defined, the first image in the album is used as default cover. If a movie is selected as a cover image, the filename of the video is listed in the SYNOPHOTO:ALBUM.cover text file.
A second file SYNOPHOTO:ALBUM.sort is in the same @eaDir folder. A content example is shown below :
{"type":"3","order":"0","list":["IMG0001.jpg","IMG0002.jpg","IMG0003.jpg"]}
The following list provides some links to webpages with additional informations about this topic :
- Synology Static Photo Gallery, by Jonathan Poland
- Controlling thumbnail generation on a Synology NAS, by Ryan Olson
- Thumbnail 1000:s of photos on a Synology NAS (in hours not months), by Michael Medin
- Fotos Ablegen – Anzahl der Thumbs pro Bild, by sonya
- Video conversion, by wakebrdr549
- Make videos work without converting, by puckpuck
- Thumbnail generation issue – workaround 4 Windows, by adynis
- Creating Thumbnails for the Synology DiskStation PhotoStation, by phillips321


 The windows key PrtScnSysRq captures the entire screen and copies it to the clipboard. You find this key at the upper right of your keyboard. Holding down the Alt key when pressing the PrtScnSysRq key, Windows captures only the currently active window and copies it to the clipboard. In Windows 10, use the Windows Log key together with the PrtScnSysRq key to capture the whole screen which is saved into a Screenshots Folder inside the Pictures directory.