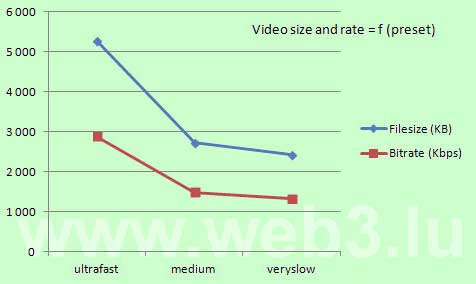
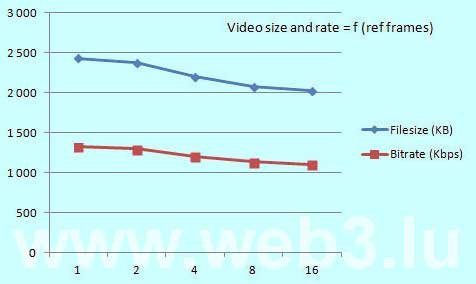
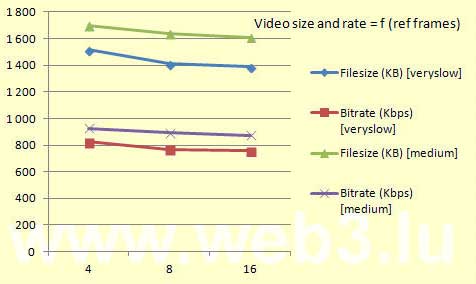
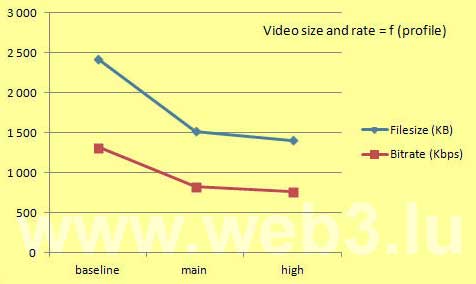
Doublage polyglotte automatique de vidéos avec HeyGen Video Translate

Introduction

Depuis la publication de mon article Das Küsschen und die Sonne stritten sich … au sujet de l’histoire de la traduction automatique, cette technologie a progressé de manière impressionnante les derniers mois. Si Google Translate est devenu un outil de travail journalier pour de nombreux internautes, les facilités de traduction automatique dans Youtube pour générer des sous-titres dans les vidéos sont moins connues. Hélas, contrairement à Google Translate, la langue luxembourgeoise n’est pas encore supportée par Google Youtube.

Génération automatique de sous-titres dans les vidéos Youtube

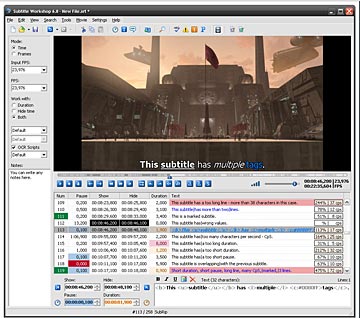
Pour présenter l’outil de génération automatique de sous-titres, j’ai utilisé une animation-vidéo-fiction au sujet de l’inventeur de la photographie couleur que j’avais réalisé au début de 2021. L’image qui suit montre une copie écran de la fenêtre Youtube qui affiche le texte des sous-titres de la traduction automatique, ainsi que la synchronisation automatique avec la parole.

Page de traduction et de synchronisation automatique de Youtube pour générer des sous-titres vidéo

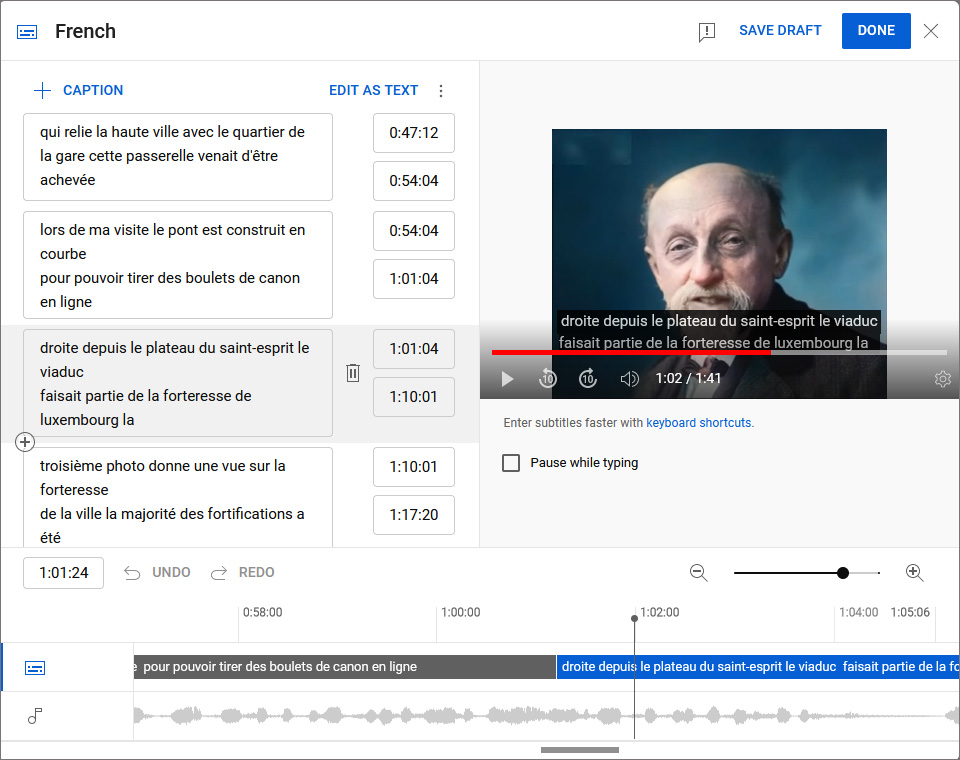
Les ponctuations et les majuscules ne sont pas encore gérées par l’outil de traduction automatique, mais il est facile de faire des modifications ou corrections manuelles en ligne. On peut également segmenter davantage les sous-titres et ajuster la synchronisation avec la parole, si nécessaire. La vidéo avec les sous-titres générés est présentée ci-après:

Doublage polyglotte automatique de vidéos avec HeyGen Video Translate

Deux ans après le lancement du générateur d’images DALL*E par OpenAI et une année après la présentation de ChatGPT par la même société, c’est une autre société qui vient de commercialiser une application qui est devenue virale ces derniers jours. Il s’agit de HeyGen qui a développé un logiciel d’intelligence artificielle permettant de doubler instantanément une vidéo en différentes langues, avec des résultats spectaculaires. L’outil s’appelle HeyGen Video Translate et permet de réaliser un doublage en treize langues, avec une synchronisation parfaite des lèvres et avec la génération d’une voix synthétique qui conserve l’intonation originale de l’orateur.

La start-up HeyGen, localisée à Los Angeles, qui s’appelait à l’origine Movio avant d’être rebaptisée en avril, a été fondée par Joshua Xu (CEO) et par Wayne Liang (CPO) en novembre 2020. Tous les deux ont été formés par l’université Carnegie Mellon à Pittsburgh. Au début, HeyGen se focalisait sur la création de son propre avatar pour réaliser des vidéos de présentation. Au-delà de la prouesse technique, c’est surtout la facilité du processus des produits Video Translate, Instant Avatar et Photo Avatar qui impressionne.

La vidéo suivante montre l’exemple d’une vidéo que j’ai enregistrée en anglais sur mon smartphone et qui a été traduite en portugais avec HeyGen Video Translate:

1. Vidéo anglaise, traduite en portugais avec HeyGen Video Translate, avec sous-titres luxembourgeois

À ce jour, HeyGen Video Translate supporte 13 langues : anglais, allemand, chinois, coréen, espagnol, français, hindi, italien, japonais, néerlandais, polonais, portugais et turc. J’ai essayé toutes les langues disponibles et téléchargé les vidéos traduites sur Youtube. Vous pouvez les visualiser ci-après (de préférence avec le navigateur Google Chrome). J’ai ajouté les sous-titres luxembourgeois manuellement. Pour certaines langues, j’ai eu des retours de la part de personnes qui les utilisent comme langues maternelles que la traduction est correcte.

2. Vidéo anglaise, traduite en italien avec HeyGen Video Translate, avec sous-titres luxembourgeois
3. Vidéo anglaise, traduite en espagnol avec HeyGen Video Translate, avec sous-titres luxembourgeois
4. Vidéo anglaise, traduite en turc avec HeyGen Video Translate, avec sous-titres luxembourgeois
5. Vidéo anglaise, traduite en néerlandais avec HeyGen Video Translate, avec sous-titres luxembourgeois
6. Vidéo anglaise, traduite en polonais avec HeyGen Video Translate, avec sous-titres luxembourgeois
7. Vidéo anglaise, traduite en japonais avec HeyGen Video Translate, avec sous-titres luxembourgeois
8. Vidéo anglaise, traduite en coréen avec HeyGen Video Translate, avec sous-titres luxembourgeois
9. Vidéo anglaise, traduite en chinois avec HeyGen Video Translate, avec sous-titres luxembourgeois
10. Vidéo anglaise, traduite en hindi avec HeyGen Video Translate, avec sous-titres luxembourgeois
11. Vidéo anglaise, traduite en français avec HeyGen Video Translate, avec sous-titres luxembourgeois
12. Vidéo anglaise, traduite en allemand avec HeyGen Video Translate, avec sous-titres luxembourgeois
13. Vidéo original en anglais, avec sous-titres luxembourgeois

Insertion automatique et manuelle de sous-titres

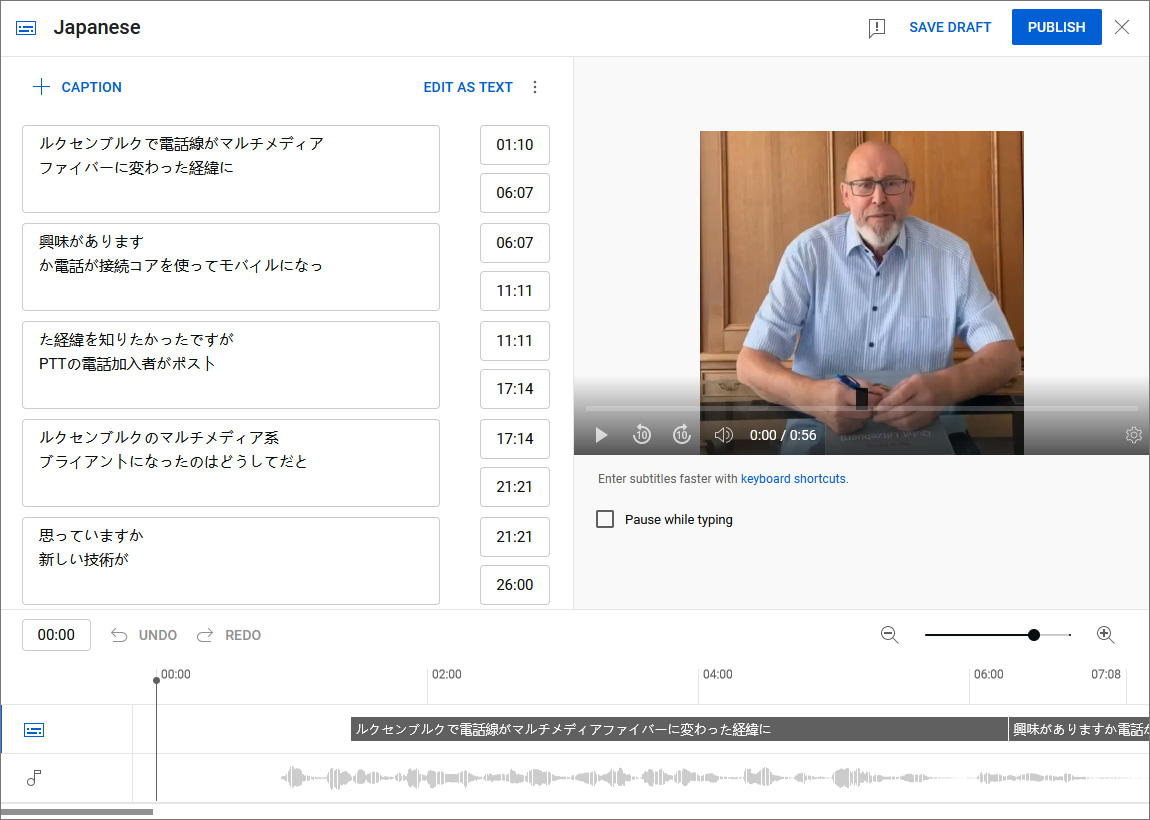
La figure suivante montre la génération, segmentation et synchronisation automatique de la vidéo traduite en langue japonaise dans l’application Studio de Youtube.

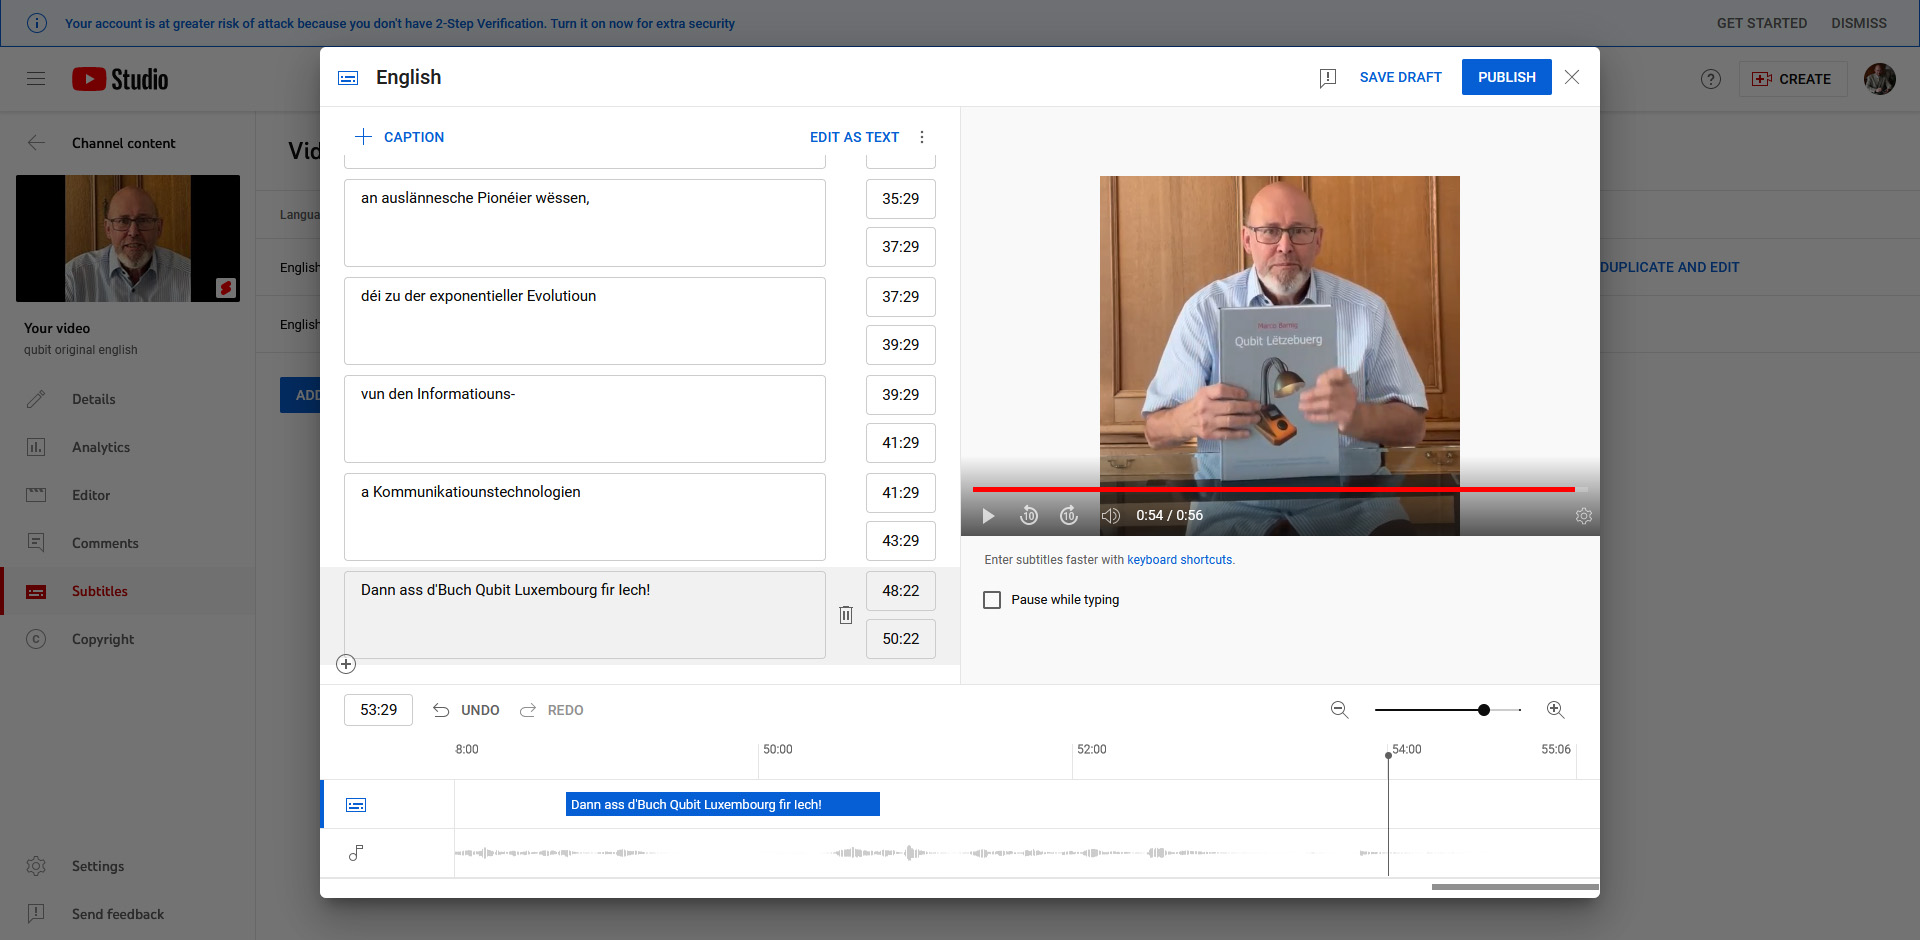
L’insertion manuelle de sous-titres luxembourgeois est présentée dans l’illustration suivante:

Bibliographie

Subtitles in mp4 video files

Last update : September 22, 2013

Subtitles

Subtitles are textual versions of the dialog in films and television programs, usually displayed at the bottom of the screen. They can either be a form of written translation of a dialog in a foreign language, or a written rendering of the dialog in the same language, with or without added information to help viewers to follow the dialog.

Closed Captioning

Another process of displaying text on a visual display to provide additional or interpretive information is called closed captioning (CC). Most people don’t distinguish captions from subtitles. In the United States and Canada (ATSC), these terms do have different meanings. Closed captions were created for the deaf community or hard of hearing individuals to assist in comprehension. Everything you purchase from Apple’s iTunes Store have CC subtitles, if at all. CC subtitles can be extracted with CCextractor (version 0.66 released on July 1, 2013), a free GPL licensed closed caption tool for Windows.

Read The Closed Captioning Bible by Werner Ruotsalainen about this topic.

SubRip

The most basic of all subtitle formats is SubRip, named with the extension .srt, which contains formatted plain text.

SRT consists of four parts :

  • A number indicating which subtitle it is in the sequence
  • The time that the subtitle should appear on the screen, and then disappear
  • The subtitle itself
  • A blank line indicating the start of a new subtitle

Here is an example :

1
00:00:20,000 --> 00:00:24,400
Altocumulus clouds occur between six thousand


2
00:00:24,600 --> 00:00:27,800
and twenty thousand feet above ground level.

Subtitle editor

Subtitle Workshop

Subtitle Workshop

There exist a great number of subtitle formats and programs to create subtitles. An efficient and convenient subtitle editing tool that supports all the subtitle formats you need and has all the features you would want from such a tool is Subtitle Workshop (version 6.0a released on August 26, 2013) from URUWorks. It even includes spell check function and an advanced video preview feature, but it doesn’t embed the subtitles in a video file.

Another performant tool is Subtitle Edit (version 3.3.8 released on September 1, 2013; Wikipedia) created by Nikolaj Lynge Olsson from Denmark.

Subtitle embedder

There exist two methods to embed subtitles in video files : soft embedding and hard burning. The following tools allow the embedding of SRT subtitles :

SRT subtitles are embedded with Timed Text as the Stream Text type, CC subtitles are labeled as EIA-608.

Subtitle player

The following players and servers support delivering of integrated subtitles :

Links

The following links provide additional informations about soft subtitles in videos :

Anamorphic video

The term anamorphic refers to a distorted image that appears normal when viewed with an appropriate lens. When shooting film or video, an anamorphic lens can be used to squeeze a wide image onto a standard 4:3 aspect ratio frame. During projection or playback, the image must be unsqueezed, stretching the image back to its original aspect ratio.

By default, 16:9 anamorphic video displayed on an standard monitor appears horizontally squeezed, meaning images look tall and thin. The advantage of this was in the past that producers could shoot wide-screen material using inexpensive equipment. Rescaling anamorphic video in order to see the entire wide screen frame on a standard definition 4:3 monitor is called letterboxing, and results in the loss of the maximum resolution available in the source footage. A wide screen (16:9) allows video-makers more room for creativity in their shot composition.

To check the support of anamorphic videos by different players, I created three mp4 videos from scratch, based on squeezed test pictures :

testbild_anamorphic

Source pictures  640×480, 854×480 and 1.280×480 squeezed to 640×480 pictures

The following ffmpeg script creates a video from a squeezed source image towards a stretched widescreen video with a ratio 2.35:1.

ffmpeg ^
-loop 1 ^
-f image2 ^
-i testbild_2_35_1_squeezed.jpg ^
-r pal ^
-vcodec libx264 ^
-aspect 235:100 ^
-crf 23 ^
-preset medium ^
-profile:v baseline ^
-level 3.1 ^
-refs 1 ^
-t 30 ^
testbild_anamorphic_2_35_1.mp4
pause

The -aspect parameter handles the correct display aspect ratio (DAR). The MediaInfo tool shows that the video has 640×480 pixels, but an DAR of 2.35:1.

MediaInfo

MediaInfo

The VLC video player stretches the video based on the DAR. Videos with a wrong DAR in the metadata can be resized manually by changing the aspect ratio in the corresponding video menu.

anamorphic video

VLC media player

More informations about anamorphic videos are available at the following links :

HEVC = H265

High Efficiency Video Coding (HEVC) is a video compression standard, a successor to H.264/MPEG-4 AVC (Advanced Video Coding), currently under development by a Joint Collaborative Team on Video Coding (JCT-VC) of the ISO/IEC Moving Picture Experts Group (MPEG) and ITU-T Video Coding Experts Group (VCEG), defined as ISO/IEC 23008-2 MPEG-H Part 2 and ITU-T H.265. HEVC is said to improve video quality, double the data compression ratio compared to H.264/MPEG-4 AVC, and can support 8K Ultra high definition television (UHD) and resolutions up to 8192×4320.

FFmpeg scripts

Last update : September 13, 2013

I use the following FFmpeg scripts to create or convert videos with FFmpeg to host them on the Synology DiskStation :

1. one image to video (15sec, 25 fps, AVC, mp4 container)

ffmpeg ^
-loop 1 ^
-f image2 ^
-i folder/imagename.png ^
-r pal ^
-vcodec libx264 ^
-t 15 ^
output_myvideo.mp4
pause

2.  image sequence to video with good quality (15sec, 25 fps, AVC, profile Baseline@L3.1, 1 Ref Frame, Chroma subsampling 4:2:0, mp4 container, start at image xxx, animation, preset very good quality, constant rate factor = 20)

ffmpeg ^
-f image2 ^
-start_number 1113 ^
-i folder/imagename_%%05d.png ^
-r pal ^
-vcodec libx264 ^
-crf 20 ^
-preset veryslow ^
-profile:v baseline ^
-level 3.1 ^
-refs 1 ^
-pix_fmt yuv420p ^
-tune animation ^
-t 15 ^
output_myvideo.mp4
pause

3. add audio stream to a mute video (15sec, AAC-LC, 48Kbps bitrate, 44.1 Kz sampling, one channel)

ffmpeg ^
-i folder/mymutevideo.mp4 ^
-i folder/mysound.flac ^
-vcodec copy ^
-acodec libvo_aacenc ^
-ar 44100 ^
-ab 48k ^
-ac 1 ^
-t 15 ^
output_mysoundvideo.mp4
pause

4. change video container

ffmpeg ^
-i folder/myvideo.mp4 ^
-vcodec copy ^
-acodec copy ^
output_mynewvideo.flv
pause

5. change framerate (stretch super8 film, digitized with 25 fps, to original framerate 18 fps)

ffmpeg ^
-i input01.avi ^
-target pal-dv ^
-vf "setpts=25/18*PTS" ^
output01.avi
pause

Video X264 encoding

Last update : September 17, 2013

I wanted to know the best X264 parameters to encode my personal movies with ffmpeg for my family website. I rendered 375 frames (15 seconds) from the open-source Big-Buck-Bunny image files (360-png) with different settings, starting at frame 1.113. This post refers to my former post about AVC (H264) video settings.

The common parameters for the encoding are :

  • -vcodec libx264
  • -f image2
  • -pix_fmt yuv420p (chroma subsampling : 4:2:0)
  • -tune animation
  • resolution (pal) : 640 x 360 pixels
  • frame rate : 25 fps

1st Test

The ffmpeg settings for the first test series are :

  • -preset veryslow
  • -profile:v baseline
  • -level 3
  • -refs 1

The value of the Constant Rate Factor (CRF) was changed from 20 to 32, in steps of 3. Here are the results :

CRF Filesize (KB) Videostream (Kbps) Bits/(Pixel*Frame)
 20  2.430  1.326  0.230
 23  1.472  802  0.139
 26  877  478  0.083
 29  531  289  0.050
 32  338  183  0.032

ffmpeg_crf

Visually the quality difference between the movies with an CRF = 20 and CRF = 32 is not perceptible. These are snapshots of the two movies :

CRF = 20  Size = 39,6 KB

CRF = 20  Image size = 39,6 KB

CRF = 32 Size = 32,6 KB

CRF = 32  Image size = 32,6 KB

2nd Test

The ffmpeg settings for the second test series are :

  • -crf : 20
  • -profile:v baseline
  • -level 3
  • -refs 1

The three presets veryslow, medium and ultrafast have been used. Here are the results :

Preset Filesize (KB) Videostream (Kbps) Bits/(Pixel*Frame)
veryslow 2.430 1.326 0.230
medium 2.729 1.489 0.258
ultrafast 5.276 2.880 0.500

ffmpeg_preset

Presets are designed to reduce the work needed to generate sane, efficient commandlines to trade off compression efficiency against encoding speed. The default preset is medium. If you specify a preset, the changes it makes will be applied before all other parameters are applied.

The X264 settings of the different presets are :

ultrafast

  • –no-8x8dct
  • –aq-mode 0
  • –b-adapt 0
  • –bframes 0
  • –no-cabac
  • –no-deblock
  • –no-mbtree
  • –me dia
  • –no-mixed-refs
  • –partitions none
  • –rc-lookahead 0
  • –ref 1
  • –scenecut 0
  • –subme 0
  • –trellis 0
  • –no-weightb
  • –weightp 0

veryslow

  • –b-adapt 2
  • –bframes 8
  • –direct auto
  • –me umh
  • –merange 24
  • –partitions all
  • –ref 16
  • –subme 10
  • –trellis 2
  • –rc-lookahead 60

3rd Test

The ffmpeg settings for the third test series are :

  • -preset veryslow
  • -crf : 20
  • -profile:v baseline
  • -level 3

The numer of reference frames was changed to the values 1, 2, 4, 8 and 16. Here are the results :

Ref frames Filesize (KB) Videostream (Kbps) Bits/(Pixel*Frame)
1 2.430 1.326 0.230
2 2.378 1.297 0.225
4 2.203 1.201 0.209
8 2.079 1.134 0.197
16 2.027 1.106 0.192

ffmpeg_ref_frames

4th Test

The ffmpeg settings for the fourth test series are :

  • -crf : 20
  • -profile:v main
  • -level 3

The numer of reference frames was changed to the values 4, 8 and 16 for the two presets veryslow and medium (4 is the minimum number of reference frames of the main profile). Here are the results :

Preset Ref frames Filesize (KB) Videostream (Kbps) Bits/(Pixel*Frame)
 veryslow 4 1.517 826 0.143
 veryslow 8 1.411 768 0.133
 veryslow 16 1.389 756 0.131
 medium 4 1.700 926 0.161
 medium 8 1.636 891 0.155
medium 16 1.607 875 0.152

ffmpeg_ref_frames_x

5th Test

The ffmpeg settings for the fifth test series are :

  • -preset veryslow
  • -crf : 20

The profiles and levels have been changed. Here are the results :

Profile@Level Filesize (KB) Videostream (Kbps) Bits/(Pixel*Frame)
baseline@3.0 2.430 1.326 0.230
main@3.0 1.517 826 0.143
high@3.0 1.405 765 0.133

ffmpeg_profiles

Profiles are not set by default in X264. If a profile is specified, it overrides all other settings, so that a compatible stream will be guaranteed.

The X264 settings of the different profiles are :

baseline

  • –no-8x8dct
  • –bframes 0
  • –no-cabac
  • –cqm flat
  • –weightp 0
  • No interlaced
  • No lossless

main

  • –no-8x8dct
  • –cqm flat
  • No lossless

high

  • No lossless

A level inside a profile specifies the maximum picture resolution, frame rate and bit rate that a decoder may use.

The complete detailed informations about settings are available in the x264.exe inbuild documentation, accessible with the command x264 –fullhelp .

The following list provides some links to websites with more informations about ffmpeg and x264 video encoding :

FFmpeg formats and codecs

Last update : September 16, 2013

By typing ffmpeg -formats in the command prompt window, a list of all supported media formats by FFmpeg is returned. The same is true for ffmpeg -codecs to get the list of all supported video- and audio-codecs.

I am particularly interested in the following FFmpeg formats and codecs :

File formats :
D. = Demuxing supported
.E = Muxing supported

  • D aac                                           raw ADTS AAC (Advanced Audio Coding)
  • DE ac3                                         raw AC-3
  • DE amr                                        3GPP AMR
  • DE asf                                          ASF (Advanced / Active Streaming Format)
  • DE avi                                          AVI (Audio Video Interleaved)
  • DE dv                                           DV (Digital Video)
  • E dvd                                            MPEG-2 PS (DVD VOB)
  • DE flv                                           FLV (Flash Video)
  • DE h264                                      raw H.264 video
  • E ismv                                         ISMV/ISMA (Smooth Streaming)
  • DE m4v                                       raw MPEG-4 video
  • DE mjpeg                                    raw MJPEG video
  • E mov                                          QuickTime / MOV
  • D mov,mp4,m4a,3gp,3g2,mj2     QuickTime / MOV
  • E mp4                                          MP4 (MPEG-4 Part 14)
  • DE mpeg                                     MPEG-1 Systems / MPEG program stream
  • E mpeg2video                             raw MPEG-2 video
  • DE mpegts                                  MPEG-TS (MPEG-2 Transport Stream)
  • D mpegvideo                               raw MPEG video
  • DE u8                                          PCM unsigned 8-bit
  • E psp                                           PSP MP4 (MPEG-4 Part 14)
  • E vob                                           MPEG-2 PS (VOB)
  • D webvtt                                      WebVTT subtitle

Codecs:
D….. = Decoding supported
.E…. = Encoding supported
..V… = Video codec
..A… = Audio codec
..S… = Subtitle codec
…I.. = Intra frame-only codec
….L. = Lossy compression
…..S = Lossless compression

  • D.V..S fraps                                 Fraps
  • DEV.LS h264                               H.264 / AVC / MPEG-4 AVC / MPEG-4 part 10
  • DEVIL. mjpeg                              Motion JPEG
  • DEV.L. mpeg1video                    MPEG-1 video
  • DEV.L. mpeg2video                    MPEG-2 video (decoders: mpeg2video mpegvideo )
  • DEA..S pcm_u8                          PCM unsigned 8-bit
  • D.S… webvtt                               WebVTT subtitle

MPEG-4 Tools

Last update : September 16, 2013

To create and modify MPEG-4 Multimedia files, you need different MPEG-4 tools, e.g. an encoder, a multiplexer and a packager :

MPEG-4 Tools : Video encoder

x264  (Wikipedia) is a free software library (libx264) and application (x264.exe) for encoding video streams into the H.264/MPEG-4 AVC format, and is released under the terms of the GNU GPL. X264 provides best-in-class performance, compression, and features, gives the best quality and has the most advanced psychovisual optimizations. A comparison with other H264 codecs is available at the MSU Graphics & Media Lab (Video Group) of Lomonosov Moscow State University. The leader in this comparison for software encoders is x264, followed by MainConcept, DivX H.264 and Elecard.

X264.exe is a command line tool. A typical command to enter in the Command Prompt Window looks as follows :

x264.exe --crf 18 --ref 3 --bframes 2 --subme 3 --keyint 100 --sar 1:1 --output %1.mkv %1
pause

All available parameters can be listed with the command x264 –fullhelp. The purpose and use of all x264 settings is also explained on the MeWiki website.

The fourcc code of the X264 codec is X264.

MPEG-4 Tools : Multiplexer

To encode videos, x264 is not sufficient. Audio, subtitles and metadata should be added, and all these data need to be multiplexed. Therefore other tools are needed. FFmpeg is one of these tools. FFmpeg is a free software project that produces libraries and programs for handling multimedia data. It includes libavcodec, the leading audio/video codec library and libavformat, an audio/video container mux and demux library. FFmpeg is published under the GNU Lesser General Public License 2.1+ or GNU General Public License 2+, depending on which options are enabled. The ffmpeg component is a command-line tool to convert one video file format to another. X264 is added as an external library to FFmpeg. Zeranoe has great static builds of FFmpeg for Windows with libx264 included. Other useful external libraries are the Fraunhofer AAC library for AAC encoding and the LAME library for MP3 encoding.

A very comprehensive documentation about ffmpeg , the libraries, utilities and tools is available at the FFmpeg website.

MPEG-4 Tools : Packager

A third command-line tool performing some manipulations on ISO media files like mp4 is MP4Box, the multimedia packager from GPAC (Project on Advanced Content). Dynamic Adaptive Streaming over HTTP (DASH) is one example. GPAC officially started as an open-source project in 2003 with the initial goal to develop from scratch, in ANSI C, clean software compliant to the MPEG-4 Systems standard, a small and flexible alternative to the MPEG-4 reference software. The GPAC framework is being developed at École nationale supérieure des télécommunications (ENST) as part of research work on digital media. A general documentation about MP4Box is available at the GPAC website.

MP4Box is a command-line tool, the following GUI’s are available :

  • MeGUI, by several authors (version 2356, released on June 8, 2013)
  • My MP4Box GUI, by Matthew Bodin (version 0.6.0.6, released on January 4, 2013)
  • Java MP4Box Gui, by Rune André Liland (version 1.7, released on May 18, 2013)
  • Yamb, by kurtnoise version 2.1.0.0 beta 2, released on June 29, 2009)

The following list provides links to additional posts about MPEG-4 tools :