
Category Archives: Programming
Protected: OFUR-pro : Valeur ajoutée
Protected: OFUR-lite : Architecture
Protected: OFUR – outil de formation universitaire radiologique : Concept
iOS Xcode Project
Last update : September 18, 2015
Xcode Project
This topic refers to my recent post about iOS Development and provides more detailed informations about iOS Xcode 6.3 projects. An Xcode project is the source for an iOS app; it’s the entire collecton of files and settings needed to construct the app. An iOS app is based on event-driven programming.
To create a new project in Xcode, the menu File -> New -> Project leads to a dialog window to chose a project template.
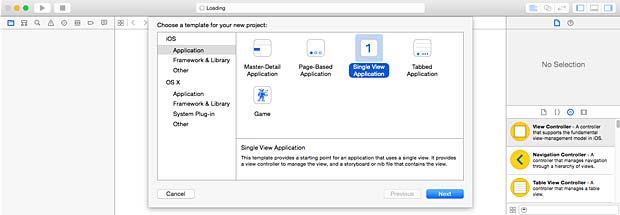
Template selection for a new Xcode project
The Single View Application in the iOS templates is a good starting point to create a simple app, for example the classic HelloWorld demo.
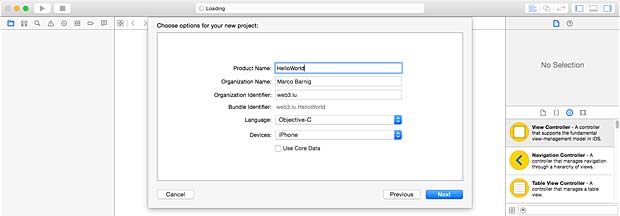
Xcode HelloWorld Demo Project
The name of the app (HelloWorld) is entered as Product Name. Spaces are legal in an app name, we could also name the project Hello World. Other punctuations in the product name can however lead to problems. The product name is used by Xcode to fill in the blank in several places, including some filenames.
My name is entered as Organization Name and my website domain name web3.lu is used as Organization Identifier. The unique bundle Identifier is automatically set to web3.lu.HelloWorld by the system.
The selected language is Objective-C, the other possibility is Swift. This choice is not binding, you can mix Objective-C and Swift code files. The selected device is iPhone, other possibilities are iPad or universal for both iPhone and iPad. The flag “Use Core Data” remains unchecked in a simple project.
Clicking the next button shows a file selection window where you can select or create a location (an Xcode workspace folder) and place the project under version control in a Git repository, which is however design overkill for a small tutorial project. Clicking the create button generates the skeleton of a simple app, with precompiled files and settings, based on the selected template. If you have not yet an Apple Development Account, a warning message says “no signing identity found”.
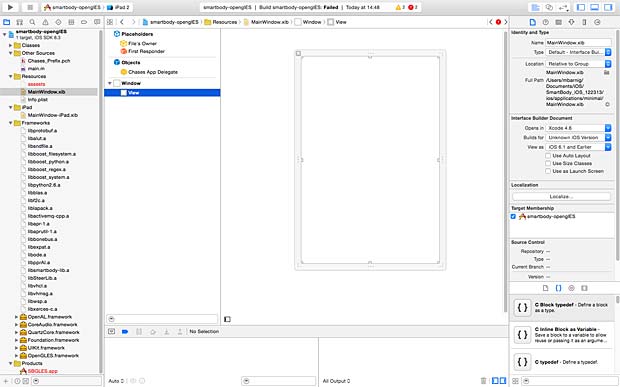
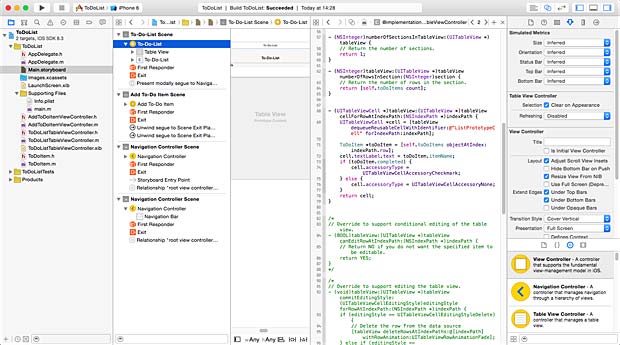
Xcode Project Window
The different files and parameters of an Xcode project can be classified as :
- source files that are to be compiled
- .storyboard or .xib files, graphically describing interface objects
- resources such as icons, images, sounds, …
- settings : instructions to the compiler and linker
- frameworks with system classes
This is a lot of embodied information that is presented in the Xcode IDE Project Window in graphical form. This window can be configured in the following parts to let you access, edit and navigate your code and to get reports about the progress of building and debugging an app :
- Menu Bar
- Tool Bar
- Left-hand Sidebar : Navigator Pane
- Right-hand Sidebar : Utilities Pane
- Middle main area : Editor Pane, or simply “Editor”
- Middle bottom area : Debugger Pane
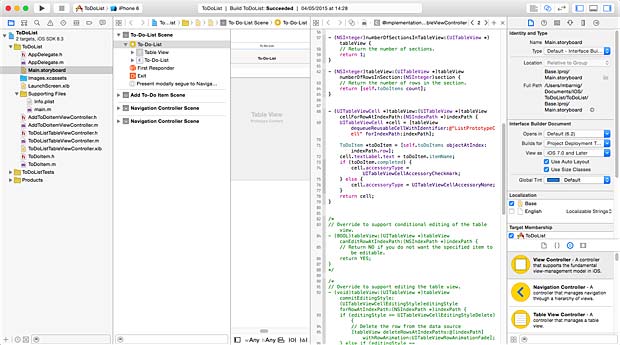
Xcode Project Window
A project widow is powerful and elaborate. The different panes and subviews can be shown or hidden inside the View Menu with the corresponding submenus. The width and height of the panes can be changed by dragging the edges. Keyboard shortcuts can be associated to panes to show, hide or switch them easily. Usually all these parts are not displayed at the same time, except very briefly in rather an extreme manner. By control-clicking a area in the Xcode project window, a shortcut menu appears to select help articles.
Menu Bar
The Menu Bar features the following menus :
- Xcode
- File
- Edit
- View
- Find
- Navigate
- Editor
- Product
- Debug
- Source Control
- Window
- Help
Xcode IDE Menubar
Toolbar
The toolbar features the following parts :
- a build / run and stop button
- a scheme and destination selector (pop-up menu)
- an activity viewer (report field)
- three icons to select the standard, assistant or version editor
- three icons to show / hide the navigator, utilities or debug areas
Xcode IDE Toolbar
Navigator Pane
 The primary mechanism of the navigator pane at left-hand is for controlling what you see in the main area of the project window. You select something in the Navigator pane, and that thing is displayed in the editor of the project window. The Navigator pane itself can display eight different sets of information; thus, there are actually eight navigators represented by the eight icons across its top.
- Project Navigator : basic navigation through the files of a project
- Symbol (Hierarchical) Navigator : a symbol is typically the name of a class or method
- Find (Search) Navigator : to find text globally, even in frameworks
- Issue Navigator : needed when the code has issues
- Test Navigator : list test files and run individual test methods
- Debug Navigator : to track possible misbehavior of the app
- Breakpoint Navigator : lists all the breakpoints
- Report (Log) Navigator : lists the recent major actions, such as building or running
At the bottom of the navigator pane is a filter which lets you limit what files are shown. Below the search filed is the current search scope.
Utilities Pane
The utilities pane at right-hand contains inspectors in the top half that provide information about the current selection or its settings; in some cases, these inspectors let you change those settings. There are four main cases :
- a code file is edited : you can toggle between File Inspector and Quick Help.
- a storyboard file is edited : in addition to the File Inspector and the Quick Help tabs, the following additional inspectors are available : Identity, Attributes, Size and Connections.
- an asset catalog is edited : in addition to the File Inspector and the Quick Help tabs, the Attribute Inspector lets you define which variants of an image are listed.
- the view hierarchy is being debugged : in addition to the File Inspector and the Quick Help tabs, the Object Inspector and the Size Inspector are available.
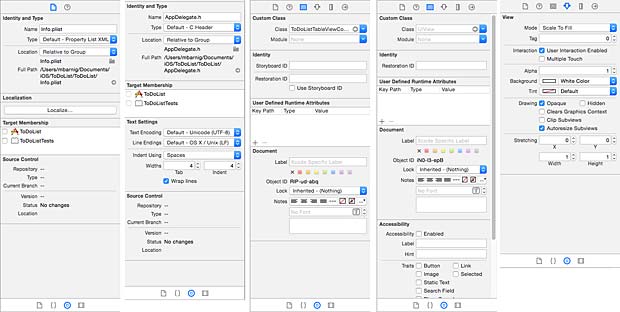
Xcode IDE Inspectors (5 examples)
In the bottom half the utilities pane contains four libraries that function as a source of objects you may need while editing your project :
- File Template Library
- Code Snippet Library
- Object Library
- Media Library
You can toggle between these four libraries. The object library is the most important. Press spacebar to see help pop-ups describing a library item.
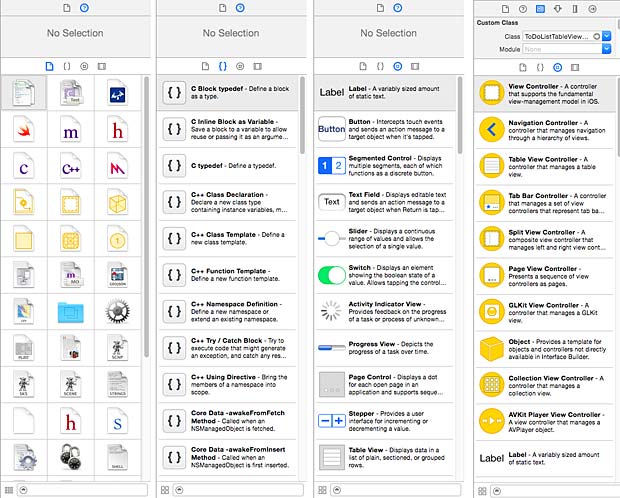
Xcode IDE libraries (4 examples)
Editor
In the middle of the project window is the editor. This is where you get actual work done, reading and writing your code or designing your interface in a .storyboard or .xib file. The editor is the core of the project window. You can hide the navigator pane, the utilities pane, and the debug pane, but there is no such thing as a project window without an editor.
The editor provides its own form of navigation, the jump bar across the top which show you hierarchically what file is currently being edited. The jump bar allows you to switch to a different file and it displays also a pop-up menu, which has also a filter field.
Xcode IDE Editor jumpbar
To edit more than one file simultaneously, or to obtain multiple views of a single file, you can split the editor window using assistants, tabs and secondary windows. The menus View -> Navigators and File -> Tab or File -> Window allow to activate the splitting. You can determine how assistant panes are to be arranged with the Menu View -> Assistant Editor submenu. The assistant pane bears a special relationship to the primary editor pane (tracking).
Xcode IDE Editor
Debugger
The debug navigator displays the call stacks of a paused app. You can debug Swift or C-based code as well as OpenGL frames. The debug navigator opens automatically whenever you pause your application (by choosing menu Debug -> Pause), or if it hits a breakpoint.
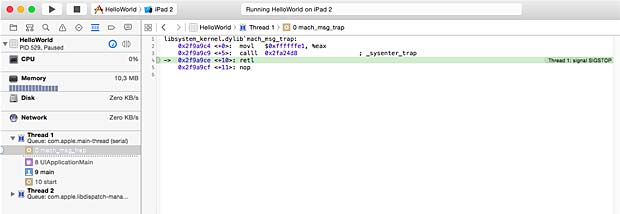
Xcode IDE Debugger
The debug navigator shows threads with the following icons :
- No icon means the thread is running normally
- A yellow status icon means that the thread is blocked and waiting on a lock or condition
- A red status icon means that you suspended the thread. A suspended thread does not execute code when you resume your application
- A gray icon means that thread or block is part of the recorded backtrace and is not currently executing
Anatomy of an Xcode Project
The first item in the Project Navigator represents the project itself. The most important file (archive, folder) in the project folder is HelloWorld.xcodeproj. All the Xcode knowledge about the project is stored in this file.
Based on the iOS SDK 8.3, a project HelloWorld has two targets :
HelloWorld and HelloWorldTests.
A target is a collection of parts along with rules and settings for how to build a product from them. The test target is a special executable whose purpose is to test the app’s code.
The HelloWorld target includes the following files :
- AppDelegate class with .h and .m files
- ViewController class with .h and .m files
- Main.storyboard file
- Images.xcassets folder with icons (asset catalog)
- LaunchScreen.xib file
- Info.plist file
- a subfolder Supporting Files with a main.m file and an Info.plist file
The HelloWorldTests target includes the following files :
- HelloWorldTests.m implementation file
- a subfolder Supporting Files with an Info.plist file
It’s important to know that groups (like the group Supporting Files) in the project navigator don’t necessarily correspond to folders in the project directory. The Supporting Files group is just a way to clump some items together in the project navigator to locate them easily. To make a new group, use the Menu File -> New -> Group.
The LaunchScreen.xib file is not necessary and can be deleted if a launch screen picture is included in the asset catalog.
The two products which will be created in the project are HelloWorld.app and HelloWorldTests.xctest.
The project and targets are specified by the following parameter sets :
- General
- Capabilities
- Info
- Build Settings
- Build Phases
- Build Rules
You can add more targets to a project, for example a custom framework to factor common code into a single locus or an application extension (examples : content for the notification center, photo editing interfaces, …).
The anatomy of a Xcode project changed with Xcode 4.2. Prior to this version, an iOS Xcode Project included the following items :
- a folder xxx.xcodeproj
- a file main.m
- a file xxx_Prefix.ch
- a file xxx-Info.plist
- a file MainWindow.xib
- a folder classes with .m and .h files
- a folder resources with pictures and data
Build a project (Phases, Settings, Configurations)
To build a project is to compile its code and assemble the compiled code, together with various resources, into the app. To run a project is to launch the built app, in the Simulator or on a connected device. Running the app automatically build it first if necessary.
Click at the tab Build Phase at the top of the target editor window to view the stages by which the app is built. The build phases are both a report to the developer and a set of instructions to the Xcode IDE. If you change the build phases, you change the build process.

Xcode IDE Build Phases
There are four build phases :
- Target Dependencies
- Compile Sources
- Link Binary with Libraries
- Copy Bundle Resources (copying doesn’t mean making an identical copy, certain types of files are treated in special ways)
You can add build phases with the menu Editor -> Add Build Phase, for example Add Run Script Build Phase to run a custom shell script late in the build process. To check the option “Show environment variables in build log” is then a useful choice.
Another aspect of how a target knows how to build the app is Build Settings. By clciking the tab Build Settings at the top of the target editor window you will find a long list of settings :
- Architectures
- Build Locations
- Build Options
- Code Signing
- Deployment
- Kernel Module
- Linking
- Packaging
- Search Paths
- Testing
- Versioning
- Apple LLVM 6.1 (Code generation, Custom Compiler Flags, Language, Language – C++, Language – Modules, Language – Objective C, Preprocessing, Warning Policies, Warnings – All languages, Warnings – C++, Warnings – Objective C, Warnings – Objective C and ARC)
- Asset Catalog Compiler – Options
- Interface Builder Storyboard Compiler – Options
- Interface Builder XIB Compiler – Options
- OSACompile – Build Options
- Static Analyzer (Analysis Policy, Generic Issues, Issues – Objective C, Issues – Security)
- User Defined
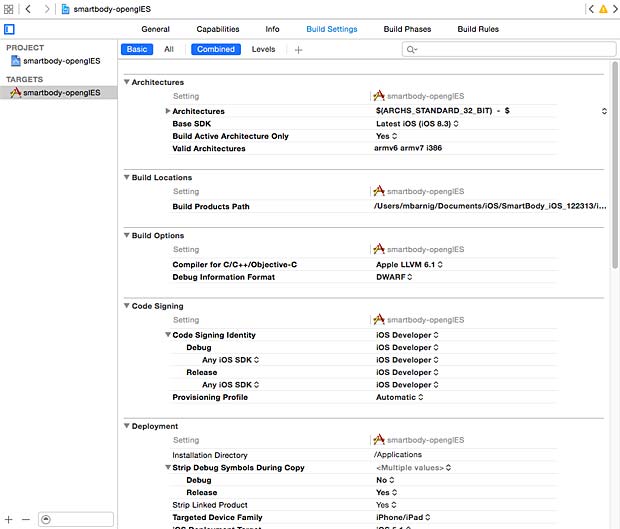
Xcode IDE Build Settings
You can define what and how build settings are displayed by selecting Basic / All or Combined / Levels. There are multiple lists of build setting values, though only one such list applies when a particular build is performed. Each list is called a configuration. By default there are two configurations :
- Debug : used through the development process
- Release : used for late-stage and performance testing, before submitting the app to the Apple App Store
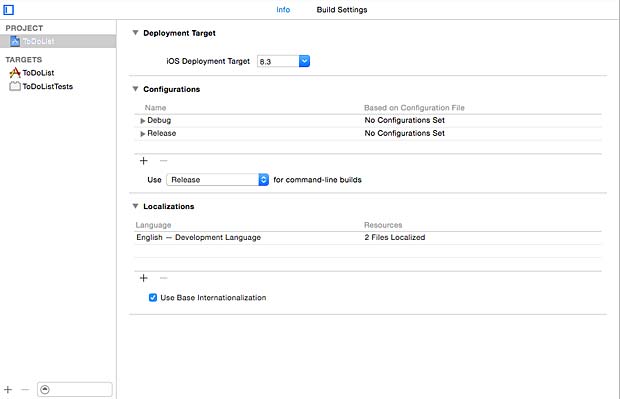
Xcode IDE Configurations
The defaults of the build settings are usually acceptable and need not be changed.
Schemes and Destinations
 To tell the Xcode IDE which configuration to use during a particular build is determined by a scheme. A scheme unites a target with a build configuration. A new project commes by default with a single scheme named after the project.
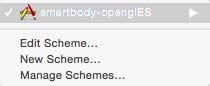
The menu Product -> Scheme -> Edit Scheme shows the current scheme. You can also show the scheme by using the scheme pop-up menu in the Project Window Toolbar.
A scheme has the following actions :
- Build
- Run
- Test
- Profile
- Analyze
- Archive
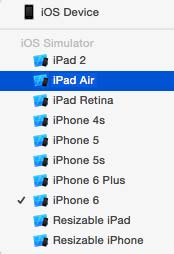
Xcode IDE destinations
Hierarchically appended to each scheme listed in the scheme pop-up menu are the destinations. A destination is a machine that can run the app. This can be a real device connected to the Mac computer running the Xcode IDE or a virtual device simulated in the Simulator.
The menu Window -> Devices allow you to download and install additionaliOS SDK’s and to manage the devices to appear as destinations in the scheme popu-up menu.
Xcode Flow and Hierarchy
Most of the work in an app is done by the UIApplicationMain function which is automatically called in the project’s main.m source file within an autorelease pool (memory management with Automatic Reference Counting : ARC) . An application object is created and a run loop is launched that delivers input events to the app.
The other files in an Xcode project do the following tasks :
- AppDelegate class with AppDelegate.h (header) and AppDelegate.m (implementation) files. This class creates an AppDelegate object as an entry point to the application. When the AppDelegate object notices that the application is launched it creates the ViewController object.
- ViewController class with ViewController.h and ViewController.m files. This class is responsible for controlling and managing a view. The generated ViewController object is responsible for setting up the view described in Main.storyboard and showing it on the screen to the user.
- Main.storyboard file is the view that the ViewController class is managing. The Main.storyboard file is created and modified with a visual designer, called “Interface Builder”, in the Xcode IDE.
The implementation file AppDelegate.m contains skeletons of important predefined methods :
- application didFinishLaunchingWithOptions
- applicationWillResignActive
- applicationDidEnterBackground
- applicationWillEnterForeground
- applicationDidBecomeActive
- applicationWillTerminate
You can add additional code to these methods that you want to be executed when the methods are called.
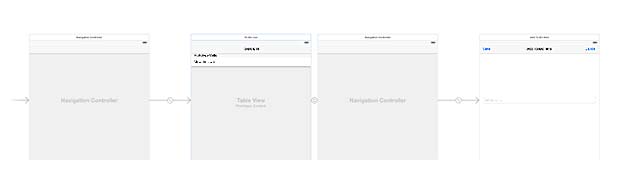
Xcode Storyboard, Screen, Scene, Canvas, View
An Xcode storyboard is the visual representation of the app’s user interface, showing screens of content and the transitions between them. The background of the storyboard is the canvas.
In a single view application, the storyboard contains only one scene. The arrow that points to the left of the scene on the canvas is the storyboard entry point, which means that this scene is loaded first when the app starts. If you have more than one scene, you can zoom the canvas in and out with the menu Editor -> Canvas -> Zoom to see the whole content.
Xcode scene entry point
To adapt the generic scene in the canvas to real devices in different orientations, you must create an adaptive interface with the AutoLayout engine. The four icons Align, Pin, Resolve Issues and Resize Behavior allow to fix and manage constraints to adapt the interface. Use the assistant editor in the preview mode with the wAny and hAny icons to check the adapted interface.
Xcode IDE AutoLayout engine tools
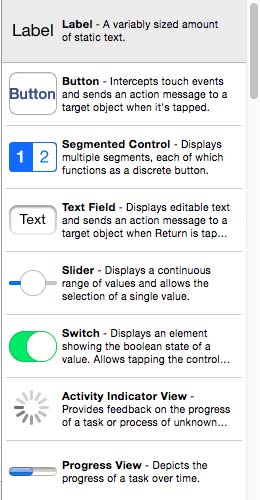
Xcode IDE Interface Elements
The library of objects provides UI elements (views, buttons, text labels, gesture controllers, …) to arrange the user interface. The size of UI elements can be modified by dragging its resize handles (small white squares) on the canvas.
The UIScreen object represents the physical iPhone or iPad screen. The UIWindow object provides drawing support for the screen. UIView objects are attached to the UIWindow object and draw their contents when directed to do so by the window. The visual interface of an app is essentially a set of UIView objects (views), which are themselves managed by UIViewController objects. UIViewController objects interact with views to determine what’s displayed by the views, handle any interactions with the user, and perform the logic of a program.
The views have following properties :
- Views represent a single item (button, slider, image, text field, …) on the user interface, cover a specific area on the screen and can be configured to respond to touch events.
- Views can be nested inside other views, which lead to the notion of a view hierarchy. They are referred as subviews (childs) or superviews (parents). Subviews are drawn and positioned relative to their superview. At the top is the window object.
- Views are not the place where the bulk of a program logic resides.
UIKit views are grouped in the following general categories :
- Content : image, text, …
- Collections : group of views
- Controls : buttons, sliders, switches, …
- Bars : toolbar, navigation, tabs, …
- Input : search, info, …
- Containers : scroll, …
- Modal : alerts, action sheets, …
The storyboard is not the only way to program an interface, you can also use .xib files or custom code. Storyboard and .xib files are converted to a bundle of NIB files at compilation.
Anatomy of an App
An app file is a special kind of folder called a package, and a special kind of package called a bundle. Use the Finder to locate the HelloWorld.app on the Mac computer. By default it is located inside a build folder in the user directory at Library/Developer/Xcode/DerivedData/.
Right clicking on the filename HelloWorld.app opens a pop-up menu with the submenu “Show Package Contents“. The following items are inside the bundle :
- HelloWorld (exec)
- PkgInfo
- Info.plist
- Folder Base.lproj including LaunchScreen.nib and Main.storyboardc
Bilingual Targets
It is legal for a target to be a bilingual target that contains both Objective-C and Swift code. To assure communication between the two languages, Xcode provides bridging headers.
Links
Additional informations about Xcode projects are available at the websites with the following links :
- Programming iOS 6 (Chapter 6 : Anatomy of an Xcode Project), by Matt Neuburg
- Integrate Objective C file in Swift iOS, by Hardik Trivedi
iOS Development
Last update : September 10, 2015
Operating System
iOS is the operating system that runs on iPad, iPhone and iPod devices. The operating system manages the device hardware and provides the technologies required to implement native apps.
The iOS architecture is layered in four levels :
- Cocoa Touch (at the top level)
- Media
- Core services
- Core OS (at the bottom level)
At the highest level, iOS acts as an intermediate between the underlying hardware and the apps.
iOS Development
To develop applications for iOS devices the following tools are required :
- Mac computer running OS X 10.9.4 or later
- Xcode
- iOS SDK
- Apple Developer Program
- Documentation
Xcode
Xcode is an integrated development environment (IDE) created by Apple for developing software for OS X and iOS devices. First released in 2003, the latest stable release is version 6.4 and is available via the Mac App Store free of charge for OS X Yosemite users. Xcode 7 is available as beta version. Xcode is installed into the /Applications directory.

Welcome Screen of the Xcode IDE
Xcode is used in two ways. It is not only the name for the suite of developer tools, but also the name of an application within that suite : an Xcode project.
The program code to develop an iOS App is embedded in an Xcode project which is saved itself in an Xcode workspace. A workspace is a container that encompasses multiple projects that share common resources.
The result of the development process is called product, specified by an Xcode target. Projects can contain one or more targets, each of which produces one product. Usually there are 2 targets : a release version and tests. The targets can also be a plain and light version of an app for the Apple Store.
An Xcode scheme defines a collection of targets to build, a configuration to use when building, and a collection of tests to execute. Introduced with Xcode 4, schemes are a powerful way to control how you build, debug, test, analyze, profile, and deploy your application. You can have as many schemes as you want, but only one can be active at a time. Xcode uses build settings to specify aspects of the build process followed to generate a product. A build setting is a variable that determines how build tasks are performed.
Another concept of Xcode are templates. Xcode includes the following built-in app templates for developing common types of iOS apps, such as games, with preconfigured interface and source code files :
- Single View Application
- Master-Detail Application
- Page-Based Application
- Tabbed Application
- Game
- Cocoa Touch Framework
- Cocoa Touch Static Library
- In-App Purchase
- Empty
Since Snow Leopard (Xcode 3.2), Xcode uses the LLVM compiler, based on the open source LLVM.org project. The LLVM compiler uses the Clang front end to parse source code and turn it into an interim format.
Xcode supports the following program files :
- xxx.h : headers (interfaces)
- xxx.m : Objective-C implementations
- xxx.mm : Objective-C++ implementations
- xxx.swift : Swift implementations
- xxx.c : C implementations
- xxx.cpp : C++ implementations
Xcode Editor, Storybuilder and Utilities windows
The developed app can be tested on a real iOS device or in the iOS simulator integrated in Xcode.
iOS SDK
The iOS SDK is a software development kit developed by Apple and released in February 2008 to develop native applications for iOS devices. The initial name was iPhone SDK.
The main features of the iOS SDK are :
- Objective-C
- Swift
- Cocoa Touch
- Frameworks
Apple Developer Program
To get everything you need to develop and distribute your iOS apps, you must enroll in an Apple Developer Program. The iOS Developer Program costs 99$ per year. After registration, payment and acceptance by Apple, I did my first login to the Apple Developer Member Center with my Apple ID on April 24, 2015.
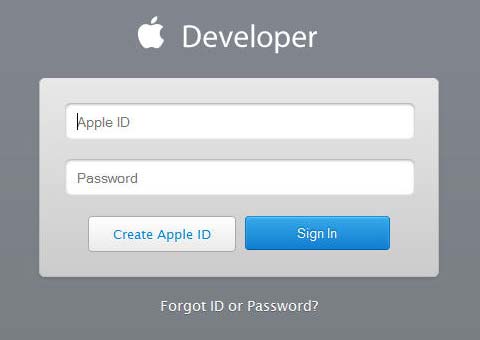
Apple Developer Member Center Login Window
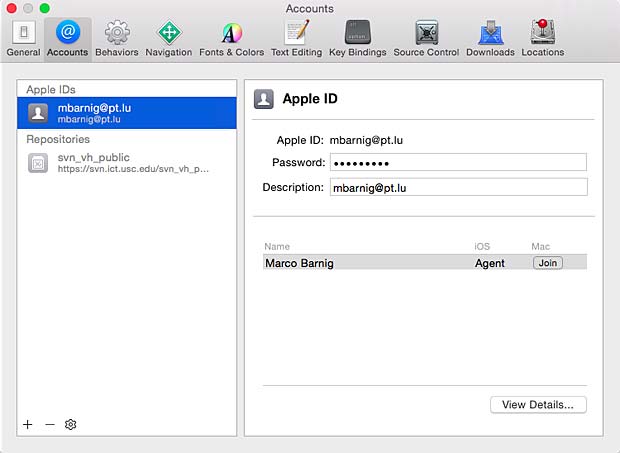
Registrated iOS Development Agent
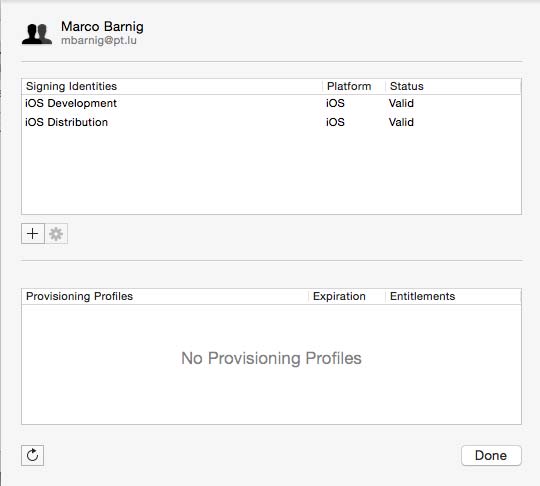
Signing Identities for iOS Development and Distribution
iOS Apps must be signed by the developer to deploy them on an iOS device. To test a signed app on a real device, you must registrate this device. You can registrate up to 100 iOS devices in your development account. The devices must be connected to the Mac computer running Xcode to test and install an app.
To register an iOS device for development, you must know its UDID (Unique Device Identifier). There are several possibilities to get this UDID when the device is connected to the Mac Computer :
- with iTunes running on a Mac
- with the Mac USB Inspector
- with Xcode running on a Mac
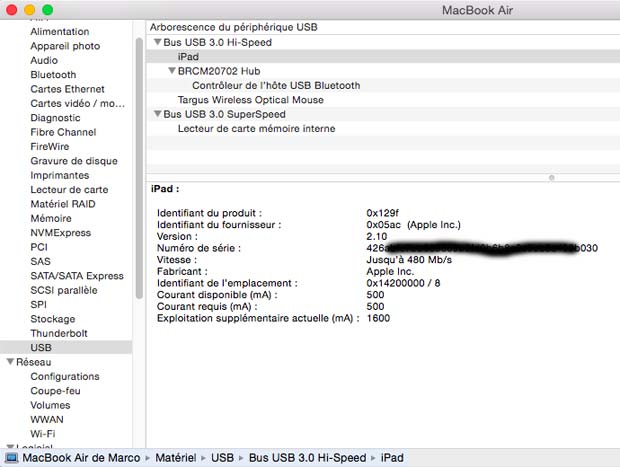
Get the iOS UDID with the USB Inspector on a Mac Computer
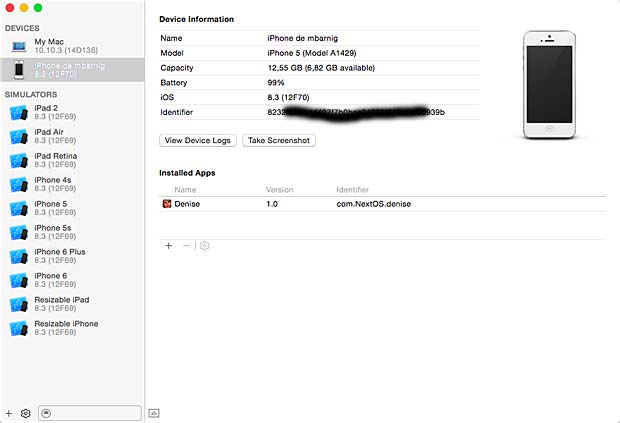
Get the iOS UDID in Xcode
Without connection an iOS device to a Mac computer, it’s possible to access the webpage get.udid.io to reveal it.
I registrated my iPhone 5 and my iPad 2 in my iOS development account.
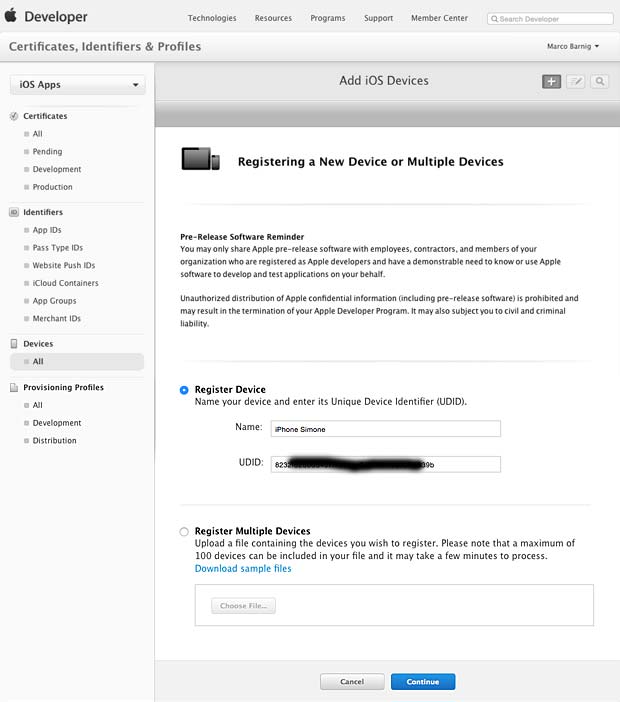
Registration of an iPad and an iPhone in the iOS Development Program

Review and confirmation of the provided informations
After reviewing and confirming the informations, the registration was complete.
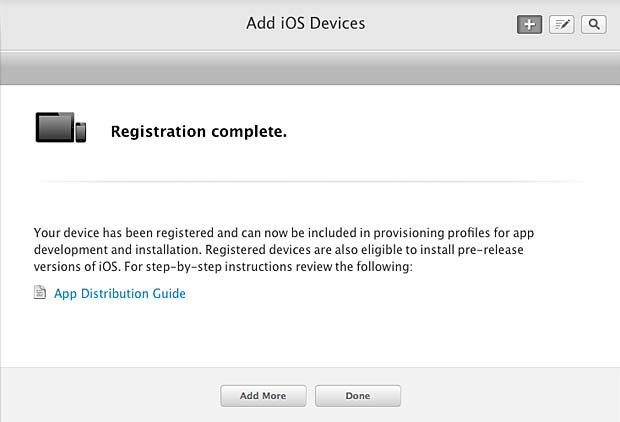
Completed Registration
Documentation
The iOS Developer Library is the most important documentation resource to help developers. The library contains API references, programming guides, release notes, technical notes, sample code and other documents.
The tutorial Start Developing iOS Apps Today is he perfect starting point for creating apps that run on iPad, iPhone, and iPod touch.
Cocoa and Cocoa Touch
Cocoa is Apple’s native object-oriented application programming interface (API) for the OS X operating system. Cocoa Touch is the API for iOS. Cocoa and Cocoa Touch follows a Model-View-Controller (MVC) software architecture.
Objective-C
Objective-C is a general-purpose, object-oriented programming language that adds Smalltalk-style messaging to the C programming language. It is the main programming language used by Apple for the OS X and iOS operating systems. Objective-C was originally developed in the early 1980s. It was selected as the main language used by NeXT for its NeXTSTEP operating system, from which OS X and iOS are derived.
Swift
Swift is a multi-paradigm, compiled programming language launched by Apple in 2014 for iOS and OS X development. Swift is intended to be more resilient to erroneous code than Objective-C, and also more concise. It uses the Objective-C runtime, allowing C, Objective-C, C++ and Swift code to run within a single program.
Frameworks
The system interfaces to the iOS Technologies are delivered by Apple in the iOS SDK in special packages called Frameworks. These are directories that contain shared libraries and the resources needed to support that library. The main iOS Frameworks provided are the following :
- UIKit
- Foundation
- AV Foundation
- Game Kit
- Game Controllers
- Core Data
- Core Graphics
- Sprite Kit
- Core Animation
- OpenGL ES
Links
Additional useful informations about iOS development are provided at the websites referenced hereafter :
- How to deploy your App on an iPhone, by CodeWithChris
- How to create an Empty Application in Xcode 6 without Storyboard, StackOverflow
- iOS Tutorial: How To Create A Simple iPhone App (3 parts), by Ray Wenderlich
- Background Modes Tutorial: Getting Started, by Ray Fix
- How to Create a Framework for iOS, by Sam Davies
- Universal Framework for iOS, by Diney Bomfim
- Storyboards Segue Tutorial: Pass Data Between View Controllers, by Simon (AppCoda)
- Scene Kit Tutorial: Getting Started, by Ricardo Rendon Cepeda
- Setting Up Your Workspace in Xcode, by Maurice Kelly and Joshua Nozzi
CMakeLists.txt
Last update : June 13, 2015
A CMakelists.txt file is the only thing needed by CMake to generate makefiles for many platforms and IDEs. CMake is a cross-platform free and open-source configurator for managing the build process of software using a compiler-independent method. It is designed to support directory hierarchies and applications that depend on multiple libraries. It is used in conjunction with native build environments such as make, Apple’s Xcode, and Microsoft Visual Studio. CMake has minimal dependencies, requiring only a C++ compiler on its own build system. It refers to the entire family of tools : CMake, CTest, CDash, and CPack.
CMake development began in the year 1999 in response to the need for a cross-platform build environment for the Insight Segmentation and Registration Toolkit (ITK). The project was funded by the United States National Library of Medicine (NLM) as part of the Visible Human Project. It was inspired by the Visualization Toolkit (VTK) at Kitware who maintains the CMake software. The latest version of CMake is 3.2.2 released on April 14, 2015.
The ability to build a directory tree outside the source tree is a key feature of CMake, ensuring that if a build directory is removed, the source file remains unaffected.
A CMake generator translates the platform-agnostic CMakeLists.txt file and produces a platform-dependent build system that you can use to compile the project. CMake can find dependencies, do conditional builds and even set different compile or link flags depending on the choice of different options by the user.
During a build with CMake there are three directories involved :
- source dir
- build dir
- install dir
CMake source directory
The source directory is where the project’s sources are stored. This is the directory to which you extract the project source archive or to where you checked out the sources from a version control system. Typically a source is any file that is explicitly modified by the developer. The source directory also contains the files which describe the build to CMake : a bunch of CMakeLists.txt files in the source directory and probably in several sub-directories. Eventually additional CMake scripts with the extension .cmake are stored in a special CMake directory. By default CMake does not alter any file in the source directory and doesn’t add new ones.
CMake build directory
The build directory is where all compiler outputs are stored, which includes both object files as well as final executables and libraries. CMake also stores several files of its own there, including its cache. You can have more than one build directory for the same source directory with different build options. The concept to have a build directory separated from the source directory is called Out of source Build. Its much easier to convince yourself that your build has been cleaned since you can simply delete the build folder and start over again.
CMake install directory
CMake is able to copy all relevant files for the build project to an install directory.
CMake GUI
The most basic CMake frontend is the CMake console which is available on all platforms. CMake has also a GUI frontend called cmake-gui.
CMake build options
I mainly use CMake with Visual Studio C++ 2010 and with Xcode on Mac OSX Yosemite.
There are three Visual Studio 2010 generators :
- Visual Studio 10 2010 : creates project files for the x86 (32bit) processor, running also on x64 processors
- Visual Studio 10 2010 IA64 : creates project files for the x64 processor
- Visual Studio 10 2010 Win64 : creates project files for the Itanium processor
Visual Studio 2010 itself is a 32bit program.
There is only one Xcode generator.
CMake Language Syntax
CMake has its own basic scripting language. A listfile may contain only commands and comments. Comments start with a # character and stop at the end of a line. The names of commands are case insensitive, the arguments are case sensitive. A list of all commands is available at the CMake website. The main commands are :
- add_definitions
- add_executable
- add_library
- cmake_minimum_required
- find_library
- include_directories
- link_directories
- message
- project
- set
- set_property
- source_group
- target_link_libraries
The basic type in CMake is a string. The SET command is used to set the value of a variable to some string. It takes two arguments: the name of the variable and its new value. To access the value of a variable, you perform a substitution with the syntax ${variable name}.
Examples :
# create a list of strings
set (VAR a b c)
# use the system version of BOOST
set (USE_SYSTEM_BOOST ON)
# use CACHE to let user set a value in CMake GUI
set (USE_SYSTEM_SQLITE OFF CACHE BOOL "Don't use the system version")
Finding dependencies
CMake can automatically search for the location of dependency libraries to include in the project.
CMake Cross-Compiling
Cross-compiling is supported by CMake starting with version 2.6.0. Cross compiling means that the software is built for a different system than the one which does the build. This means
- CMake cannot autodetect the target system
- Usually the executables don’t run on the build host
- The build process has to use a different set of include files and libraries for building, i.e. not the native ones
CMake Example
The following example shows the CMakeLists.txt file of the OrthancWebViewer 1.0 project. The following parameters are used :
- parameters of the build : set (VAR ON CACHE BOOL “some text”)
- parameters to fine-tune linking against system libraries :
set (VAR ON CACHE BOOL “some text”) - distribution specific settings : set (VAR OFF CACHE BOOL “some text”)
- include resources and abcde.cmake files
- check the availability of the Orthanc SDK
- add specific definitions
- set (CORE_SOURCES …)
- add libraries and set target properties
- install targets
- add UnitTests
The following figures show the CMake GUI on Windows and Mac OSX handling the OrthancWebViewer project.
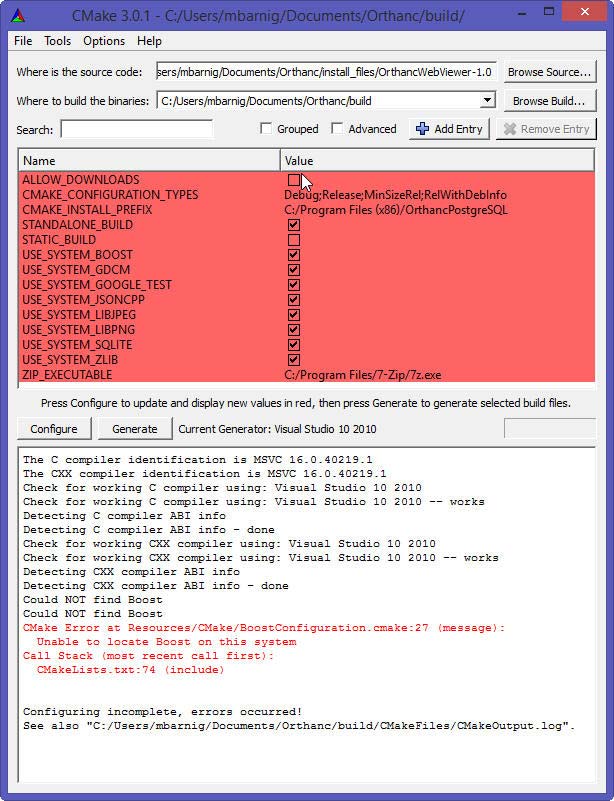
CMake version 3.0.1 on Windows 8.1
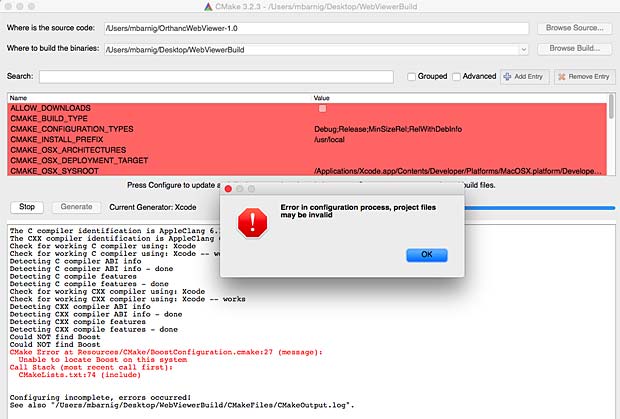
CMake version 3.2.3 on Mac OSX
On Mac OSX Cmake generated a CMakeCache.txt file in the Build folder and a CMakeOutput.log file in the Build/CMakeFiles folder.
CMake links
The following list provides links to websites with addition informations about Cmake :
- CMake by Example, by Mirko Kiefer
- Getting Started with CMake, by Nathan Crock
- CMake : How To Find Libraries, by CMake
- CMake : Testing with CTest, VTK Wiki
- CMake Tutorials, by CMake
- CMake tutorial, by John Lamp
- Building your project by CMake, by Ogre3D
- Learning CMake, by Pau Garcia i Quiles
- CMake : getting started, Mash Wiki
- CMake and Visual Studio, by Cognitive Waves
- Introduction à CMake, par Loïc Gouarin
- CMake – the beautiful beast, by Professor Fox
Character encoding for Festival TTS files
Today, the dominant character encoding for the World Wide Web and for text files is UTF-8 (Universal Character Set + Transformation Format 8 bits). UTF-8 uses one to 4 bytes to encode one symbol (1,112,064 valid code points in the Unicode code space). The first 128 characters of Unicode, which correspond one-to-one with ASCII, are encoded using a single byte with the same binary value as ASCII, making valid ASCII text valid UTF-8-encoded Unicode as well.
The Festival TTS package doesn’t support UTF-8. The development of Festival started about 20 years ago when UTF-8 was only known by a few people of the Open Group for Unix Systems. Festival only supports one byte character encoding. All files created with the Festvox tools to develop new languages or voices for Festival are in US-ASCII format.
Problems appear if we need to use non-ASCII characters in Festival, for example the characters é è ë à ä ö ü for the luxembourgish language. In UTF-8 these characters are encoded with two bytes (16 bits), which yields errors in Festival. There exist however a series of 8-bit character encoding standards defined by ECMA, IEC and ISO. These standards are known as ISO-8859-x, where x is one of 15 parts. The listed luxembourgish specific characters are included in the ISO-8859 parts 1, 2, 3, 4, 9, 10, 14, 15 and 16. The preferred ISO-8859 standard for the luxembourgish language is part 15, which includes the euro sign and provides the coverage of all the french and german letters. ISO 8859-15 encodes what it refers to as Latin alphabet no. 9.
Most text editors and other tools used today to write scripts and program code use UTF-8 as default format. On Windows I use Notepad++ to edit my files. Changing the encoding is easy. On my Mac OSX 10.10.2 (Yosemite) I use TextEdit, Terminal and Xcode to edit my files for Festival TTS. I changed the following preferences to encode my scripts and programs in ISO-8859-15.
TextEdit
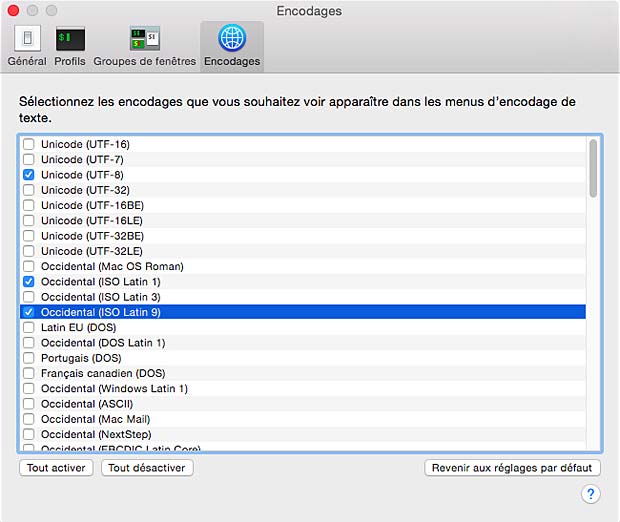
I first checked the list of the encoding formats to show in the selection menu of the preference window.

List of character encoding formats in TextEdit
The Occidental (ISO Latin 9) format corresponds to the ISO-8859-15 standard.
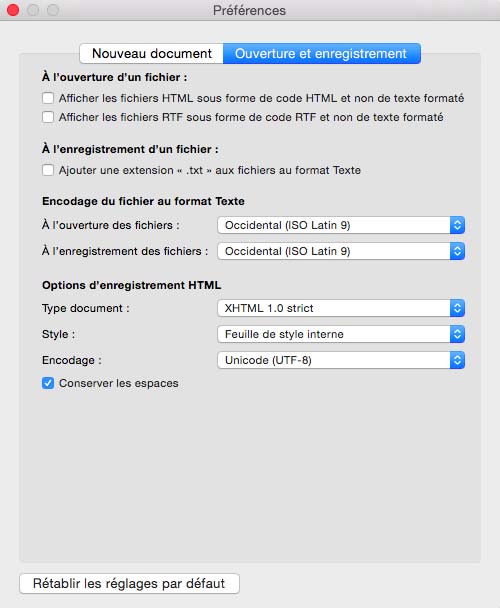
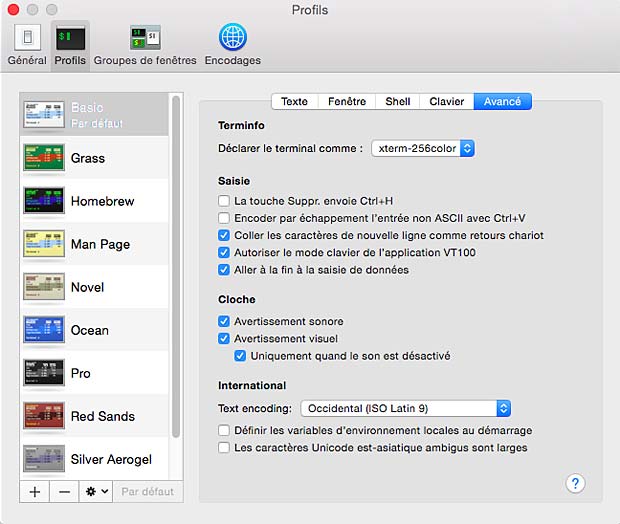
Preferences selected in TextEdit
Terminal (bash)
Same procedure for the OSX terminal. I checked the list of the encoding formats to show in the selection menu of the preference window.
List of character encoding formats in the OSX Terminal
In the OSX terminal preference window I also selected the Occidental (ISO Latin 9) format corresponding to the ISO-8859-15 standard.
Preferences selected for the OSX Terminal
XCode 6.2
An ISO-8859-15 encoded text file (for example created witt TextEdit) is not recognized as such by Xcode 6.2. Characters as “é à è ö ä ü” are displayed as “È ‡ Ë ˆ ‰ ¸ “. The indicated Xcode decoding is Western (Mac OS Roman), even if the default text encoding set in Preferences > Text Editing is set to Western (ISO Latin 9). The characters are displayed as expected if the text is reinterpreted with the File Inspector to ISO Latin 9. Files created with Xcode are encoded always in UTF-8, the default text encoding setting seems to take no effect.
The Xcode window to select potential encoding formats uses a different presentation, but displays the same formats as those in TextEdit or OSX Terminal.
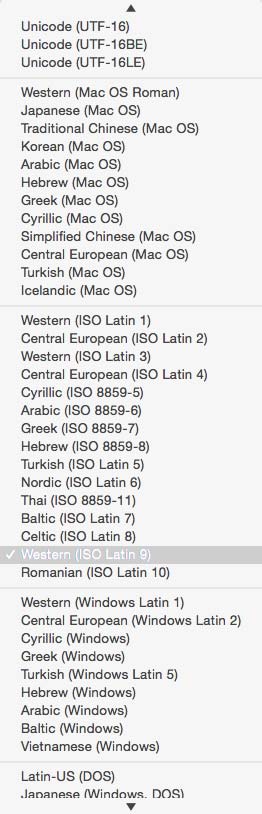
List of encoding formats in Xcode
Again I defined the default text encoding as Occidental (ISO Latin 9) alias ISO-8859-15.
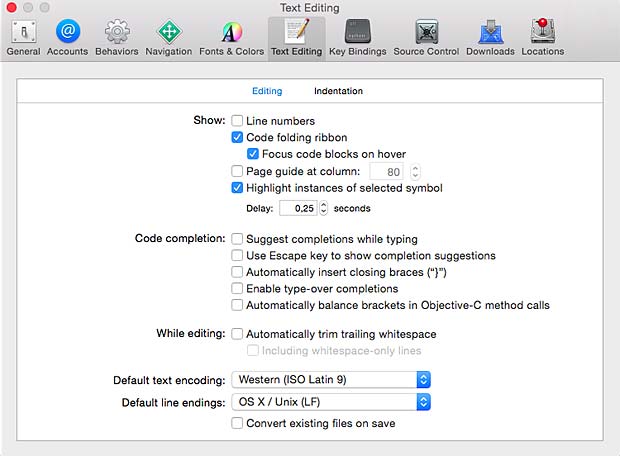
Preferences selected for Xcode
File conversion
To check the text encoding of a file we can use the command file
mbarnig$ file -I name.extSome examples are shown hereafter :
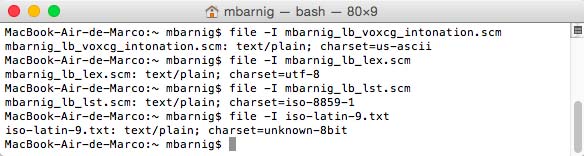
Show file encoding with the command $ file -I
To convert an UTF-8 file in the ISO-8859-15 format we can use the command iconv
mbarnig$ iconv -f utf8 -t ISO-8859-1 utf8.txt > iso.txtAn example is shown hereafter :

File format conversion with the command $ iconv
The encoding formats available in iconv are listed with the option -l or –list :
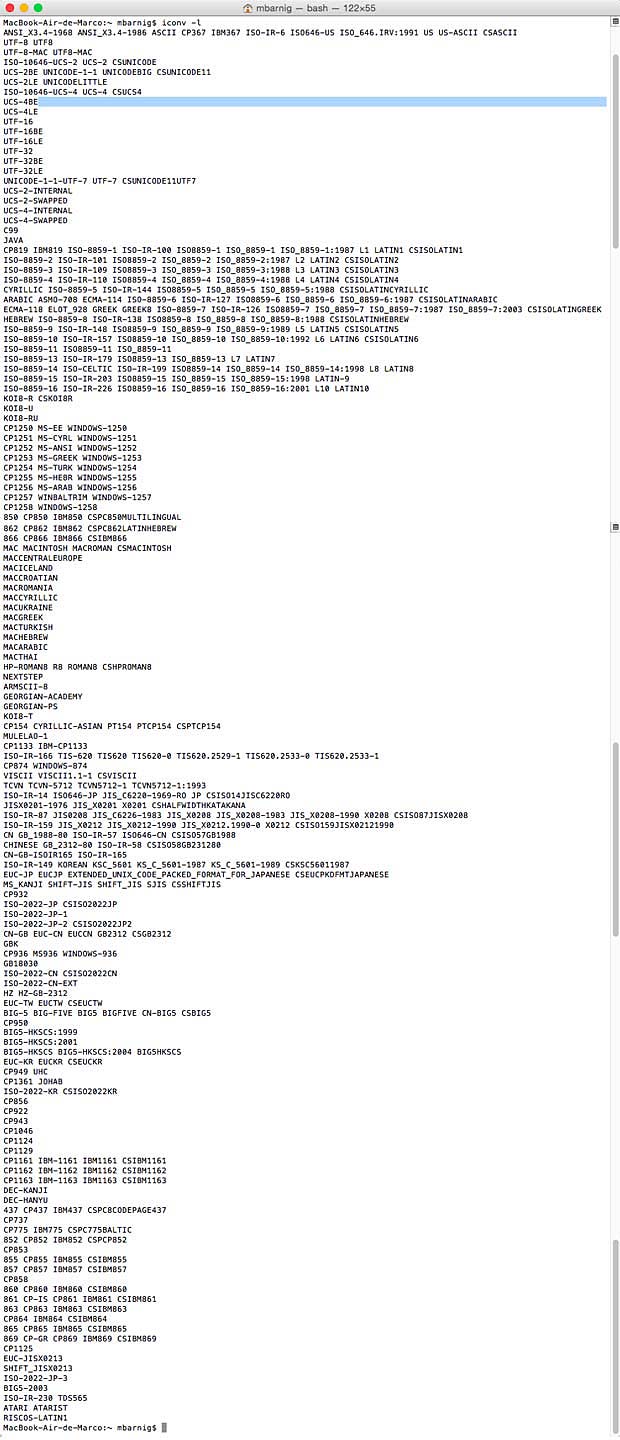
Encoding formats available in iconv
Environment Variables
To show the environment variables we can use the command locale :
mbarnig$ locale
Environment variables in OSX locale
LANG= ; native language + local customization if no LC_ variables
LC_COLLATE=”C” ; character collation
LC_CTYPE=”C” ; character handling functions
LC_MESSAGES=”C” ; affirmative and negative responses
LC_MONETARY=”C” ; monetary related numeric formatting
LC_NUMERIC=”C” ; numeric formatting
LC_TIME=”C” ; date and timing formatting
LC_ALL= ; value to overwrite all LC_ variables
“C” stands for simplest locale (character set ASCII, single byte character encoding, language US-english, …)
To show all the available locales we use the option -a
mbarnig$ locale -a
List of locales defined in OSX 10.10.2
To change the locales we use the export function :
mbarnig$ export LANG=fr_CH
mbarnig$ export LC_ALL=fr_CH.ISO8859-15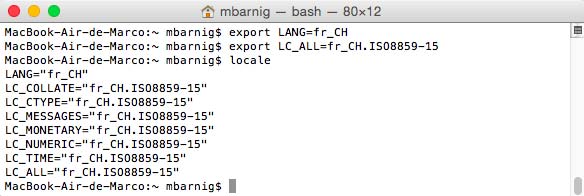
Modification of locales in OSX 10.10.2 with the export command
The export functions can be included in the /Users/mbarnig/.bash_profile file.
Links
- All about Unicode, UTF8 & Character Sets, by Paul Tero
Festival TTS Scheme
Last update : April 23, 2015
Scheme
The Scheme programmimg language is a dialect of Lisp designed to be more consistent. Originally specified in 1958, Lisp is the second-oldest high-level programming language; Fortran is one year older. Lisp has a distinctive, fully parenthesized Polish Notation. The name LISP derives from LISt Processing. All program code in Lisp is written as s-expressions, or parenthesized lists. Lots of brackets comes to most people’s mind when they look at s-expressions. Lisp was invented by John McCarthy in 1958 while he was at the Massachusetts Institute of Technology (MIT). Lisp became quickly the favored programming language for artificial intelligence (AI) research. Another dialect of Lisp is Common Lisp (CL).
Scheme was invented by Guy Lewis Steele Jr. and Gerald Jay Sussman. The Scheme language is standardized in the official IEEE standard and in a de facto standard called the Revisedn Report on the Algorithmic Language Scheme (RnRS). The latest standard R7RS was finalized in 2013. An improper list of Scheme resources is available at the schemers.org website.
The Festival TTS system uses an enhanced version of Scheme, based on George Carrette’s SIOD (Scheme in one Defun).
In Scheme, an expression is an atom or a list. Atoms can be symbols, numbers, strings or special types like functions, arrays, hash tables. A list consist of a left parenthesis, a number of expressions and a right parenthesis. Comments are started by a semicolon and run until end of line. Scheme is case sensitive.
Each member of a list (except set!) is evaluated. The 1st item is treated as function and applied using the remainder of the lists as arguments to the function. Strings are bounded by the double-quote character.
"This is a string with embedded \"...\" quotes"Double quotes in a string are escaped with a backslash ( \ ).
Scheme Core Functions
The core functions are :
- (set! SYMBOL VALUE) ; attribute a value to a variable
- (define (FUNCNAME ARG0 ARG1 …) . BODY) ; declare the boy of a function with arguments
- (if TEST TRUECASE [FALSECASE] ) ; if the value of TEST is non-nil, return value of evaluated truecase-expression, otherwise, if present, return evaluated falsecase-expressionor nil
- (cond (TEST0 . BODY) (TEST1 . BODY) …) ; multipe if statement
- (begin . BODY) ; returns the value of the last s-expression in a list
- (or . DISJ) ; return the value of the 1st non-nil disjunct
- (and : CONJ) ; return the value of the 1st nil conjunct or the value of the last conjunct
- (car EXPR) ; return the 1st item of a list or nil for an atom or empty list
- (cdr EXPR) ; return the rest of a list or nil for an atom or empty list
- (cons EXPR0 EXPR1) ; build a new list with car of EXPR0 and crd of EXPR1
- (list . BODY) ; form a list from each of the arguments
- (append . BODY) ; join each of the arguments into a single list
- (nth N LIST) ; return Nth member of list (1st item is 0th member)
- (nth_cdr N LIST) ; return Nth cdr list
- (last LIST) ; return last crd of a list
- (reverse list) ; return the list in inverse order
- (member ITEM LIST) ; returns the cdr in LIST whose car is ITEM or nil if not found
- (assoc ITEM ALIST) ; standardlist format for representing value pairs
- (intern “abc”) ; convert a string to a symbol
- (parse-number “3.14”) ; convert a string to a number
- (mapcar fct list1 list2 …) ; returns a list which is the result of applying the function fcn to the elements of each of the lists specified
- (number? x) ; returns true if x is a number
- (symbol? x) ; returns true if x is a symbol
- (quote x) ; special form that returns x without evaluating it. Commonly written in abbreviated format as ‘x (apostrophe x = short hand for quote). The (quote something) form returns that something as itself no matter what the something is (symbol, list …). Self evaluated data like numbers and strings need not to be quoted.
If the 1st statement of a function is a string, it is treated as a documentation string. The string will be printed when help is requested for that function symbol. To request help, press the keys <Esc> and <h> simultaneously after entering the name of the function.

Scheme Help Function
s-expressions
A Scheme s-expression is a construct that returns a value. Typical s-expressions are
3
( 1 2 3)
(a ( b c ) d)
(( a b ) ( d e ))
Some examples of simple arithmetic scheme s-expressions are presented hereafter :
(+ 2 3 4)   ; add the arguments
(set! a 3)  ; define the variable a to 3
(* a 5)     ; multiply the arguments
(/ 8 a)     ; divide the 1st argument by the 2nd argument
(- 12 a)    ; substract the 2nd argument from the 1st argument
(cons 1 2)  ; join 2 arguments as a pair
The following figure shows the results :
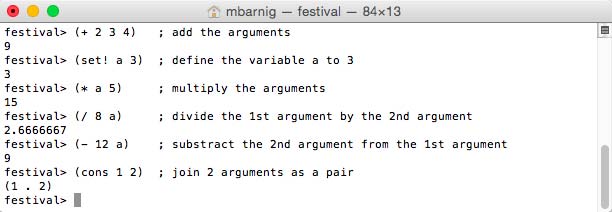
Scheme arithmetic expressions
Here are some more examples of scheme s-expressions :
; define a list with 3 fruits
(set! fruits '(apples pears bananas))
; use the 1st item of the list
(car fruits)
; use the remaining items following the 1st item of the list
(cdr fruits)
; define a list with 2 vegetables
(set! vegetables '(carrots beans))
; combine the fruit and vegetable lists
(append fruits vegetables)
; get the number of items in the list
(length fruits)
; get the number of items in the combined list
(length (append fruits vegetables))
; join 2 lists as a pair
(cons vegetables fruits)
The next figure shows the results :

Scheme list expressions
Regular expressions
A regular expression is a sequence of characters that forms a search pattern, mainly for use in string matching (filters). A regular expression is sometimes called a rational expression and abbreviated as regex or regexp. The concept was formalized in the 1950s by the American mathematician Stephen Kleene who created a regular language. Today regular expressions are so useful in computing that the various systems to specify regular expressions have evolved to provide both a basic and extended standard for the grammar and syntax.
Festival Scheme uses a regex implementation based on Henry Spencer‘s regex code. In general all characters match themselves, except for the following ones which have special interpretations (meta-characters), if they are not preceded by a backslash :
. * + ? [ ] ( ) | ^ $ \- . matches any character in the regex
- * matches zero or more occurences of the preceding item in the regex
- + matches one or more occurences of the preceding item in the regex
- ? matches zero or one occurence of the preceding item in the regex
- [ ] defines a range of characters
- ( ) defines a section (scope, block, capturing group)
- | or operator ; separates alternatives
- ^ if specified first negates the class
- $ matches the ending position of a string
- \ backslash to escape meta-characters
Examples :
- a.c > abc, acc, adc
- a*c > c, aac, ac, aaaaaaaac
- a+c > ac, aaac
- ab?c > ac, abc
- [a-z] any lower case letter
- [a-zA-Z] any lower or upper case letter
- gr(e|a)y > grey, gray
- ^abc > any characters other than a, b or c
Boolean Values
Scheme provides a special unique object called false, whose written representation is #f and who is the result of a condition expression (if or cond). This is the only value that counts as false, all others count as true. For this reason there is no need to provide a boolean object true, but for clarity, Scheme provides an object written #t which can be used as true value. In Festival’s Scheme (SIOD), #f and #t are unbound variables. In SIOD the variable t stands for true and nil stands for false.
Named and unnamed (anonymous = lambda) functions
Here is an example of a new (named) function :
(define (add a b) (+ a b))
(add 7 5)
Scheme functions
Scheme provides a lot of useful string functions, for example
(string-equal ATOM1 ATOM2)
(string-append STR1 STR2)
(string-before STR SUBSTR)
(string-after STR SUBSTR)
(string-length SYMBOL)
(string-matches STR REGEX)
(Symbolexplode SYMBOL)
(member_string STR LIST)
A function that returns either true (t) or false (nil) is called a predicate.
Instead of a named function, we can create unnamed (anonymous) functions using the special lambda form.
(lambda (arg1 arg2 ...) form1 form2 ...)This function is simply defined where it’s used; for example, to square the items of a list we can apply the following construct
(set! mylist '(1 3 6 8))
(mapcar (lambda (x) (* x x)) mylist)
Scheme lambda example
Conditionals
Scheme provides a very powerful nested conditional expression with the syntax
( cond < clause 1 > <c lause 2 > < clause 3 > ... )where < clause > is of the form
( < predicate > < form > ...)The last clause may be an else clause which has the syntax
( < else > < form 1> < form 2 > ...)Cond is a special form where each clause is processed until the predicate expression of the clause evaluates true. Then each subform in the predicate is evaluated with the value of the last one becoming the value of the cond form.
A simple example is :
(cond (( > a b ) 'greater)
      (( < a b ) 'less)
      (t 'equal))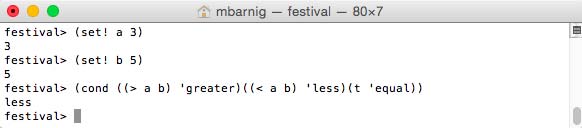
Scheme cond example
A more complex example is show hereafter :
(cond
((string-matches name "[1-9][0-9]+")
  (mbarnig_lb::number token name))
((string-matches name "[A-Z]+")
  (mbarnig_lb::upper_case_abbr token name))
((string-matches  name "[a-z]+")
  (mbarnig_lb::lower_case_abbr token name))
(t (list name))) ; when no specific rules apply do the general ones
Another special conditional form is
(and subform1 subform2 subform3 ...)This form causes the evaluation of its subforms in order, from left to right, continuing if and only if the subform returns a non-null value.
System commands
Here are some examples of scheme system commands :
(quit) or (exit) ; close the program
(pwd) ; show the pathname of the current directory
(cd DIRECTORY)
(getenv NAME)
(setenv NAME VALUE)
(set_backtrace t) ; display a backtrace when a scheme error occurs
(unwind-protect …) ; catch errors and continue normally
Hooks
A hook in Scheme terms is a position within the program code where a user may specify his own customization. There a number of places in Festival where hooks are used. A hook variable contains either a function or a list of functions that are to be applied at some point in the processing. A list of defined hooks in Festival is shown below :
- after_analysis_hooks : functions applied after analysis, before synthesis
- default_after_analysis_hooks : default functions applied after analysis
- before_synth_hooks : functions applied on synthesized utterances
- default_before_synth_hooks : default functions applied on synthesized utterances
- after_synth_hooks : functions applied after synthesis to manipulate waveforms
- default_after_synth_hooks : default functions applied after synthesis
- diphone_module_hooks : functions applied at the start of the diphone module
- tts_hooks : functions applied during text to speech
- xxml_hooks : functions applied before tts_hooks
- xxml_token_hooks : functions applied to each token
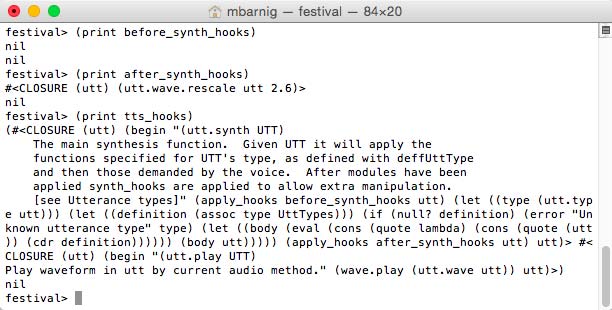
Festival hooks
Links
A list with links to websites providing additional informations about Scheme is provided hereafter :
Synology Photostation PostgreSQL Database
Last update : November 17, 2015
The Synology DSM 5.0 operating system uses the database PostgreSQL version 9.3 for Photostation 6.0 which can be administered with phpPgAdmin.
The Synology phpPgAdmin package created by Nigel Barnes (alias Pernod 70) has been updated on March 31, 2014 to work with the new Synology DSM version 5.1. The new package version is 5.1.0-002, the sources are available at Github.
The following configuration files are used :
by phpPgAdmin
- /usr/syno/synoman/phpsrc/phpPgAdmin/conf/config.inc.php
- /usr/syno/synoman/phpsrc/phpPgAdmin/conf/config.inc.php-dist
by PosrtgreSQL
- /etc/postgresql/pg_hba.conf
- /etc/postgresql/pg-ident.conf
- /etc/postgresql/postgresql.conf
- /etc.defaults/postgresql/pg_hba.conf
- /etc.defaults/postgresql/pg-ident.conf
- /etc.defaults/postgresql/postgresql.conf
config.inc.php
I named this configuration file phpPgAdmin in the Synology Config File Editor. The original content is show below :
<?php

 /**
 * Central phpPgAdmin configuration. As a user you may modify the
 * settings here for your particular configuration.
 *
 * $Id: config.inc.php-dist,v 1.55 2008/02/18 21:10:31 xzilla Exp $
 */

 // An example server. Create as many of these as you wish,
 // indexed from zero upwards.

 // Display name for the server on the login screen
 $conf['servers'][0]['desc'] = 'PostgreSQL by Synology';

 // Hostname or IP address for server. Use '' for UNIX domain socket.
 // use 'localhost' for TCP/IP connection on this computer
 $conf['servers'][0]['host'] = '';

 // Database port on server (5432 is the PostgreSQL default)
 $conf['servers'][0]['port'] = 5432;

 // Database SSL mode
 // Possible options: disable, allow, prefer, require
 // To require SSL on older servers use option: legacy
 // To ignore the SSL mode, use option: unspecified
 $conf['servers'][0]['sslmode'] = 'allow';

 // Change the default database only if you cannot connect to template1.
 // For a PostgreSQL 8.1+ server, you can set this to 'postgres'.
 $conf['servers'][0]['defaultdb'] = 'template1';

 // Specify the path to the database dump utilities for this server.
 // You can set these to '' if no dumper is available.
 $conf['servers'][0]['pg_dump_path'] = '/usr/bin/pg_dump';
 $conf['servers'][0]['pg_dumpall_path'] = '/usr/bin/pg_dumpall';

 // Example for a second server (PostgreSQL for Windows)
 //$conf['servers'][1]['desc'] = 'Test Server';
 //$conf['servers'][1]['host'] = '127.0.0.1';
 //$conf['servers'][1]['port'] = 5432;
 //$conf['servers'][1]['sslmode'] = 'allow';
 //$conf['servers'][1]['defaultdb'] = 'template1';
 //$conf['servers'][1]['pg_dump_path'] =
'C:\\Program Files\\PostgreSQL\\8.0\\bin\\pg_dump.exe';
 //$conf['servers'][1]['pg_dumpall_path'] =
'C:\\Program Files\\PostgreSQL\\8.0\\bin\\pg_dumpall.exe';


 /* Groups definition */
 /* Groups allow administrators to logicaly group servers together under
 * group nodes in the left browser tree
 *
 * The group '0' description
 */
 //$conf['srv_groups'][0]['desc'] = 'group one';

 /* Add here servers indexes belonging to the group '0' seperated by comma */
 //$conf['srv_groups'][0]['servers'] = '0,1,2';

 /* A server can belong to multi groups. Here server 1 is referenced in both
 * 'group one' and 'group two'*/
 //$conf['srv_groups'][1]['desc'] = 'group two';
 //$conf['srv_groups'][1]['servers'] = '3,1';

 /* A group can be nested in one or more existing groups using the 'parents'
 * parameter. Here the group 'group three' contains only one server and will
 * appear as a subgroup in both 'group one' and 'group two':
 */
 //$conf['srv_groups'][2]['desc'] = 'group three';
 //$conf['srv_groups'][2]['servers'] = '4';
 //$conf['srv_groups'][2]['parents'] = '0,1';

 /* Warning: Only groups with no parents appears at the root of the tree. */


 // Default language. E.g.: 'english', 'polish', etc. See lang/ directory
 // for all possibilities. If you specify 'auto' (the default) it will use
 // your browser preference.
 $conf['default_lang'] = 'auto';

 // AutoComplete uses AJAX interaction to list foreign key values
 // on insert fields. It currently only works on single column
 // foreign keys. You can choose one of the following values:
 // 'default on' enables AutoComplete and turns it on by default.
 // 'default off' enables AutoComplete but turns it off by default.
 // 'disable' disables AutoComplete.
 $conf['autocomplete'] = 'default on';

 // If extra login security is true, then logins via phpPgAdmin with no
 // password or certain usernames (pgsql, postgres, root, administrator)
 // will be denied. Only set this false once you have read the FAQ and
 // understand how to change PostgreSQL's pg_hba.conf to enable
 // passworded local connections.
 $conf['extra_login_security'] = false;

 // Only show owned databases?
 // Note: This will simply hide other databases in the list - this does
 // not in any way prevent your users from seeing other database by
 // other means. (e.g. Run 'SELECT * FROM pg_database' in the SQL area.)
 $conf['owned_only'] = false;

 // Display comments on objects? Comments are a good way of documenting
 // a database, but they do take up space in the interface.
 $conf['show_comments'] = true;

 // Display "advanced" objects? Setting this to true will show
 // aggregates, types, operators, operator classes, conversions,
 // languages and casts in phpPgAdmin. These objects are rarely
 // administered and can clutter the interface.
 $conf['show_advanced'] = false;

 // Display "system" objects?
 $conf['show_system'] = false;

 // Minimum length users can set their password to.
 $conf['min_password_length'] = 1;

 // Width of the left frame in pixels (object browser)
 $conf['left_width'] = 200;

 // Which look & feel theme to use
 $conf['theme'] = 'default';

 // Show OIDs when browsing tables?
 $conf['show_oids'] = false;

 // Max rows to show on a page when browsing record sets
 $conf['max_rows'] = 30;

 // Max chars of each field to display by default in browse mode
 $conf['max_chars'] = 50;

 // Send XHTML strict headers?
 $conf['use_xhtml_strict'] = false;

 // Base URL for PostgreSQL documentation.
 // '%s', if present, will be replaced with the PostgreSQL version
 // (e.g. 8.4 )
 $conf['help_base'] = 'http://www.postgresql.org/docs/%s/interactive/';

 // Configuration for ajax scripts
 // Time in seconds. If set to 0, refreshing data using ajax
will be disabled (locks and activity pages)
 $conf['ajax_refresh'] = 3;

 /** Plugins management
 * Add plugin names to the following array to activate them
 * Example:
 * $conf['plugins'] = array(
 * 'Example',
 * 'Slony'
 * );
 */
 $conf['plugins'] = array();

 /*****************************************
 * Don't modify anything below this line *
 *****************************************/

 $conf['version'] = 19;

?>
config.inc.php-dist
This is a backup copy of the main configuration file config.inc.php.
pg_hba.conf
Client authentication in PostgreSQL is controlled by a configuration file, which traditionally is named pg_hba.conf (HBA stands for host-based authentication). I named this configuration file PostgreSQL in the Synology Config File Editor. The original content is show below :
# TYPE DATABASE USER ADDRESS        METHOD
local  all      all                 trust
host   all      all  127.0.0.1/32   trust
host   all      all  ::1/128        trust
A backup copy with these default values is stored in the /etc.defaults/ folder.
pg-ident.conf
The configuration file pg-ident.conf is used to map the operating system user name to a database user name if an external authentication system is involved. In the Synology setup this file and the backup copy stored in the /etc.defaults/ folder are empty.
postgresql.conf
The original content is show below :
hba_file = '/etc/postgresql/pg_hba.conf'
ident_file = '/etc/postgresql/pg_ident.conf'

external_pid_file = '/run/postgresql/postmaster.pid'

listen_addresses = '127.0.0.1'
max_connections =64

shared_buffers = 24MB

log_destination = 'syslog'
syslog_ident = 'postgres'
client_min_messages = notice
log_min_messages = warning
log_min_error_statement = error
log_min_duration_statement = -1

track_activities = off
track_counts = off

autovacuum = off

datestyle = 'iso, mdy'
lc_messages = 'C'
lc_monetary = 'C'
lc_numeric = 'C'
lc_time = 'C'

escape_string_warning = off
synchronize_seqscans = off

standard_conforming_strings = off
A backup copy with these default values is stored in the /etc.defaults/ folder.
Configuration
Out of the box with the default configuration parameters, the login to the PostgreSQL database with the phpPgAdmin app works with the username postgres and an empty password.
After an update or upgrade of the DSM operating systme, the phpPgAdmin webpage (http://yourdomain/phpPgAdmin/) is usually no longer accessible. You must reinstall the 3rd party phpPgAdmin installation package with the following steps :
- deinstall phpPgAdmin
- set the confidence level in parameters to the required 3rd party installation
- install manually the latest phpPgAdmin package
- check the configuration files with the configuration editor (mainly the extra_login_security parameter which I set to false in the config-file named phpPgAdmin)
- Start the phpPgAdmin package in the package center
- Go to the phpPgAdmin webpage, enter the default login credentials and verify your databases
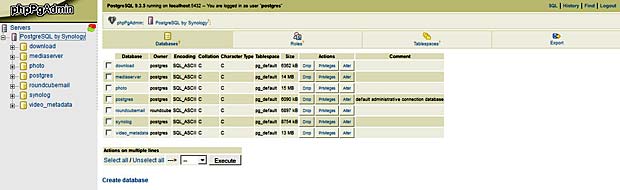
PostgreSQL database management with phpPgAdmin on Synology
The last update of the Synology System was done on November 17, 2015, followed by a new installation of phpPgAdmin.
Export
To export the Photo PostgreSQL database for backup purposes, I select the photo database, click the tab “Export” in the menu bar, select “Structure and Data” with the Format “SQL”, chose the option “download” and finally click the button “Export”. The file is saved with the name “dump.sql” in the standard local download folder.

Export PostgreSQL Synology photostation database with phpPgAdmin
Links
A list with links to sources providing additional informations about the Synology PostgreSQL database is shown hereafter :
- Synology Forum : Connecting to the PhotoStation’s database
- Synology Forum : Installed phppgadmin as 3rd-party application
- Synology wiki.de : PhpPgAdmin als 3rd-Party Applikation
- Kristalsoft blog : Installation de phpPgAdmin sur un DiskStation
- Community package hub : phpPgAdmin
- JosDBlog : Synology Photo Station et commentaires
- NAS storage blog : Dump and restore databases easily with PostgreSQL
- Synology support : Comment puis-je changer le mot de passe root de MariaDB/MySQL ?