CMakeLists.txt

Last update : June 13, 2015

A CMakelists.txt file is the only thing needed by CMake to generate makefiles for many platforms and IDEs. CMake is a cross-platform free and open-source configurator for managing the build process of software using a compiler-independent method. It is designed to support directory hierarchies and applications that depend on multiple libraries. It is used in conjunction with native build environments such as make, Apple’s Xcode, and Microsoft Visual Studio. CMake has minimal dependencies, requiring only a C++ compiler on its own build system. It refers to the entire family of tools : CMake, CTest, CDash, and CPack.

CMake development began in the year 1999 in response to the need for a cross-platform build environment for the Insight Segmentation and Registration Toolkit (ITK). The project was funded by the United States National Library of Medicine (NLM) as part of the Visible Human Project. It was inspired by the Visualization Toolkit (VTK) at Kitware who maintains the CMake software. The latest version of CMake is  3.2.2 released on April 14, 2015.

The ability to build a directory tree outside the source tree is a key feature of CMake, ensuring that if a build directory is removed, the source file remains unaffected.

A CMake generator translates the platform-agnostic CMakeLists.txt file and produces a platform-dependent build system that you can use to compile the project. CMake can find dependencies, do conditional builds and even set different compile or link flags depending on the choice of different options by the user.

During a build with CMake there are three directories involved :

  • source dir
  • build dir
  • install dir

CMake source directory

The source directory is where the project’s sources are stored. This is the directory to which you extract the project source archive or to where you checked out the sources from a version control system.  Typically a source is any file that is explicitly modified by the developer. The source directory also contains the files which describe the build to CMake : a bunch of CMakeLists.txt files in the source directory and probably in several sub-directories. Eventually additional CMake scripts with the extension .cmake are stored in a special CMake directory. By default CMake does not alter any file in the source directory and doesn’t add new ones.

CMake build directory

The build directory is where all compiler outputs are stored, which includes both object files as well as final executables and libraries. CMake also stores several files of its own there, including its cache. You can have more than one build directory for the same source directory with different build options. The concept to have a build directory separated from the source directory is called Out of source Build. Its much easier to convince yourself that your build has been cleaned since you can simply delete the build folder and start over again.

CMake install directory

CMake is able to copy all relevant files for the build project to an install directory.

CMake GUI

The most basic CMake frontend is the CMake console which is available on all platforms. CMake has also a GUI frontend called cmake-gui.

CMake build options

I mainly use CMake with Visual Studio C++ 2010 and with Xcode on Mac OSX Yosemite.

There are three Visual Studio 2010 generators :

  • Visual Studio 10 2010 : creates project files for the x86 (32bit) processor, running also on x64 processors
  • Visual Studio 10 2010 IA64 : creates project files for the x64 processor
  • Visual Studio 10 2010 Win64 : creates project files for the Itanium processor

Visual Studio 2010 itself is a 32bit program.

There is only one Xcode generator.

CMake Language Syntax

CMake has its own basic scripting language. A listfile may contain only commands and comments. Comments start with a # character and stop at the end of a line. The names of commands are case insensitive, the arguments are case sensitive. A list of all commands is available at the CMake website. The main commands are :

  • add_definitions
  • add_executable
  • add_library
  • cmake_minimum_required
  • find_library
  • include_directories
  • link_directories
  • message
  • project
  • set
  • set_property
  • source_group
  • target_link_libraries

The basic type in CMake is a string. The SET command is used to set the value of a variable to some string. It takes two arguments: the name of the variable and its new value. To access the value of a variable, you perform a substitution with the syntax ${variable name}.

Examples :

# create a list of strings
set (VAR a b c)
# use the system version of BOOST
set (USE_SYSTEM_BOOST ON)
# use CACHE to let user set a value in CMake GUI
set (USE_SYSTEM_SQLITE OFF CACHE BOOL "Don't use the system version")

Finding dependencies

CMake can automatically search for the location of dependency libraries to include in the project.

CMake Cross-Compiling

Cross-compiling is supported by CMake starting with version 2.6.0. Cross compiling means that the software is built for a different system than the one which does the build. This means

  • CMake cannot autodetect the target system
  • Usually the executables don’t run on the build host
  • The build process has to use a different set of include files and libraries for building, i.e. not the native ones

CMake Example

The following example shows the CMakeLists.txt file of the OrthancWebViewer 1.0 project. The following parameters are used :

  1. parameters of the build : set (VAR ON CACHE BOOL “some text”)
  2. parameters to fine-tune linking against system libraries  :
    set (VAR ON CACHE BOOL “some text”)
  3. distribution specific settings : set (VAR OFF CACHE BOOL “some text”)
  4. include resources and abcde.cmake files
  5. check the availability of the Orthanc SDK
  6. add specific definitions
  7. set (CORE_SOURCES …)
  8. add libraries and set target properties
  9. install targets
  10. add UnitTests

The following figures show the CMake GUI on Windows and Mac OSX handling the OrthancWebViewer project.

CMake

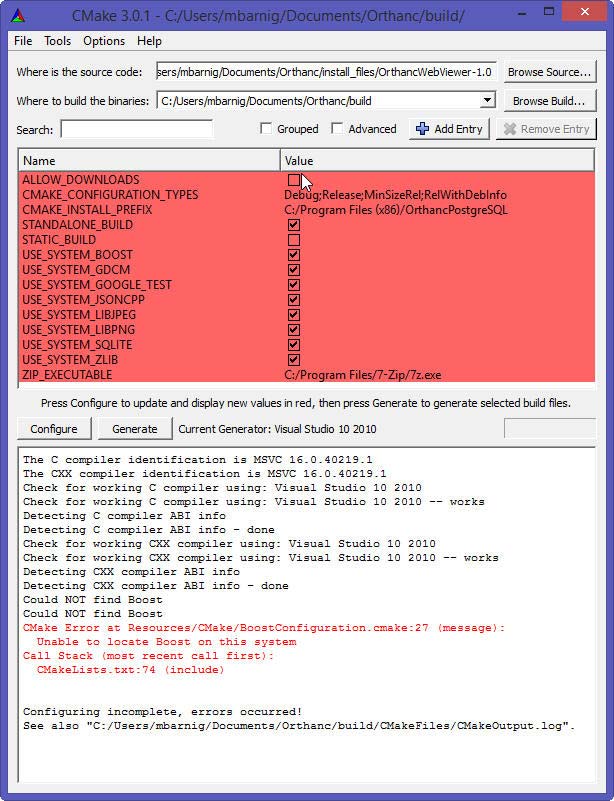
CMake version 3.0.1 on Windows 8.1

CMake

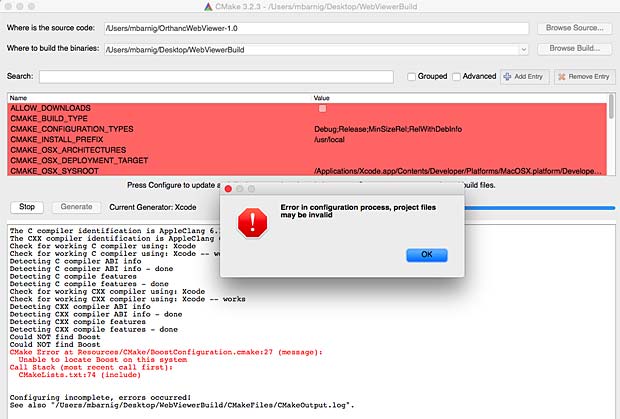
CMake version 3.2.3 on Mac OSX

On Mac OSX Cmake generated a CMakeCache.txt file in the Build folder and a CMakeOutput.log file in the Build/CMakeFiles folder.

CMake links

The following list provides links to websites with addition informations about Cmake :

Dependency Walker

Dependency Walker is a free utility that scans any 32-bit or 64-bit Windows module (exe, dll, ocx, sys, etc.) and builds a hierarchical tree diagram of all dependent modules. For each module found, it lists all the functions that are exported by that module, and which of those functions are actually being called by other modules. Another view displays the minimum set of required files, along with detailed information about each file including a full path to the file, base address, version numbers, machine type, debug information, and more.

Wikedia states that Dependency Walker was included in Microsoft Visual Studio until Visual Studio 2005 (Version 8.0) and Windows XP SP2 support tools. The utility was developed by Steve P. Miller, but is copyrighted to Microsoft. The latest version is 2.2.6000, released on October 29, 2006.

The following figure shows the dependencies of the TuxDroidServer program.

Dependency Walker version 2.2.6000, bny Steve P. Miller

Dependency Walker version 2.2.6000, by Steve P. Miller


Tux Droid Development

Last update : September 1, 2020

Referring to my recent post about the Tux Droid History, I would like to share my findings about the progress of the software development done by the community to keep Tux Droid alive.

Test environment

I use the following equipments to install and test the software :

1. PC Windows 7 64 bits

Windows 7 Edition Familiale Premium
Service Pack 1
Intel Core2 Quad CPU Q8400@2,66 GHz
RAM : 4 GB
Screen resolution : 1.024 x 768 pixels

2. PC Windows 7 32 bits

Windows 7 Edition Familiale Premium
Service Pack 1
Intel Pentium D CPU@2,66 GHz
RAM : 4 GB
Screen resolution : 1.280 x 1.024 pixels

3. Laptop Vista 32 bits

Windows Vista Home Premium
Service Pack 2
Intel Core2 DUO CPU T6400@2GHz
RAM : 4 GB
Screen resolution : 1.280 x 800 pixels

4. Laptop Linux Debian 32 bits

Gnome 3.4.2
Intel Core2 CPU U7500@1GHz
RAM : 1 GB
Screen resolution : 1.366 x 768 pixels

5. Tablet Samsung 2 7.0

Android Version 4.1.1
Dual Core Processor 1GHz
Memory : 16 GB
Screen resolution : 600 x 1.024 pixels (in portrait mode)

6. Tux Droid V2

Firmware : ?
5 ATMEL AVR microcontrollers
RAM : 128 MB

First Tests

Tuxbox 2.0

To start testing, I installed the binaries TuxBox_Setup_French_7_Vista.exe from the Tux Droid community depot on PC 1 and 2 and on Laptop 3. On Laptop 4, I installed the package tuxbox-French-TTS-3.1.4-i386.deb from the same website.

TuxBox 2.0 is running fine on all four equipements.

I uninstalled TuxBox 2.0 on the different computers before continuing the tests to avoid a mixing of libraries and files.

TuxDroidServer

Joël Matteotti developped the TuxDroidServer, using the TCP protocol, to manage the Tux Droid. I installed his Windows binaries TuxDroidServer-rev150-win32-binaries.zip on equipement 1, 2 and 3 and his Linux tarball TuxDroidServer-rev150-linux-i686-binaries.tar.gz on equipment 4. Here are the results of my tests :

  • PC 1 (Windows 7 64 bits) : works as expected, but only in compatibility mode XP service pack 3
  • PC 2 (Windows 7 32 bits) : works (with crashes) in normal or compatibility mode
  • Laptop 3 (Vista 32 bits) : crashes even before the server is started, in normal or compatibility mode (see following figure)
TuxDroidServer crash

TuxDroidServer crash

  •  Laptop 4 (Linux Debian 32 bits): Installation fails due to missing file libcurl.so.4. I was not yet able to find and install this shared library.

When the server is started on Windows, libtuxdriver version 29 is indicated. I expect to see version 30, referring to the documentation.

TuxDroidServer started

TuxDroidServer started

I don’t find any information about the warning concerning the STATUS FRAME.

TuxDroidClient

The window of the TuxDroidClient has fixed dimensions of 728 x 888 pixels and cannot be resized. I can only use it on PC 2 where the screen hight is sufficient to display the client window.

TuxDroidClient Error Message

TuxDroidClient Error Message

The error message displayed by the TuxDroidClient seems to have a problem with the character unicode.

Android Controller

I copied the Android package TuxDroidControler-1.3.0-Android-2.3.3, created by Joël Matteotti, to my Android Development workspace and installed it succesfully with the command

adb install bin/TuxDroidControler.apk

on my equipment 5 (Samsung tablet 2  7.0 ). After saving the IP address, port number and Tux key of the server in the app, it works as expected (knowing that it is still a proof of concept).

TuxDroid Android App

TuxDroid Android App

Next steps

In the next step I will try to set up a Tux Droid Development environment for Windows and Linux to compile the binaries from the SVN sources and to progress with my tests based on the most recent software revisions. I will also have a closer look at the firmware and at the driver updates and check if my Tux Droids have the latest firmware. Finally I will file all identified bugs in the Bug Tracker.

ECLIPSE – an open development platform

Last update : June 29, 2015

Eclipse is an open source community whose projects are focused on building an open development platform comprised of extensible frameworks, tools and runtimes for building, deploying and managing software across the lifecycle. A detailed overview about the Eclipse software is available at Wikipedia.

I started a year ago to use the EUROPA version (platform 3.3) of Eclipse to develop JAVA applications for the web. I changed  later to the  release GANYMEDE (plaform 3.4.) published in june 25th, 2008. I used the IDE for Java EE Developers (163 MB) with tools for Java developers creating JEE and Web applications.

A tutorial how to create servlets with Eclipse has been published on the Java Tips website. A french tutorial about servlets and jsp pages with Eclipse and Tomcat is available at the website of Serge Tahé (Maître de conférences en Informatique à l’université d’Angers). Another useful tutorial about Struts (méthode de développement gérée par l’Apache Software Foundation qui a pour but de fournir un cadre standard de développement d’applications web en Java respectant l’architecture dite MVC : Modèle – Vue – Contrôleur ) has been edited by the same author.

Other interesting tutorials are listed below :

To integrate my existing Java projects in Eclipse, I created a new Java Project in the Eclipse Workspace, copied the folder with the source files in this new project folder and executed the file – refresh menu.

The Eclipse platform is also used for Android developments, a preconfigured ECLIPSE version is included in the Google Android SDK.

In the context of the OFUR project, I installed in late June 2015 the new Eclipse Mars version (4.5) with the Javascript Development Tools (from the Web, XML, JavaEE and OSGi section), the Eclipse Web Developer Tools and the jshint Tools.

I added my signature files ida_dsa and ida_rsa to the SSH2 settings in the Eclipse – Window – Preferences – General -Network Connections – SSH2 menu. I accepted the default location for the workspace (users/mbarnig/workspace) and for the local GIT repository (users/mbarnig/git) in the Eclipse – Window – Preferences – Team – Git menu.

To checkout the original code for the DICOM Web Viewer (DWV),  I entered the HTTPS clone URL of the DWV Github front page to the Git Repository in the Eclipse – Window – Show View – Others – Git menu, clicked the Clone a Git Repository action and selected the master branch to start the download of the source code.

The DWV tree was loaded into the local DWV repository. In the root source folder the file eclipse.epf (Eclipse Process Framework Project) produces a customizable software process enginering framework. I imported the .epf file with the menu File – Import – General – Preferences.