Newsletter analysis with spam check tools

To be sure that a newsletter with innocent words and formatting get not trapped in people’s or ISP’s spam filters, it’s useful to check it with an appropriated tool. Site Build It offers a free SpamCheck tool by form on the web or by e-mail.

I use the free MailingCheck software (version 104) from eDisplay to analyse my newsletters before sending them to the recipients. The test-email file has to be in .eml or .htm format. MailingCheck, as most spam check tools, use the open-source Apache SpamAssassin Project.

Another tool used by ISP’s to prevent spam  are blacklists. A useful guide about this topic is available at the SpamLinks website. Blacklists or blocklists are lists of IP addresses, domain names, email addresses or content of the headers or the body, or some combination of these different types, that can be used to help identify spam. A special subset of IP address and domain name lists exist which can be queried using DNS, which are called DNS Blackhole Lists or DNSBLs. Blacklists can be unverified and cause “collateral damage”; their criteria for listing may not be clear.

I use the free Anti-Spam Blacklist Thing software from BlacklistPatrol/SpamButcher.

Antispam

Blacklist Patrol offers also a paid service to proactively monitor major anti-spam blacklists to see if an email server has been listed on any of them.

More informations about spam and blacklists can be found on wikipedia.

GWT-Ext

GWT-Ext is a powerful widget library that provides rich widgets like Grid with sort, paging and filtering, Tree’s with Drag & Drop support, highly customizable ComboBoxes, Tab Panels, Menus & Toolbars, Dialogs, Forms and a lot more right out of the box with a powerful and easy to use API. It uses GWT and Ext. GWT-Ext has a LGPL license option.

NetBeans : another IDE

“What IDE is the best : Eclipse or NetBeans ?” is an often discussed topic among developpers.

NetBeans is a free, open-source Integrated Development Environment for software developers with all the tools you need to create professional desktop, enterprise, web, and mobile applications with the Java language, C/C++, and even dynamic languages such as PHP, JavaScript, Groovy, and Ruby. The actual version of NetBeans is 6.5.

Twitter Applications and API

Twitter has received a lot of attention from developpers. A very useful list of all available applications, bots, scripts, programs and other informations related to Twitter is published on the Twitter Fan Wiki.

The Twitter API wiki documentation currently divides the API into two categories: the REST API Documentation and the Search API Documentation. The Search API uses a slightly different syntax and is documented separately because it was developed independently at Summize, a company that Twitter has since acquired; while the Search API is still pretty straightforward and RESTful, plans are underway to make it more consistent with Twitter’s other REST API methods. More informations are available on the DevX.com website.

For most popular programming languages, there exist a Twitter API library that lets you send and receive tweets and other Twitter-related information using the syntax and data structures of those programming languages. Libraries for the Twitter Api for different programming languages are listed on the Twitter Development Google Groups website and on the Twitter website.

There are six Java projects kwown related to the Twitter Api :

Small Java Web Server

Paul Mutton, who graduated at the University of Kent at Canterbury in 2001 with first class honours in Computer Science (BSc Hons), created  a very small standalone web server written in Java (less than 4 KByte). A more advanced version has less than 10 KByte and is called Jibble Web Server.

The softwares are OSI Certified Open Source Software, available under the GNU General Public License (GPL). Commercial licences are also available.

Other useful Java projects from Paul Mutton are :

Nabaztag choreographies

updated: 2.8.2010

Nabaztag choreographies contains led control and ear control. Each of the five leds can be controlled to have RGB values from 0-255. Ears can be moved to certain positions from 0x0 to 0x12 forwards or backwards. Also there is a possibility to move an ear forwards a certain step count. These files are made from three parts. First there is a header which contains the length of bytes and in middle there is the data and at the end four zero bytes.

00 00 00 08 00 07 02 255 00 00 00 00 00 00 00 00

Choreography files are timed and this reflects also to the command bytes. First byte of command bytes tells how long to wait before playing a new command from the beginning of last command (ts = timesteps). Second byte tells the type of command. After these two bytes there can be any amount of bytes relative to the command.

The different commands (orange data) are :

  • TEMPO command (code 01, default tempo = 10;  tempo = 1 > timestep = 10 ms;  tempo = 100 > timestep = 1s) :
    ts 01 10
  • LED command (code 07, LED-id, red, green, blue, two zero bytes) :
    ts 07 02 FF FF 00 00 00
  • EAR command (code 08, right=0 or left=1 ear, ear position 0-18, forward=0 or backward=1) :
    ts 08 00 05 01
  • EAR STEP command (code 0B, right=0 or left=1 ear, steps forward) :
    ts 11 01 0A
  • MIDI command (code 0A, play random note) :
    ts 10
  • CHOR command (code 0E, LED-id, code F0): set LED to Palette-color  (PL commande in message) or to Preset-color (CL command in message)
    ts 0E 01 F0
  • IFNE command ( synchronizes choreography to sound; details unknown) :
Nabaztag Flash

Nabaztag Flash

There are different choreography editors available (none with support of MIDI or CHOR command) :

Choreography Maker

Bunny Messenger

jNabServer for Nabaztag

Last update : March 1, 2017

JNabServer is an open-source server software which handles communication with Nabaztag/tags, Wi-Fi enabled robotic rabbits that can be used as physical user-agents in human-computer interaction.

JNabServer is a part of a project by SPI -Research Group from University of Tampere in Finland. It is the base on a research on how Nabaztag could be used as an multimodal user-agent. The project is a part of Speech-based & Pervasive Interaction Group research.

JNabServer is written in j2se 6 (Java Standard edition) so it is platform independent. Main idea is that people can develop their applications and ideas more freely on jNabServer platform. By releasing this code as an Open-Source Project the developers want to give this extendible platform to be used in various projects including her own research in the university of Tampere.

The jNab server is started with the following command from the jNab folder

java -cp libjNab.jar jNab

in the command prompt window with a Java 6 environment.

The customization of the server is done in the configuration file jNab.conf. I set the following parameters:

# Ip address to which the server will be bound
jNab.server.ip=192.168.1.2

# Port to which the server will be bound to listen for Nabaztag’s
jNab.server.port=81

# Ip address to which the configuration server will be bound
jNab.conf.ip=192.168.1.2

# Port to which the configuration server will be bound to listen to a Telnet client
jNab.conf.port=6969

To manage the jNab.Server, a Telnet session is established with the telnet program which is usually located in the C:/WINDOWS/system32/ folder. The telnet program is started with the following command from the WINDOWS/system32/ folder

telnet.exe 192.168.1.2 6969

in the command prompt window (or use the telnet command o [ip-address] [port]). If the connection is succesful, the server will answer with a welcome message :

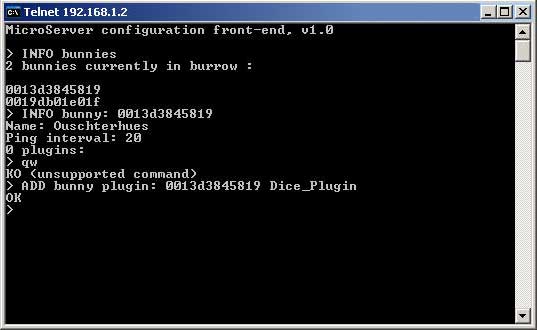
MicroServer configuration front-end. v1.0

An example is shown in the following figure :
Telnet

Telnet

If the connection fails, possible reasons are :

  • an error in the configuration file or in the telnet address
  • the ports are barred in the firewall
  • the ports are used by an other program running

A recommended solution to solve the problems is to verify the correct working of the server and the telnet client on the same computer with the IP-address “localhost” or “127.0.0.1”. If the computer running the jNabServer is managed by DHCP (Dynamic Host Configuration Protocol), the  IP-address attributed by the router is to be used.

To connect the Nabaztag’s to the server, you have to modify his connection parameters. To activate the wireless access-point of the Nabaztag, press down and hold the button between his ears while plugging the power cord. When all the lights of the Nabaztag turn blue, you can release the button. Catch the wireless network of the Nabaztag with the name nabaztag## on your laptop and click Connect.

Enter the Nabaztag IP address http://192.168.0.1 in the browser to access the Nabaztag configuration page. Go to the advanced configuration page and change the address of the Violet platform from r.nabaztag.com/vl to 192.168.1.4:81/vl. Click Update and Start and the Nabaztag will connect to the jNab-server.

The Nabaztag will request the bc.jsp webpage from the server with a HTTP-GET command and receive as answer the file bootcode.bin (59 KByte) with the binary boot code. It’s the initial bootcode from Violet before the protocol was changed to XMPP (Jabber).

The hardware of the Nabaztag consist of two moving ears which positions are tracked with optical sensors, a button, a microphone, a speaker and a rfid-reader. The rfid-reader reads tags of type ISO 14443 B. These tags operate on 13,56mhz and have a 4096-bit EEPROM.

The loaded byte code inside Nabaztag operates the following actions :

  • display and change the colour of the five LED’s (four in front and one in bottom)
  • turn the ears forward or backward
  • register a single or a double button-click
  • register an ear movement
  • read RFID tags
  • record and encode (ADPCM) sound from microphone when button was pressed for 2 seconds
  • receive and play sound to the speaker
  • send the events to the server
  • process data received from server
  • call the server with fixed intervals (ping interval)

The GET/POST requests used by the Nabaztag are the following :

  • bc.jsp (to request and process the correct booting byte code)
  • locate.jsp (to ask the IP adresses of the ping- and the broadcast-server)
  • p4.jsp (basic ping calls with informations about events)
  • record.jsp (encoded audio data of the recorded sound is passed to the server)
  • rfid.jsp (ID of the sniffed RFID is passed to the server)

A more detailed information is available at the website of the university of Tampere in Finland.

The implemented commands to send via the Telnet protocol to the jNab-server are (my Nabaztag “Aenderhues” and “Ouschterhues” with serial numbers “0013d3845819” and “0019db01e01f” are used as example) :

  • INFO server
  • SHUTDOWN client
  • SHUTDOWN server
  • INFO bunnies
  • INFO bunny: 0013d3845819
  • SET bunny name: 0013d3845819 Aenderhues
  • SET bunny ping interval: 0013d3845819 25
  • ADD bunny plugin: 0013d3845819 Dice_Plugin
  • SET bunny plugin parameter: 0013d3854819 Talkie_Plugin 0019db01e01f
  • REMOVE bunny plugin: 0013d3845819 Dice_Plugin
  • SAVE bunny: 0013d3845819

The available plugin’s are :

  • Dice_Plugin
  • GreenOrangeRedWithEars_Plugin
  • SystemOutLogger_Plugin
  • Echo_Plugin
  • Null_Plugin
  • Talkie_Plugin

The processing requests treated by the worker java class are :

  • case 1 : bunny asks for its bootcode
  • case 2 : bunny asks for location
  • case 3 : bunny notifies an event (ping, rfid, record, …)
  • case 4 : bunny asks for a choreography
  • case 5 : bunny asks for a local file

I installed the jNab-server on my Desktop (wired) and run the Telnet client on my Laptop (wireless), both are connected to a Thomson Speedtouch Router 585i of my Home Network (LAN). The following informations are displayed on the console during normal operation:

<jNab/server> new connection from /192.168.1.34:12933

<jNab/server/worker: /192.168.1.34:12933> Request received:

Request with params : {tc=7fffffff  v=65808  st=1  requestfile = /vl/p4.jsp  h=4  sd=0  sn=0013d3845819}

<jNab/server/worker: /192.168.1.34:12933> Processing request

<bunny /0013d3845819> Handling a ping event

<jNab/server/worker :/192.168.1.34:12933> Packet to send is a default packet

<jNab/server/worker:/192.168.1.34:12933> Sending packet:

Packet:

[Data block type: 3 size: 1]

[Raw data :20]

[Ping interval block set for 20 seconds]

[Data block type: 4 size: 23]

[Raw data 127 -1 -1 -1 0 0 0 0 0 0 0 0 0 0 0 0 0 0 0 0 0 0 0 ]

The server sends a packet to the Nabaztag when it request a ping command. The answer packets are custom byte arrays. These byte arrays start with byte 7F and end with FF and 0A bytes. In between there can be any amount of blocks. Blocks consists of three parts. First there is a byte telling the type of the block(03 , 04 , 09 and 0A). Next three bytes are reserved to indicate the length of data in the blocks. After the length bytes there is the data for the block. The following figure shows an example :

Nabaztag packet

Nabaztag packet

There are four different block types :

  • 03 : ping blocks to change the ping interval
  • 04 : ambient blocks sets light flashing patterns
  • 09 : reboot block
  • 0A : message blocks contains commands that are separated from each other with newline character

There are eight possible commands in a message block :

  • ID : id of the message
  • CL : color
  • PL : palette
  • CH : choreography
  • MU : sound
  • MC : sound
  • ST : shoutcast streaming
  • MW : wait

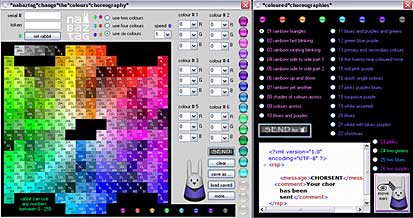
Choreographies are files that can be played by calling them from message blocks with CH command.
JAVA versions

last update : september 2010

If the JAVA versions for development and deployment are different, there is a risk to get the following errors:

  • java.lang.ClassFormatError: ClassName (unrecognized class file version)
  • Exception in thread “main” java.lang.UnsupportedClassVersionError: Bad version number in .class file
  • java.lang.UnsupportedClassVersionError: (Unsupported major.minor version 49.0)

Java has been developed by Sun Microsystems and released in 1995 as a core component of Sun Microsystems’ Java platform. The language derives much of its syntax from C and C++ but has a simpler object model and fewer low-level facilities. Java applications are typically compiled to bytecode that can run on any Java virtual machine (JVM) regardless of computer architecture. As of May 2007, in compliance with the specifications of the Java Community Process, Sun made available most of their Java technologies as free software under the GNU General Public License. More details can be found on Wikipedia.
Sun distinguishes between its Software Development Kit (SDK) and Runtime Environment (JRE) (a subset of the SDK); the primary distinction involves the JRE’s lack of the compiler, utility programs, and header files.

The initial version of JAVA was published as JDK 1.0 on 23 january 1996 with the codename OAK.

JDK 1.1. was launched on february 19, 1997 with new features.

Version 1.2. was published on december 8, 1998 with the codename Playground. This and subsequent releases were rebranded Java 2 with the distinctions J2SE (Java 2 Platform, Standard Edition), J2EE (Java 2 Platform, Enterprise Edition) and J2ME (Java 2 Platform, Micro Edition).

J2SE 1.3. was released on may 8, 2000 as Kestrel and included JAVA Sound.

J2SE 1.4. was published on february 6, 2002 with the codename Merlin and included Java Web Start, 18 updates have been released for this version.

Originally numbered 1.5, the Java version released on september 30, 2004, called Tiger, was named J2SE 5. 17 updates have been released for this version.

The latest Java Version, SE 6, (codename Mustang) was published on december 11, 2006. As of this version, Sun replaced the name “J2SE” with Java SE and dropped the “.0” from the version number. The current update is version 12.

Java SE 7 with the codename Dolphin is in the early planning and development stages and is tentatively scheduled for release in 2010.

The Java Business Support road map is available at the Sun website.

The Java Class File Disassembler javap gives the version of a compiled Java class. The major version number correspondance is indicated in the following table :

45 :arrow: Java 1.0 / 1.1
46 :arrow: Java 1.2
47 :arrow: Java 1.3
48 :arrow: Java 1.4
49 :arrow: Java 5.0
50 :arrow: Java 6

Another possibility to identify the java version is to inspect the class file with an Hex-editor. The major version number is stored in the 6th and 7th byte of the file.

To show the installed java version on a server, the following code can be used :
String maxVersion = System.getProperty(“java.class.version”)

An example of a servlet displaying the java version of my hosted Tomcat server is linked here.

Here is a link to show whether Java is working on your computer and to display the installed Java version.

ImageMagick & PerlMagick

ImageMagick® is a software suite to create, edit, and compose bitmap images. It can read, convert and write images in over 100 formats. ImageMagick can translate, flip, mirror, rotate, scale, shear and transform images, adjust image colors, apply various special effects, or draw text, lines, polygons, ellipses and Bézier curves.

ImageMagick is free software delivered as a ready-to-run binary distribution or as source code that you may freely use, copy, modify, and distribute. Its license is compatible with the GPL. It runs on all major operating systems and offers an iterface to most programming languages (Java, php, Perl, Pascal, Ruby, Python, C++, …).

The Definitive Guide to ImageMagick explains all of these capabilities and more in a practical, learn-by-example fashion, the book ImageMagick Tricks by Sohail Salehi is a fast-paced and practical tutorial packed with examples of photo manipulations, logo creation, animations, and complete web projects.

PerlMagick is an objected-oriented Perl interface to ImageMagick. This module can read, manipulate and write an image or image sequence from within a Perl script. This makes it very suitable for Web CGI scripts. I created the following test script on my hosted webserver to verify the correct configuration of ImageMagick and PerlMagick.

#!/usr/bin/perl -w
use strict;
use CGI::Carp qw(fatalsToBrowser);
use Image::Magick;
# created by Marco Barnig on 6th january 2009

my $headline = “Perl Test Script test9.pl”;

print “Content-type: text/htmlnn”;
print ‘<!DOCTYPE HTML PUBLIC “-//W3C//DTD HTML 4.01 Transitional//EN”>’, “n”;
print “<html><head><title>Perl Test</title></head><body>n”;
print “<h1>$headline</h1>n”;
print “<p>This test script opens an image file test.jpg, makes a clone, modify it and save it as mynew.gif</p>n”;

my $image1 = new Image::Magick;
my $status = $image1->Read( “../../httpdocs/media/test.jpg” );
die “Couldn’t open file test.jpg !” if “$status”;
my $image2 = $image1->Clone();
#blah, do something to $image2
$image2 -> Draw (
stroke    => “red”,
primitive => “line”,
points    => “20,20 180,180”);
my $status3 = $image2->Write( “gif:../../httpdocs/media/mynew.gif” );
die “Couldn’t save file mynew.gif in folder httpdocs/media !” if “$status3”;
print “<img src=”http://www.artgallery.lu/media/logo.gif”></img>n”;
print “<br/><br/>”;
print “<img src=”http://www.neen.lu/media/mynew.gif”></img>n”;
print “<br/><br/>”;
print “Das Script ist fertig”;
print “</body></html>n”;

.htpasswd & .htaccess on webservers

Apache and other webservers lets you password protect individual files, folders, or your entire website fairly easily with .htpasswd and .htaccess.

To password protect a folder on your site, you need to put the following code in your .htaccess file:

AuthUserFile /full/path/to/.htpasswd
AuthType Basic
AuthName “My Secret Folder”
Require valid-user

The path /full/path/to/.htpasswd should be the full path (the path to the file from the Web server’s volume root) to a text file called  .htpasswd uploaded in a folder outside of the web root, if possible.

The textfile .htpasswd contains the following informations, separated by a colon (:)

username:encryptedpassword

It’s possible to include multiple users in the .htpasswd file.

To encrypt the password, you can use free webtools like

or  the htpasswd utility that comes with Apache.

More details are available in the following tutorial.