Protected: LinkFacts Export-Import
The best of two breeds
Last update : June 25, 2021
Coqui.ai and Rhasspy are two outstanding projects, dealing with modern speech technologies and sharing their open-source code on GitHub. Coqui.ai states that it frees speech technology and brings research into reality. Rhasspy provides a fully offline set of voice assistant services for home automation.
Both projects have released TTS (Text-to-Speech) and STT (Speech-to-Text) models for several languages, based on deep machine learning. Rhasspy has developed an excellent system for grapheme to phoneme conversion (sort of frontend) called gruut and offers a flexible output interface (sort of backend), with various intent recognition systems and intent handling systems. The focus of Coqui.ai is the research, development and teaching of different ML (Machine Learning) models for TTS and STT : Tacotron-DCA, Tacotron2-DDC, Glow-TTS, SpeedySpeech, DeepSpeech etc.
Recently, the main developer of Coqui-TTS, Eren Gölge, alias erogol, and the creator of Rhasspy, Michael Hansen, alias synesthesiam, worked together to integrate gruut into Coqui-TTS. The GitHub pull request, prepared by synesthesiam, was ready for merging on June 17, 2021. I am very interested to work with this combined TTS release to eventually create a synthetic voice for the luxembourgish language.
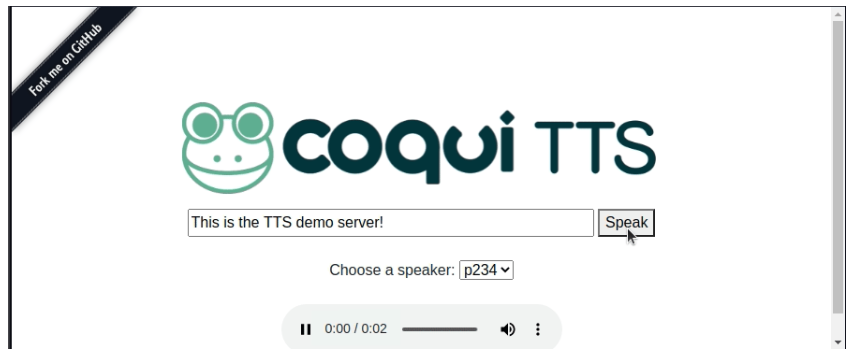
A few days ago, I cloned the branch add-gruut of the Coqui-TTS GitHub repository, forked by synesthesiam, on my Desktop-PC to check if the new tool allows to train a synthetic voice, with a small dataset, during a limited training period.
I used a part (4.500 utterances) of the french public SIWIS dataset to train a Glow-TTS model. My hyper-parameters to configure the model are based on the Rhasspy-Larynx configuration file of the french Larynx Glow-TTS model, trained with the full SIWIS dataset.
My configuration file can be downloaded from this link.
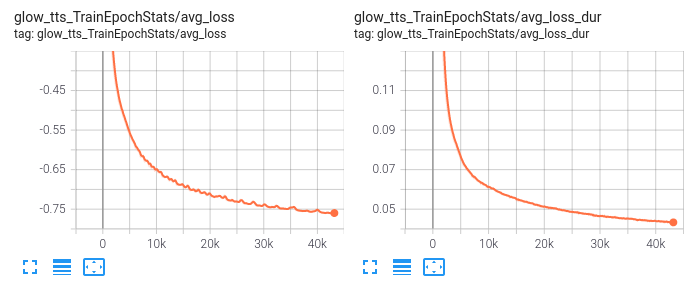
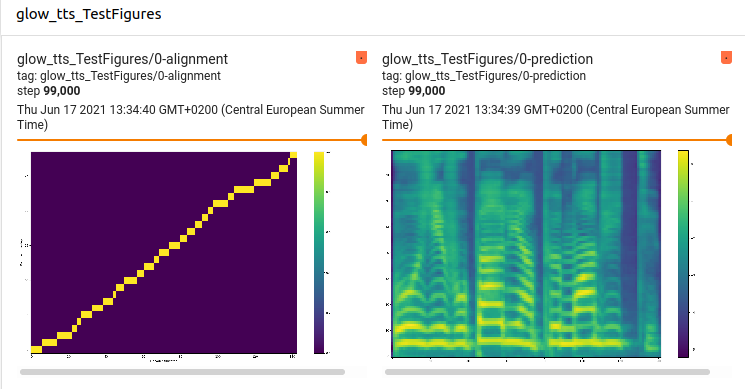
The model was trained with 1000 epochs with a batch size of 45, which equals to 99.000 steps. The main scalars and images displayed on the Tensorboard at the end of the training are shown hereafter :
The final model is available here : fr-siwis-coqui-glow-99k.pth.tar
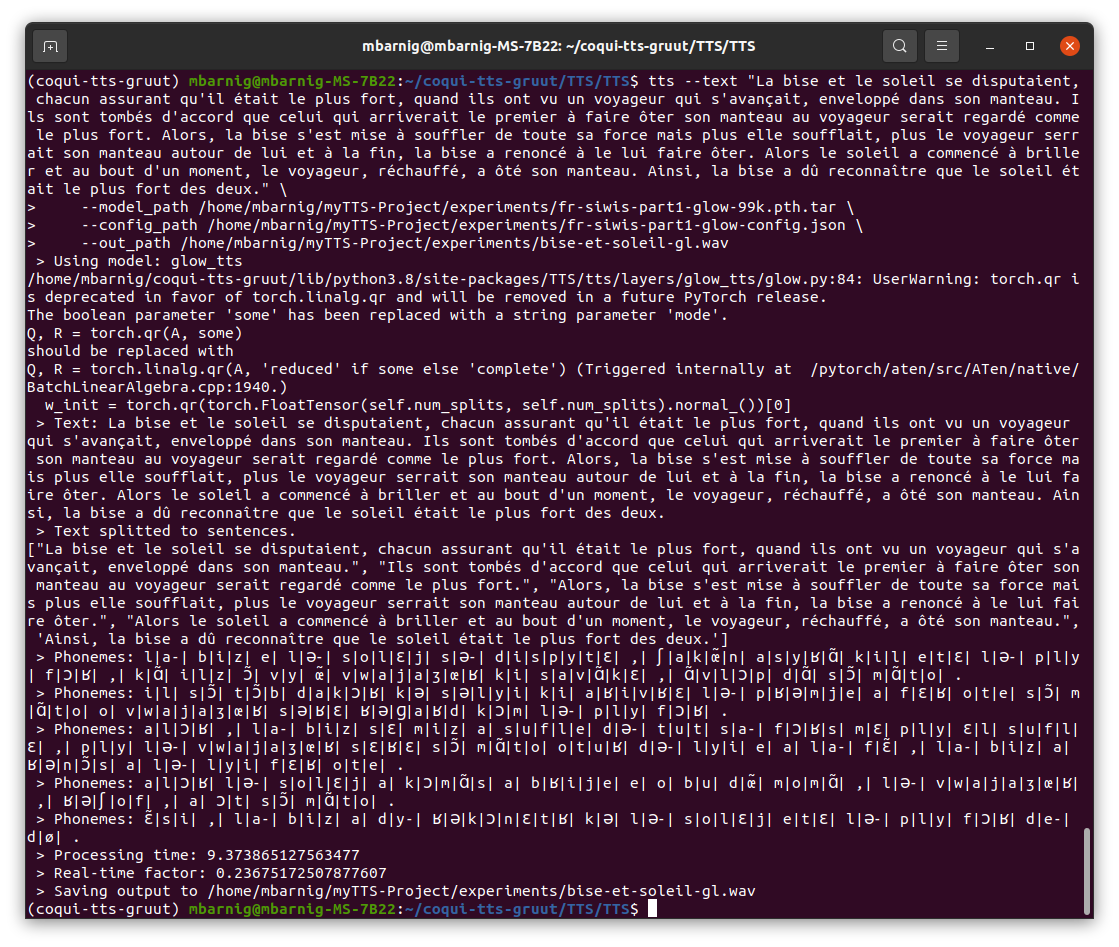
I run the following script to synthesize the french version of the fable The North Wind and the Sun :
tts --text "La bise et le soleil se disputaient, chacun assurant qu'il était le plus fort, quand ils ont vu un voyageur qui s'avançait, enveloppé dans son manteau. Ils sont tombés d'accord que celui qui arriverait le premier à faire ôter son manteau au voyageur serait regardé comme le plus fort. Alors, la bise s'est mise à souffler de toute sa force mais plus elle soufflait, plus le voyageur serrait son manteau autour de lui et à la fin, la bise a renoncé à le lui faire ôter. Alors le soleil a commencé à briller et au bout d'un moment, le voyageur, réchauffé, a ôté son manteau. Ainsi, la bise a dû reconnaître que le soleil était le plus fort des deux." \
--model_path /home/mbarnig/myTTS-Project/experiments/fr-siwis-part1-glow-99k.pth.tar \
--config_path /home/mbarnig/myTTS-Project/experiments/fr-siwis-part1-glow-config.json \
--out_path /home/mbarnig/myTTS-Project/experiments/bise-et-soleil-gl.wav
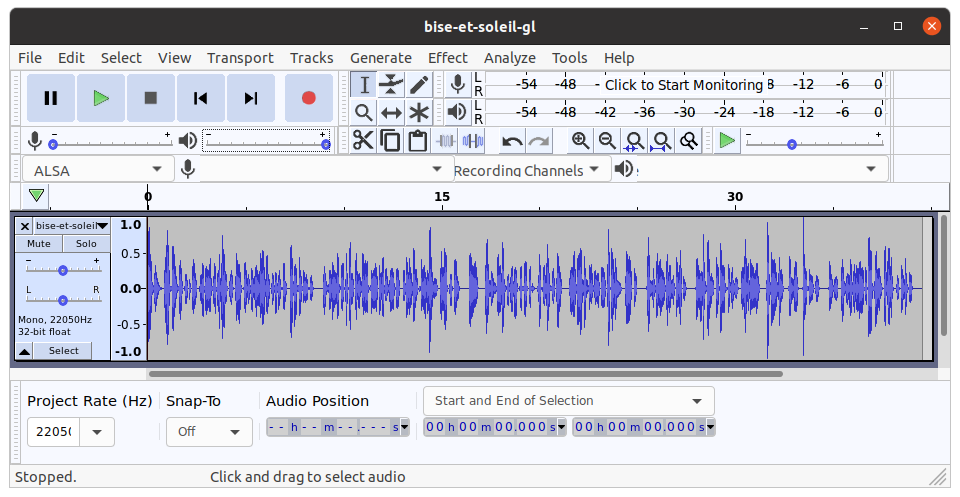
Here are the results when using the default Griffin-Lim vocoder :
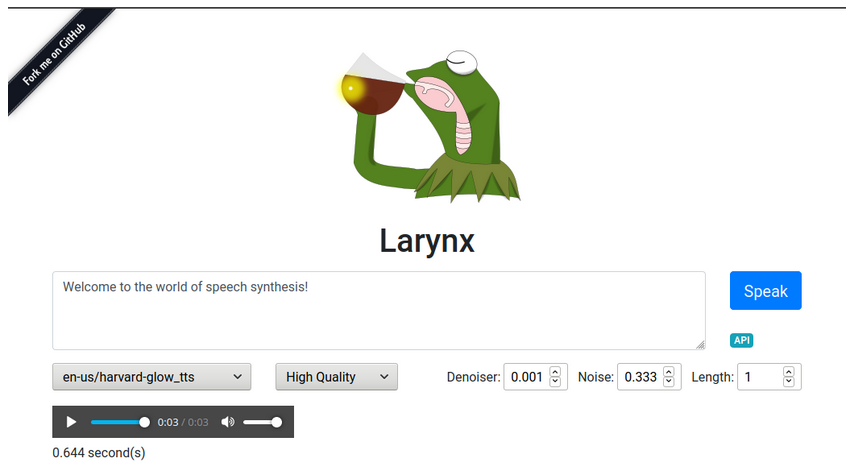
To improve the voice we must continue the training. The SIWIS Larynx voice, released by Rhasspy, was trained with 270.000 steps and more utterances.
Below the audio signals and sounds of the SIWIS voice, trained with 195.000 steps, are displayed:

Text-to-Speech sound samples from Coqui-TTS
Last update : June 1, 2021
The present contribution is related to my recent thread in the Coqui discussion forum.
Before telling the story of my experience with Text-To-Speech (TTS) synthesis, I would like to show the current state-of-art of open-source machine-learning (ML) technologies, by presenting sound samples synthesized with english, french and german TTS models, created by Coqui.ai, a young start-up launched in March 2021 on the ruins of the Mozilla speech projects.
The test utterance that I used for the synthesis is the first sentence of the fable The North Wind and the Sun. This fable is made famous by its use in phonetic descriptions as an illustration of spoken language in the Handbook of the International Phonetic Association and the Journal of the International Phonetic Association.
Here are the three test sentences in english, french and german :
The North Wind and the Sun were disputing which was the stronger when a traveller came along wrapped in a warm cloak.
La bise et le soleil se disputaient, chacun assurant qu’il était le plus fort, quand ils ont vu un voyageur qui s’avançait, enveloppé dans son manteau.
Einst stritten sich Nordwind und Sonne, wer von ihnen beiden wohl der Stärkere wäre, als ein Wanderer, der in einen warmen Mantel gehüllt war, des Weges daherkam.
Here are the synthesized sound samples and waveforms of several released Coqui-TTS models :
1. Model : tacotron2 ; Language : english ; Dataset : EK1 ; Wav-Size : 296,5 KB

2. Model : tacotron2-DDC ; Language : english ; Dataset : LJSpeech ; Wav-size : 328,3 KB

3. Model : tacotron2-DDC ; Language : english ; Dataset : SAM ; Wav-size : 256,6 KB

4. Model : tacotron-DCA ; Language : english ; Dataset : LJSpeech ; Wav-size : 303,7 KB

5. Model : glow-tts ; Language : english ; Dataset : LJSpeech ; Wav-size : 361,0 KB

6. Model : speedy-speech-wn ; Language : english ; Dataset : LJSpeech ; Wav-size : 338,0 KB

7. Model : tacotron-DDC ; Language : french ; Dataset : MAI ; Wav-size : 237,6 KB (problem)

8. Model : tacotron-DCA; Language : german ; Dataset : Thorsten ; Wav-size : 479,8 KB

My TTS story
Over the next decade, speech is expected to become the primary way people interact with devices — from phones and laptops to digital assistants. Today’s voice-enabled devices are inaccessible to most of the planet’s languages and accents. Currently, neither Amazon’s Alexa, Apple’s Siri, nor Google Home support luxembourgish, a West Germanic language that is spoken by about 600,000 people inside Luxembourg and in the border regions of the neighbour counries Belgium, France and Germany. The same is true for Africa. No single native african language is supported by the GAFAM companies.
I has always been interested in voice technologies. Last year I published a book about the history of speech synthesis, starting with the mechanical speaking heads in the middle Ages.

Next to the speaking heads the talking machines of Wolfgang von Kempelen and Josef Faber became famous. In the second half of the 19th century the first electromagnetic speech devices were designed. The pioneers were Joseph Henry, Graham Bell, Thomas Edison. Pedro the Voder, created by Homer Dudley, was exposed at the World Exhibition 1939 in New York.
Late 1940 Franklin S. Cooper designed the pattern-playback machine which converted spectrograms to speech. It was a sort of forerunner of the Tacotron.
At an MIT conference in 1956 Gunnar Fant and Walter Lawrence demonstrated their synthesizers OVE-I and P.A.T. in an interactive dialog session. Both equipments were controlled by several parameters to change the formants and features of the speech. The first commercial speech synthesizer was the electronic Bell speech kit launched early 1960. It was the last project developed by Homer Dudley.
Progressively transistors were replaced by integrated circuits. State of art of the speech synthesis at this time was the linear predictive coding (LPC). This technology was implemented in the integrated circuit TMC0281 developed by Texas Instruments for the famous toy Speak & Spell launched in June 1978.
In 1974 Richard Thomas Gagnon obtained a license for an electronic phoneme based synthesizer called VOTRAX. His employer, the company Federal Screw Works, produced these devices with great success. Ten years later, in 1984, this synthesizer was renamed Votalker and sold as PC card for the computers IBM PC, Apple II and Commodore 64. The same year Digital Equipement Corporation (DEC) launched an autonomous synthesizer with an RS-232 serial computer interface. It was based on the program KlatTalk developed by Dennis Klatt in 1982.
Dennis Klatt is considered as the father of the speech synthesis software. He recorded his own voice to extract the speech features for the program. The first synthesizer used by Stephen Hawkins spoked with the voice of Dennis Klatt.
The Klatt synthesizer became famous with the general public when Jonathan Duddington added this technology in his speech software for the Acorn Computers. He started the development of this tool, named Speak, in 1995. In 2006 Speak became eSpeak and was at that time a very popular open-source program running on all kind of operating systems. The last message by Jonathan Duddington on Internet was on April 16, 2015. At my knowledge nobody in the large eSpeak community knows what happened to Jonathan Duddington.
At the end of 2015, the coordination of the project has been entrusted to Reece Dunn by the community and a new GitHub repository with the name eSpeak-NG (new generation) was created. Because eSpeak-NG supports more than 100 different languages, the tool is commonly used today as a grapheme-to-phoneme conversion front-end for high-end TTS and STT engines.
The development of hight quality speech synthesizers began at the end of the 20th century. Edinburgh, Mons, Nagoya, Pittsburg and Saarbrucken were the capitals where the related technologies have been developed in universities and marketed by spin-offs or licensed to big companies. Every software engineer committed to the development of speech tools knows the big projects like CMU-Spinx, Festival, Festvox, Flite, FreeTTS, HTK, HTS, Kaldi, MaryTTS, MBROLA or SPTK.
MaryLux is the unique luxembourgish synthetic voice created until now. It was developed in 2014 with the MaryTTS technology.
Ten years ago the landscape of the speech technologies changed. Deep-machine learning became the new fetish. Amazon, Apple, AT&T, Baidu, Facebook, Google, IBM, Microsoft were the dominant players in the fields of artificial intelligence (AI), neural-networks (NN) and machine-learning (ML) to create TTS and STT models. The new ML-projects were named DeepVoice, GAN, Glow, Tacotron, WaveGrad etc. In the hardware domain of ML, NVIDIA became the new king.
In July 2017, Mozilla launched the project Common Voice to help make voice recognition open to everyone. The same year in November the initial release off the open source speech recognition ML-model DeepSpeech, using the common voice dataset, which was contributed to by nearly 20,000 people worldwide at this time, was described by Mozilla.
Early 2018 the GitHub repository Mozilla-TTS was created, but the first and unique version 0.0.9 was only released in January 2021. In August 11, 2020, Mitchell Baker, CEO of Mozilla, announced that the World, Internet and Mozilla will be changing and that Mozilla will be restructured to focus on Firefox in the future. In an internal message the Mozilla employees were informed that the changes also include a significant reduction of the workforce by approximately 250 people. This was the beginning of the end of Mozilla STT and Mozilla TTS.
This restructuration of Mozilla was probably also the start of the initiative Coqui.ai, dedicated to open speech technology and to serving as the hub where speech researchers, developers, and practitioners congregate. The start-up Coqui.ai was founded in March 2021 by four machine learning (ML) experts with a strong experience on the Mozilla deep-learning voice STT (speech-to-text) and TTS (text-to-speech) projects.
The founders of the start-up Coqui.ai are :
Kelly Davis worked at Mozilla in Germany from April 2015 to September 2020. The last three years he was the manager of the Mozilla Machine Learning Group. Before he worked as software engineer and research programmer at different companies and startup’s and he founded the startup forty.to in 2012. Kelly Davis has a BS from MIT and a PhD from the Rutgers University (1997).
Eren Gölge was senior research engineer at Mozilla Germany from January 2018 to February 2021. He has a MS from the Bilkent University (2014) and was PhD candidate up to mid-2017. During his studies he worked for different companies and he cofounded the startup 8bit.ai in 2014. He announced the creation of Coqui.ai on March 15, 2021 in the Mozilla discussion forum.
Josh Meyer has a BA from the Seton Hall University and a PhD in computational linguistics from the University of Arizona (2019). During his studies he worked as research assistant and consultant for different companies and projects, among them an internship at Mozilla in the San Francisco Bay Area. From January 2020 to April 2021 he worked as a Machine Learning Fellow at Mozilla on open voice technology projects in East Africa.
Reuben Morais has a technical degree in industrial informatics from CEFET-MG in Belo Horizonte (2011). Since 2010 he was a volunteer contributor at Mozilla and he worked for several companies. In 2015 he continued his studies at the Federal University (UMFG) in Belo Horizonte and obtained a BS in information systems in 2018. During his studies he continued to work as ML research engineer at Upwork Global Inc as contractor for Mozilla. Since July 2019 he works as senior research engineer for Mozilla.
Besides Coqui.ai there are some other great communities dealing with TTS and STT, for example Rhasspy, an open source, fully offline set of voice assistant services, created by Michael Hansen, alias synesthesiam. Another example is Microft AI, the open answer to Amazon Echo and Google Home, launched on Kickstarter in 2015.
I will eventually write a second book about speech synthesis to present the history of the open-source ML-projects realized by the communities of Microft.ai (Mimic), Rhasspy, Coqui.ai and others. Before starting this undertaking, I will fulfill my dream to develop a high quality luxembourgish speech synthesizer, with the tools and kind help of these communities. Perhaps I can even go further and create a multilingual (luxembourgish, german, french and english) and multispeaker model.
Rodange, June 1, 2021
Marco Barnig
30ième anniversaire du World Wide Web
Mise à jour : 13 mars 2022
1. Introduction (1889 -1988)
Wikipedia définit le World Wide Web comme suit : WWW, littéralement la «toile (d’araignée) à l’échelle mondiale», communément appelé le Web, et parfois la Toile, est un système hypertexte public fonctionnant sur Internet. Le Web permet de consulter, avec un navigateur, des pages accessibles sur des sites.
L’idée de donner accès à toutes les connaissances du monde est déjà ancienne. A la fin du XIX siècle, Paul Otlet et Henri la Fontaine ont développé un système de classification décimale universelle qui a conduit à la création du Mundaneum en Belgique en 1910.
L’idée a été reprise par l’ingénieur anglais Samuel Fedida en 1968. Il a conçu le système ViewData, après avoir lu la publication visionnaire “The Computer as a Communication Device” de J.C.R. Licklider et de Robert W. Taylor. Un premier prototype de ce service vidéotex a été présenté en 1974, le système a été commercialisé dans la suite au Royaume Uni sous le nom de PRESTEL.

l’Ecole Polytechnique Fédérale de Zurich en 1976
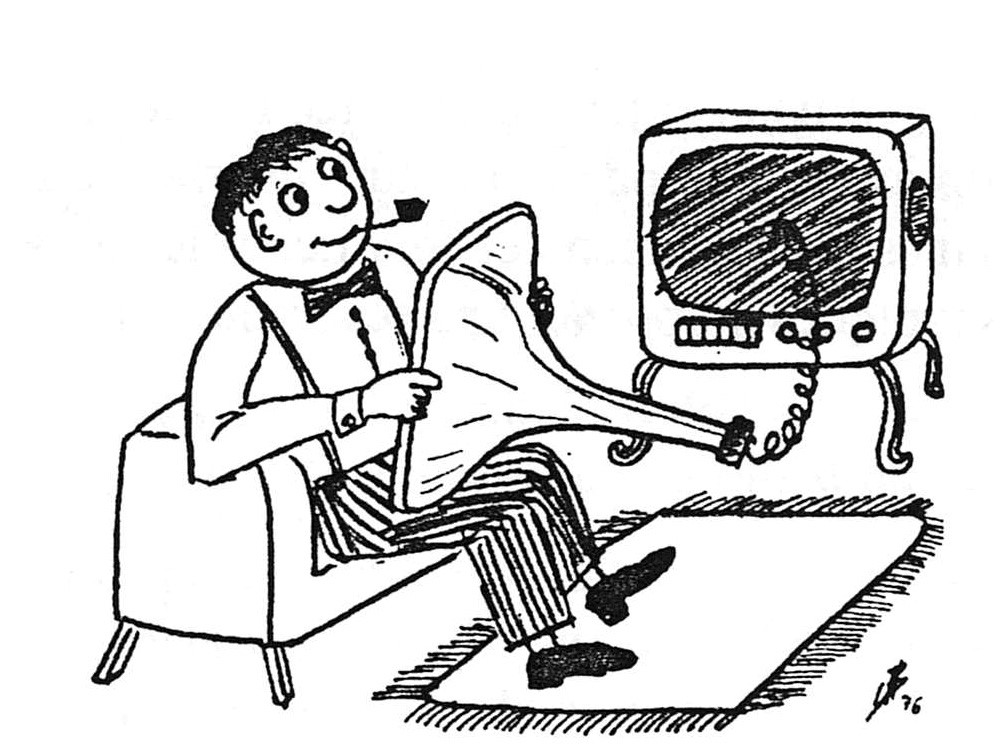
A l’époque j’ai développé des systèmes d’affichage TV pour le vidéotex à l’EPFZ. En 1976 j’ai dessiné l’illustration ci-après qui garde son actualité et qui documente qu’il a fallu attendre presque 40 ans pour réaliser son rêve de pouvoir accéder aux informations du monde entier, bien installé dans un fauteuil.
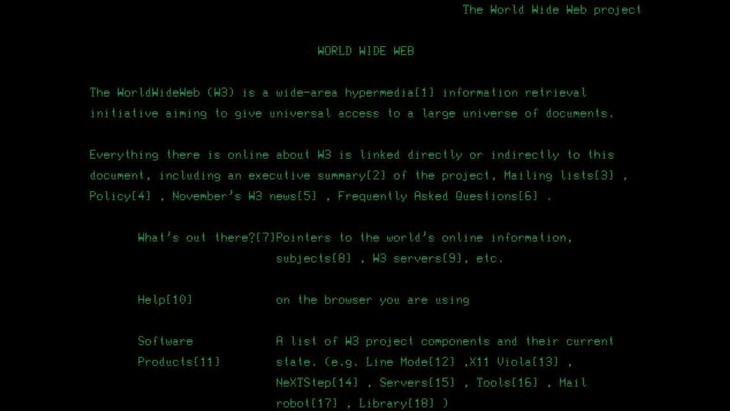
2. Timothy John Berners-Lee (1989)
Appelé TimBL, Timothy John Berners-Lee est un ingénieur anglais qui a proposé il y a trente ans l’introduction d’un système hypertexte pour gérer la documentation scientifique volumineuse au sein du CERN à Genève. Il est considéré aujourd’hui comme l’inventeur du “World Wide Web”.
Le 12 mars 1989 il a remis son document “Information Management: A Proposal” à son supérieur au CERN, Mike Sendall. La proposition est accessible sur le site web du CERN par le lien http://info.cern.ch/Proposal.html .
La proposition n’a jamais été acceptée comme projet officiel du CERN, mais Mike Sendall accordait du temps libre à son collaborateur pour concrétiser son idée. En octobre 1990, Timothy John Berners-Lee avait finalisé le développement des technologies de base du hypertexte : HTML, URL et HTTP. Il programmait également le premier éditeur/navigateur de pages web et le premier serveur web. Fin 1990, le système était opérationnel au CERN et une année plus tard des usagers externes ont été invités à joindre la communauté web sur Internet.
Timothy John Berners-Lee plaidait pour offrir ces nouvelles technologies, qui étaient la propriété du CERN, gratuitement à la communauté web sur Internet. Ses efforts ont été couronnés de succès. Le 30 avril 1993, le CERN a mis les logiciels et protocoles www dans le domaine public. C’était le début d’une aventure commune gigantesque.
En 1994 Timothy John Berners-Lee a quitté le CERN pour joindre le MIT où il a créé le W3C (World Wide Web Consortium), une communauté internationale dévouée au développement de standards ouverts pour l’Internet. Depuis sa création il est à la tête de cette institution comme directeur.
En 2013 le CERN a lancé un projet pour rendre les premières pages www, qui étaient hébergés sur l’ordinateur NeXT de Timothy John Berners-Lee, accessibles au public sous le lien https://first-website.web.cern.ch.
3. RESTENA (1990 – 1993)
Avant l’introduction de l’hypertexte dans Internet, ce réseau était déjà opérationnel dans la majorité des pays du monde, même si à l’époque il n’était connu et accessible que par une petite communauté scientifique.
Pour accéder à Internet ou pour y raccorder un serveur web, on doit disposer d’une adresse IP. Il s’agit d’une ressource limitée qui est gérée par l’IANA (Internet Assigned Numbers Authority). Cette autorité a été mise en place par Jon Postel en 1988 à l’université de Californie Sud (USC) dans le cadre d’un contrat avec le Ministère de la Défense des Etats-Unis. On se rappelle que Internet est issu du réseau militaire américain ARPANET. Le premier message sur ARPANET a été transmis le 29 octobre 1969.
Un système de noms de domaines, associés aux adresses IP, a été créé pour simplifier la mémorisation des accès aux serveurs web sur Internet. A côté des premiers noms de domaines publics avec les extensions .com, .org et .net, des noms de domaines nationaux ont été définis pour chaque pays du monde. Pour le Luxembourg il s’agit de l’extension .lu. La gestion des noms de domaines était également assurée par Jon Postel qui dirigeait l’IANA jusqu’à sa mort en 1998.
A la fin des années 1980 la question se posait donc à qui attribuer l’autorité pour la gestion des adresses IP et des noms de domaines Internet à Luxembourg. Avec ses services des postes et télécommunications non-séparés, l’Administration des P&T disposait de tous les atouts pour jouer ce rôle. Or à l’époque les P&T devaient faire face à la libéralisation du secteur des télécommunications qui avait déjà démarré sur le terrain, et ceci en absence d’une réglementation nationale afférente. On préparait le changement du statut de l’administration des P&T. La loi portant création de l’entreprise des P&T, sous forme d’un établissement public, date du 10 août 1992. Les services techniques étaient en outre en train de préparer leur déménagement de la rue de Hollerich vers la Cloche d’Or où le nouveau bâtiment des Télécommunications a été inauguré en 1993. Last but not least, les P&T étaient confrontées à la réalité que le service vidéotex, introduit en 1986 sous la pression de la presse écrite, ne rencontrait pas le succès escompté. Il est donc compréhensible que les dirigeants des P&T ne souhaitaient pas s’engager au début des années 1990 dans une autre aventure farfelue comme celle de l’Internet naissant.
Pour éviter que l’Internet luxembourgeois tombe sous la tutelle d’une société privée, le groupe de travail initié à la fin des années 1980 par le Ministère de l’Education Nationale pour planifier la mise en place d’un réseau informatique pour la recherche et les écoles s’est porté candidat pour jouer le rôle d’une autorité Internet luxembourgeoise. Le réseau afférent est devenu opérationnel en 1989 sous le nom de RESTENA et a introduit dans la suite une demande auprès de Jon Postel pour gérer le domaine national .lu ainsi que pour obtenir les adresses IP requises. Comme on avait besoin d’une connexion à Internet et d’une adresses e-mail pour introduire cette demande, mais qui faisaient défaut à l’époque à Luxembourg, il a fallu passer par des collègues à l’étranger pour transmettre ces courriels.
Après maintes tentatives, Antoine Barthel, un des responsables de RESTENA, a réussi à atteindre Jon Postel au téléphone en février 1992. Celui-ci confirmait qu’il avait toutes les pièces de la candidature luxembourgeoise sur son bureau, que le dossier était pertinent et qu’il allait donner une suite favorable à la demande. Le 14 février 1992 RESTENA recevait l’attribution de 65.536 adresses IP de classe B, le 3 mars de la même année la confirmation de la disponibilité des noms de domaines .lu a été confirmée. Les premiers noms enregistrés étaient restena.lu, menvax.lu, men.lu, crpht.lu et crpcu.lu.
Les P&T étaient représentées dans le groupe de travail RESTENA et bientôt la première connexion a été établie avec le réseau Internet aux Etats-Unis, via le réseau public LUXPAC des P&T et par quelques détours européens.
Le Luxembourg était prêt pour se lancer dans le www. Les premiers services étaient utilisés par des chercheurs et des enseignants à Luxembourg. En 1994 plus que la moitié des quelques dizaines de sites web luxembourgeois réalisés étaient l’œuvre de cette communauté. Au début RESTENA était une cellule autonome du CRPHT hébergée dans les locaux de ce centre de recherche au Kirchberg. En 2000 RESTENA est devenu une fondation qui a déménagé dans la Maison du Savoir à Belval en 2016. Antoine Barthel a été Directeur de RESTENA jusqu’à sa retraite en 2017, en partenariat avec Théo Duhautpas.
4. Lancement commercial (1994 – 1999)
La première entreprise à lancer un service www commercial à Luxembourg était Europe Online. Fondée par des grands groupes étrangers et luxembourgeois, elle a été présentée le 1er juin 1994 comme troisième pilier de l’industrie des médias au Luxembourg. Elle offrait un service payant avec des technologies propriétaires aux usagers luxembourgeois et européens. Après une perte de centaines de millions de francs luxembourgeois en 1995, les investisseurs étrangers se sont progressivement retirés. D’abord placé sous contrôle judiciaire, Europe Online a été mise en faillite en 1996. Une centaine de personnes a été licenciée et les ordinateurs de l’entreprise ont été vendus aux enchères.
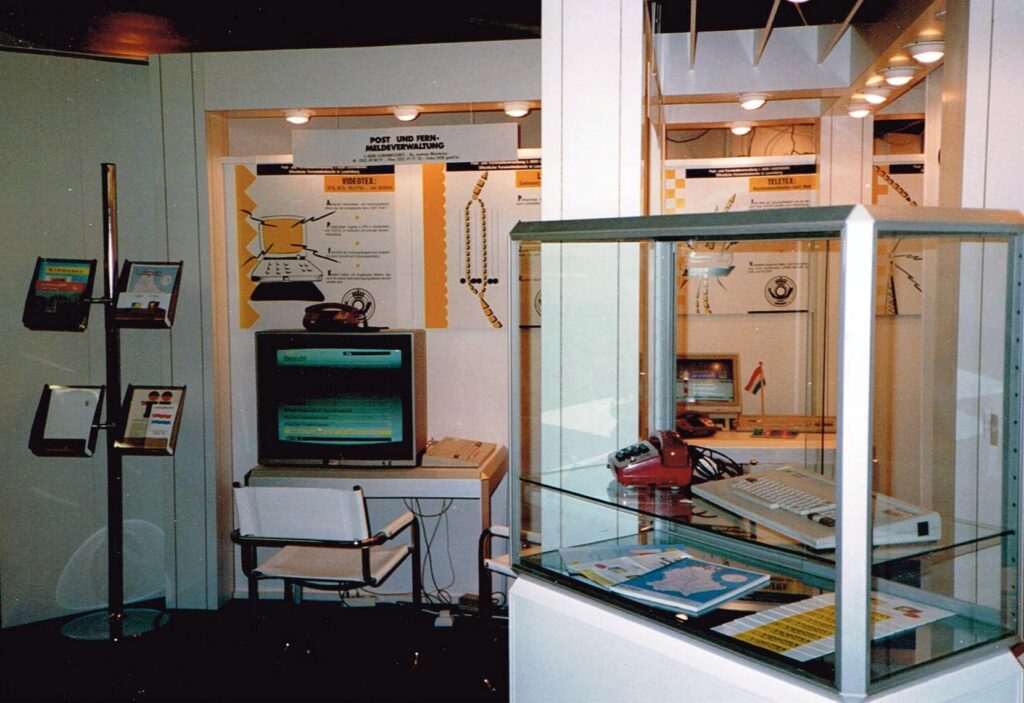
Les P&T, qui étaient devenues une entreprise publique en 1992, avaient une approche plus prudente. Les ingénieurs du service téléinformatique avaient développé à la fin des années 1980 des passerelles de conversion vidéotex pour accéder, outre au service VIDEOTEX luxembourgeois, également aux services afférents dans les pays voisins : Minitel en France, Bildschirmtext en Allemagne, Prestel au Royaume Uni. Il n’y avait pas de standard commun vidéotex à l’époque.
L’accès aux passerelles se faisait avec des modems via le réseau téléphonique commuté. La technologie de ces passerelles a été présentée par les P&T sur le stand commun luxembourgeois à la CEBIT 1988. Dans la suite elle a été offerte aux opérateurs télécom en Suisse, Autriche et aux Pays Bas et mise en service avec l’aide du développeur des P&T dans ces pays.
Au début des années 1990, les passerelles vidéotex ont été étendues pour permettre l’accès aux serveurs web connectés à Internet. Si l’accès au service vidéotex fonctionnait sur base d’un abonnement avec authentification, l’accès au réseau Internet se faisait d’une façon anonyme via des portes téléphoniques facturées à raison de 12 francs luxembourgeois. On appelait ce système un accès kiosque.
L’accès à Internet a été présentée la première fois au public en 1995 sur un stand des P&T à la Bureautec et dans le cadre d’une présentation “L’information et les multimédia” dans le forum “Technologies nouvelles et télécommunications” organisé par l’OLAP. A côté de l’accès kiosque, l’Entreprise des P&T proposait des accès à Internet par ligne directe, par le réseau LUXPAC, par le réseau ISDN et par le réseau PSTN en mode abonné avec identification.
En 1996, l’Entreprise des P&T a lancé son premier cube Internet qui rendait la notion abstraite d’un accès Internet plus tangible pour les usagers. Le cube était une boîte en carton qui contenait un disque compact avec un navigateur et d’autres logiciels pour l’accès à Internet, un guide d’usager en plusieurs langues ainsi que le mot de passe pour s’identifier. Le prix de vente du cube comprenait les frais d’initialisation et des mois d’abonnement gratuit. La conception du Cube Internet était l’idée de Patrick Hansen, un jeune ingénieur commercial attaché au service marketing des P&T. Après son départ des P&T, il a créé plusieurs start-up’s et il est aujourd’hui le patron du groupe Luxaviation.
Les premiers usagers de l’Internet et autres initiés du web ont fréquenté le premier Cybercafé, situé au Marx à Hollerich. Les meilleurs sites web luxembourgeois recevaient un “Web Award”. A partir de 2000, on se rencontrait au début de chaque mois au First Tuesday.
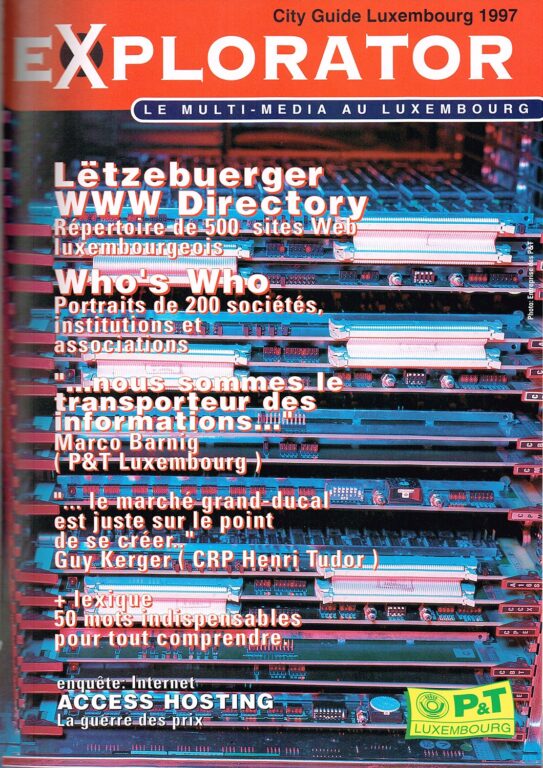

L’éditeur Mike Koedinger publiait “Le Guide du multimedia au Luxembourg” comme partie intégrante ou comme hors-série du magazine Explorator. Ces guides constituent aujourd’hui une source précieuse pour s’informer sur l’évolution du web après le démarrage commercial de l’Internet. Ainsi on peut découvrir dans le guide publié en avril 1977 la première édition du “Lëtzebuerger www Directory”, reprenant 465 sites web luxembourgeois, segmentée en cinq groupes :
- Commerce (55%)
- Organisations sans but lucratif (19%)
- Particuliers (11%)
- Education (8%)
- Etatique (7%)
Parmi les fournisseurs d’accès Internet on trouve à côté de l’Entreprise des P&T 15 autres sociétés : CMD, Compuserve, Connexion Interway, Eunet, Digit 352, HermesNet, IBM Global Network, Imaginet, Infopartners, Innet, Klinke & Co, Selection Line, Téléphonie, Luxembourg Online et Visual Online. Seuls les deux derniers opérateurs alternatifs ont survécu. Visual Online fait partie du groupe POST depuis l’année 2000.
Le “Who’s Who du Multimédia au Luxembourg”, inclue dans le guide, reprenait environ 200 sociétés opérant dans l’industrie de l’information.
La progression du www pendant la période de 1995 jusqu’à la fin du XX siècle était fulgurante. Les prix d’abonnement et d’utilisation de l’Internet baissaient continuellement, le nombre des usagers et du trafic augmentait à vue d’oeil, des nouvelles versions du Cube Internet des P&T se suivaient et des nouveaux sites web attiraient l’attention des usagers chaque jour. L’introduction de nouvelles technologies comme l’accès mobile WAP (Wireless Application Protocol), le JavaScript et les applications Flash et RealVideo permettaient d’étoffer l’affichage des textes et images par des animations et petites vidéos.
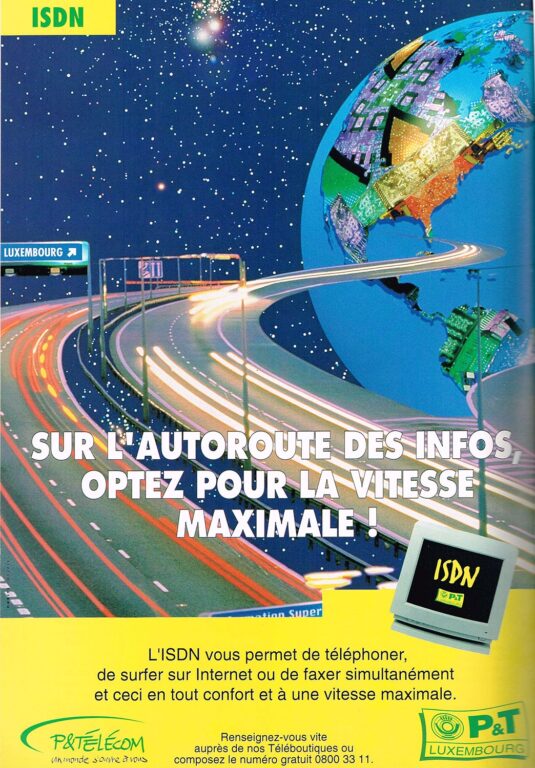
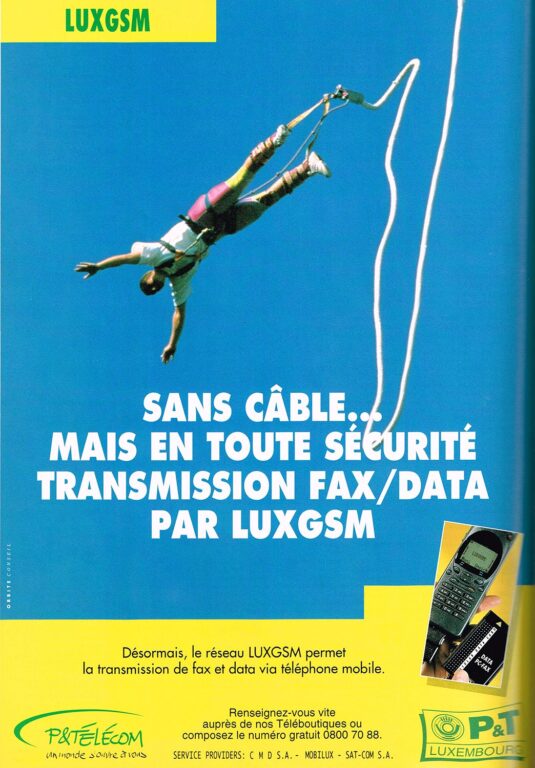
Les publicités Internet des P&T en 1997, présentées ci-après, montrent l’esprit de l’époque.
Les contenus présentés au début du www étaient statiques et il n’y avait guère d’interactivité : il s’agissait du web dit “read only”. Les usagers se plaignaient des bandes passantes trop faibles, des lenteurs d’affichage du contenu et du mauvais support de la part des fournisseurs d’accès.
5. Evolution (2000 – 2019)
Pour illustrer l’évolution du web j’ai proposé en juillet 2013 une chronologie Internet en neuf étapes sur mon site web https://www.web3.lu/divide-the-web-timeline-in-nine-epochs/.

Après l’étape “read-only” le web est devenu interactif (read-write) pendant la période de 2000 à 2004. La vitesse d’accès a augmenté sensiblement avec le lancement de LuxDSL et du GPRS en 2001 et de UMTS en 2003. Wikipedia a été lancé, des nouvelles technologies comme AJAX et JSON ont rendu le JavaScript plus performant. Le nombre de blogs a explosé, la 3D (Second Life) a été introduite et les webcams et Skype ont fait leur apparition.
La période de 2005 à 2009 constitue l’étape du web collaboratif. Facebook a progressé rapidement après son lancement en 2004. Youtube, Twitter, Amazon et PayPal ont démarré leurs services entre 2005 et 2007.
La prochaine étape était le web adaptif ou web mobile, avec l’introduction des premiers tablettes iPads en 2010 et la généralisation des smartphones. Le nouveau standard HTML5 a été approuvé, le démarrage de LuxFibre par l’Entreprise des P&T en 2011 a levé la vitesse d’accès à Internet à des centaines de Megabit par seconde. Une année plus tard le lancement de la quatrième génération des réseaux mobiles (LTE – 4G) à Luxembourg a rendu le web définitivement mobile.
L’étape de mi-2012 à 2014 est considérée comme le web sémantique. La recherche sur le web a été perfectionnée, les premiers assistants personnels avec commande vocale et synthèse de la parole, comme Siri et Alexa, ont fait leur entrée.
A partir de 2015 l’intelligence artificielle est introduite dans presque toutes les applications du web. La publicité personnalisée est omniprésente. J’appelle cette étape le web intelligent.
Depuis environ 2 ans les usagers sont de plus en plus influencés et manipulés par le web. J’appelle cette étape qui se termine à la fin de cette année le web conscient.
6. Aspects particuliers (1980 – 2019)
6.1. Equipements et navigateurs
Depuis le développement du web par Timothy John Berners-Lee, la technologie fondamentale n’a pas changé. Le contenu est toujours programmé en HTML (version 5 à l’heure actuelle), l’adresse de la page web afférente est référencée par une URL (Uniform Resource Locator) et les requêtes se font par le protocole HTTP (HyperText Transfer Protocol), même si ce protocole est aujourd’hui sécurisé et s’appelle HTTPS.
Pour accéder au contenu web, il faut d’abord accéder à Internet par un réseau de télécommunications. Dans le passé on faisait la distinction entre différents types d’accès : par le réseau téléphonique commuté (PSTN), par ISDN, par un réseau de données comme LUXPAC, par une ligne louée ou par un réseau mobile comme LUXGSM. Aujourd’hui tous les réseaux de télécommunications sont basés sur le protocole IP. LUXPAC, ISDN et LUXGSM sont oubliés et même le PSTN est en train de disparaître. Aujourd’hui l’usager typique du web ne se soucie plus du type d’accès. L’équipement fait le choix pour lui. Par défaut l’accès se fait par WiFi, si non par le réseau mobile. Seules quelques usagers avertis raccordent leurs ordinateurs par un câble Ethernet à leur routeur (typiquement une Fritzbox) s’ils ont des raisons particulières. En général la connexion de l’équipement à Internet est permanente.
Pour afficher ou écouter le contenu web, il faut disposer d’un logiciel de navigation. Aujourd’hui on a le choix entre plusieurs navigateurs (browser) : Firefox, Chrome, Safari, IE, Edge, Opera etc. Et même si on utilise une app iOS ou Android pour accéder à un contenu web spécifique comme FaceBook, Twitter ou Youtube, au lieu du navigateur standard, cette application est basée sur un logiciel de navigation classique. La question si le www est remplacé par les réseaux sociaux ne se pose donc pas.
En ce qui concerne la question d’existence d’anciennes machines associées au début du www, il n’existe pas d’équipement représentatif pour cette période. Il y a une multitude d’ordinateurs personnels et de modems qui a été utilisée pour l’accès à Internet entre 1990 et 1999. Pour avoir une vue globale je conseille de visiter le musée virtuelle Computarium à Diekirch : https://computarium.lcd.lu/
Ce musée a été réalisé par Francis Massen, un vrai pionnier de l’introduction de l’informatique dans l’éducation nationale et de la mise en place de l’Internet à Luxembourg. Il était un des membres du groupe de travail RESTENA, son fils est le directeur actuel de cette fondation.
S’il n’y a pas d’équipement représentatif pour le début du www à Luxembourg, la situation est différente au niveau des logiciels. Les premiers navigateurs répandus en 1995 étaient Netscape Navigator 2.0 et Internet Explorer 1 de Microsoft.
Il est toutefois difficile de faire aujourd’hui une démonstration du fonctionnement de ces navigateurs. Même si on dispose d’un ancien ordinateur avec un système d’exploitation de l’époque (Microsoft, Apple, Next, BBC Acorn, …), il faut également disposer des contenus web de l’époque et ceci dans un système fermé. J’ai démarré un projet de simulation afférent, mais ce n’est pas ma première priorité.
Le prochain chapitre décrit toutefois une solution de contournement.
6.2. Wayback Machine
Depuis 1996, l’Internet Archive, une association américaine sans but lucratif, construit une bibliothèque numérique qui enregistre régulièrement les pages d’accueil de tous les sites web accessibles. Cette archive contient aujourd’hui plus de 320 milliards de pages web. Pour accéder à ces pages historiques, une interface appelée Wayback Machine permet à chacun d’entrer une ancienne URL pour reproduire les pages web afférentes sauvegardées à des intervalles réguliers. https://archive.org/web/
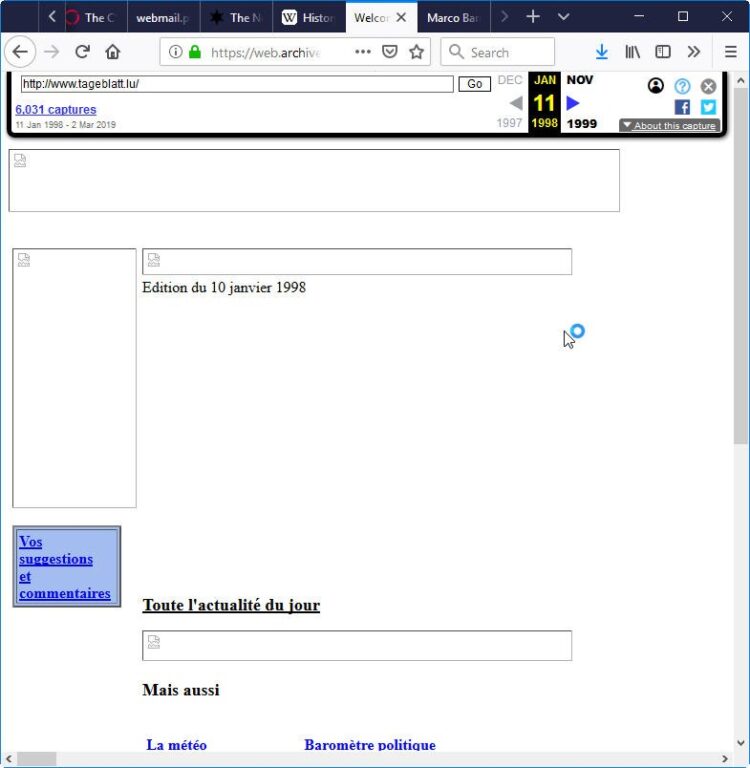
Je reproduis ci-après quelques anciennes pages dont celle du Tageblatt. Comme les ressources externes ne sont pas conservées, la reproduction est plus ou moins complète en fonction de la programmation HTML des pages web afférentes.
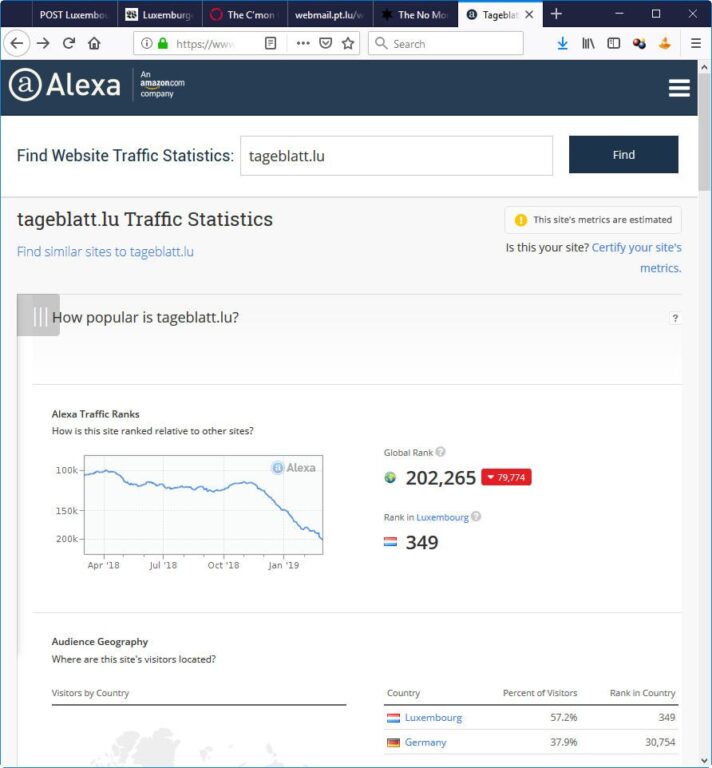
Une autre source historique intéressante est le site web Alexa.com, une filiale d’Amazon, qui produit des statistiques sur l’évolution du trafic d’un site web. L’image qui suit montre les indications fournies pour le site web du Tageblatt.
https://www.alexa.com/siteinfo
6.3. Pionniers
Désigner des personnes vivantes ou décédées comme pionniers de l’introduction de l’Internet à Luxembourg et d’oublier ou d’écarter d’autres est un exercice délicat. Je vais toutefois tenter de le faire, sur base de mon expérience et de mes archives, en appliquant les critères suivants :
- ont joué un rôle important au niveau du web avant 1998
- ont continué à faire progresser le web après 1998
- ont laissé des traces tangibles de leur activité
- étaient des résidents au Luxembourg ou des frontaliers
Certaines personnes ont déjà été présentées dans les chapitres précédents. Je vais donner une vue globale ci-après par secteur d’activités.
6.3.1. Equipe téléinformatique des P&T (mes anciens collaborateurs dans ma qualité de chef du département Nouveaux Services de Télécommunications jusqu’en 1994)
- Paul Ney : chef du service téléinformatique ; administrateur de Visual Online ; aujourd’hui retraité
- Fernand Koenigs : adjoint du chef de service ;
- Thierry Coutelier : programmeur Linux ; fondateur du Linux User Group Luxembourg ; depuis 1999 programmeur auprès de SES
- Marc Durbach : développeur des passerelles VTX/Internet ; programmeur chez Europe Online (1994) ; Directeur de CMD (1996) ; Groupe Assurances Foyer ; aujourd’hui retraité
- Hubert Schumacher : ingénieur P&T; depuis 1998 créateur et co-fondateur de plusieurs start-up’s (Synapse, M-PLIFY, ZAP, atHome, Q-LEAP) ; aujourd’hui CEO de LinkFacts
6.3.2. Equipe Marketing des P&T (mes anciens collaborateurs dans ma qualité de chef du nouveau service commercial des P&T à partir de 1993)
- Patrick Hansen : créateur du cube Internet des P&T (1996) ; depuis 1998 créateur et co-fondateur de plusieurs start-up’s; aujourd’hui CEO de Luxaviation
- Marc Neuen : ingénieur commercial (1996) ; depuis 1999 créateur et co-fondateur de plusieurs start-up’s (LuxJob, atHome, Sympass, yellow.lu, HomeExperts, Linc) ; actuellement CEO de Linc SA et administrateur de différentes sociétés dans le domaine de l’Internet et des nouvelles technologies.
- Tom Kettels : chef de produit Internet P&T; chef du service Multimédia P&T; conseiller auprès du Ministère de l’Etat; LuxConnect; LU-CIX; depuis 2018 Operational Lead Infrachain
- Céline Kruten : ingénieur multimédia ; différentes fonctions au service marketing P&T ; depuis 2019 propriétaire, gérant-artiste de la société Les Herbes Folles
6.3.3. Equipe RESTENA
- Antoine Barthel : Professeur à l’IST ; Directeur de RESTENA depuis 1989; aujourd’hui retraité
- Théo Duhautpas : Professeur de télécommunications à l’IST (1975); Directeur de RESTENA depuis 1989; aujourd’hui retraité
- Alain Frieden : depuis 1988 ingénieur-réseau auprès de RESTENA
6.3.4. Education Nationale
- Françis Massen : professeur-docteur en sciences physiques et mathématiques au LCD ; membre du groupe RESTENA ; pionnier de l’enseignement de l’informatique aux lycées ; créateur du musée virtuelle Computarium; depuis 2009 en retraite
- Nico Beckerich : professeur de mécanique au Lycée Technique à Wiltz ; membre du groupe RESTENA ; créateur du réseau Wilytec ; actuellement retraité
- Dominique Portante : instituteur ; inspecteur ; fondateur et directeur du SCRIPT (Service de Coordination de la Recherche et de l’Innovation pédagogiques et technologiques) au MEN ; Professeur de linguistique à l’université; actuellement retraité
6.3.5. Centres de Recherches
- Fernand Reinig : Professeur ; Directeur au CRP Gabriel Lippmann de 1988 à 2014 ; administrateur RESTENA ; membre du conseil FNR ; depuis 2015 responsable du LIST
- Guy Kerger : Directeur du centre de ressources multimédia au CRPHT de 1989 à 2000 ; participation au programme MIDAS-NET en 1996 ; création de la start-Up MindForest en 2000 ; aujourd’hui managing partner du groupe MindForest
6.3.6. Etat
- Guy Dockendorf : Ministère de la Culture, Premier Conseiller de Gouvernement honoraire
- Pierre Decker : Ministère de l’Enseignement Supérieur et de la Recherche, Premier Conseiller de Gouvernement honoraire
6.3.7. Fournisseurs d’accès Internet
- Claude Schuler : Visual Online
- Christian Schmit : Visual Online
- Christian Gatti : Visual Online
- Paul Retter : Luxembourg Online
- Claude Radoux : Luxembourg Online
6.3.8. Media
- Mike Koedinger : Fondateur et CEO du groupe d’édition Maison Moderne en 1994 ; Publication des magazines Explorateur et du guide Multimedia à partir de 1994 ; Fondateur de la plate-forme Lemonland Media Lab en 2018 ; actuellement président du Conseil d’administration de Maison Moderne
- François Altwies : chef de projet Telepolis en 1995 ; rédacteur adjoint de Explorator de 1996 à 1999 ; fondateur et CEO de XYZ Productions en 1997 ; Business Developper chez Beaufort et Telindus (2001 – 2006) ; différentes activités dans différentes sociétés entre 2006 et 2013; depuis 2013 Neuroplasticity Coach et Bio-&Neurofeedback Trainer
- Tom Weber : Station Manager newMedia auprès du groupe RTL depuis 1998 ; actuellement Digital Director RTL
- Luc Schengen : depuis 1988 producteur et réalisateur de contenus rich-Media, audio-visuel, 3D, Vidéo etc. dans sa société In-Visible
- Roland Dernoeden : depuis 1980 PDG de l’Imprimerie Centrale
6.3.7. Entrepreneurs sériels
- Samuel Dickes : Créateur de la start-up AlpaNet (1996) ; créateur et directeur du premier portail Internet luxweb à Luxembourg à partir de 1996 ; New Media Manager chez Editus de 1999 à 2006 avec transfert de luxweb ; depuis 2006 Business Development and Multimedia Executive Manager dans le groupe RTL
- Patrick Kersten : ingénieur commercial ; créateur et co-fondateur de plusieurs start-up’s ; depuis 2013 fondateur et CEO de Doctena
- Eric Lackner : consultant chez Spectrum Computers (1988) et Andersen Consulting (1990 – 1995) ; CFO et CEO auprès de Spectrum Technology (1995 – 2003 ; dirigeant de différentes sociétés ; depuis 2010 philanthrope et consultant indépendant
- Sylvain Cottong : Diplôme d’économie de l’UCL en 1994 ; création de la start-up Mediaarchitect en 1997 ; conseiller du gouvernement pour e-Government et pour la Société de l’Information ; fondateur de plusieurs start-up’s à partir de 2006 ; actuellement conseiller indépendant
- Daniel Eischen : créateur de plusieurs start-up’s depuis 1995 (Concept Factory, Interact, Quest, Sustain, Exxus, InnoHub, TribeGlobal) ; actuellement administrateur délégué et CEO de Interact
- Raoul Mulheims : créateur de la plateforme et communauté Luxusbuerg Chat en 1996 avec plus de 80.000 usagers enregistrés jusqu’à 2007 ; Managing Partner de Mpulse en 2006 ; co-fondateur de Nvision en 2009 ; Co-fondateur et CEO de Digicash Payments en 2012 ; actuellement co-fondateur et CEO de Finologee (FinTech)
- Gary Kneip : Sales Manager DEC de 1985 à 1989 ; Head of ICT BIL de 1989 à 1993 ; Fondateur et CEO de Primesphere de 1993 à 2003 ; CEO du groupe DATA4 depuis 2004 ; Fondateur et CEO de ProDomus depuis 2015
- Guy Sandt : RTL Productions de 1981 à 1986 ; Développement Multimedia auprès de Computerland Europe ; Création de la société du web Guy Sandt sarl (Commercialisation Click2View) ; Réalisation de portails Internet pour les voitures d’occasion et l’immobilier à partir de 2000 ; depuis 2006 consultant indépendant
- Daniel Schwall : avocat ; RTL de 1980 à 1988 ; Bayard Presse de 1988 à 1992 ; Création et CEO de Digit 352 de 1992 à 1999 ; réalisation de différents projets entre 1999 et 2018 ; depuis 2018 rattrappeur de temps perdu à Nice
- Xavier Buck : Créateur d’un club informatique au Luxembourg avec 1.500 membres au milieu des années 1980; entrepreneur de l’Internet depuis 1996; co-fondateur du datacenter.eu en 2000 ; président du Luxembourg ICT Cluster depuis 2014
- Marco Houwen : son parcours est un peu différent des autres entrepreneurs sériels, mais il est devenu depuis 2000 omniprésent dans l’environnement Internet luxembourgeois
6.4. Statistiques
Il est difficile de trouver des statistiques correctes et cohérentes sur l’utilisation de l’Internet et du web et de leur évolution depuis 1995. Les anciens rapports de gestion des P&T ne fournissent pas de données quantitatives sur le nombre d’abonnés ou sur le trafic Internet des P&T. A partir de 1997 c’est l’ILR qui rassemble les statistiques pour l’ensemble des opérateurs. Je n’ai toutefois pas trouvé de données pertinentes dans les rapports annuels de l’IRL.
A mon avis la meilleure source pour trouver des données plus ou moins fiables sont les études publiées occasionnellement par le Statec sur son portail des statistique, basées sur des enquêtes effectuées auprès d’un échantillon d’usagers.
Quelques statistiques globales se trouvent sur ma page web
https://www.web3.lu/internet-history/ .
7. Perspectives d’avenir (> 2020)
Quelle sera l’état du web dans l’avenir ? L’omniprésence d’Internet dans la vie journalière sera encore accentuée. L’introduction de la cinquième génération des réseaux mobiles (5G) facilitera la généralisation de l’Internet des Objets (IoT = Internet of Things). Le web sera complètement dominé par les contenus vidéos. L’interface vocal remplacera le clavier. Les usagers ne prendront plus le temps pour approfondir un sujet. Tout message qui ne passe pas les 10 premières secondes sera ignoré par le lecteur. Mais grâce à l’intelligence artificielle et à la conscience synthétique naissante du web, l’humanité va maîtriser ces problèmes.
Synthèse vocale
Dernière mise à jour : 3 juillet 2021
En juillet 2020 j’ai publié le présent contenu dans un livre, en auto-édition, auprés de Books-on-Demand (BoD). Le livre peut être commandé dans la librairie de BoD, auprès de Amazon ou de toute autre grande libraire.

1. Avant-propos
Pour rédiger le présent historique sur la synthèse vocale, je me suis basé, dans la mesure du possible, sur des sources originales des récits et descriptions édités. La digitalisation des bibliothèques nationales et des archives dans les universités, centres de recherche et entreprises privées a permis à ces institutions d’offrir des accès en ligne à leurs précieux documents et anciennes collections. Je peux confirmer que de nombreux auteurs de contributions scientifiques et historiques sur Internet copient l’un de l’autre, sans se soucier de l’exactitude et de la véracité du contenu. Même le statut de Wikipedia comme première référence des connaissances sur le web est souvent contesté. Suite de mes propres expériences je peux toutefois certifier que les articles de Wikipédia qui contiennent de nombreuses références bibliographiques académiques sont en général de qualité élevée.
L’accès généralisé à des anciens documents montre que dans le passé où il n’y avait pas encore Internet ni téléphone et où la mobilité était restreinte, les scientifiques de renom avaient déjà des contacts réguliers entre eux et se consultaient l’un l’autre. La vue globale qu’on obtient grâce aux bibliothèques numériques fait apparaître que dans certains cas le mérite d’une invention ne revient pas nécessairement au plus brillant qui avait l’idée initiale, mais au plus raffiné qui était le premier à déposer un brevet ou à faire une publication afférente. Dans ces cas il faudrait réécrire l’histoire des sciences.
Aujourd’hui il est de plus en plus difficile d’identifier un inventeur individuel. Dans la majorité des cas ce sont des équipes multidisciplinaires qui font avancer la recherche dans tous les domaines.
2. Introduction
Aujourd’hui la synthèse vocale constitue une technique informatique de synthèse sonore qui permet de créer de la parole artificielle à partir de textes. Grâce à l’intelligence artificielle et l’apprentissage approfondi (deep learning), on peut créer des synthétiseurs vocaux qui transforment le texte orthographique directement en sons numérisés, sans se soucier de la phonologie.
Dans le passé la synthèse vocale informatique se basait largement sur des techniques de traitement linguistique pour transformer le texte orthographique en une version phonétique. Les phonèmes traduits sont ensuite convertis en sons moyennant des techniques de traitement du signal.
Mais avant de devenir une science informatique, la synthèse vocale se basait sur des constructions mécaniques, ensuite sur des circuits électriques. Je me suis très tôt intéressé à ces techniques. En 1976, je supervisais un travail de diplôme à l’Institut d’électronique de l’EPFZ qui consistait à réaliser un circuit de synthèse vocale avec des filtres électroniques réglés. À la fin, le synthétiseur était capable de prononcer la phrase “Ich bin ein Computer”.
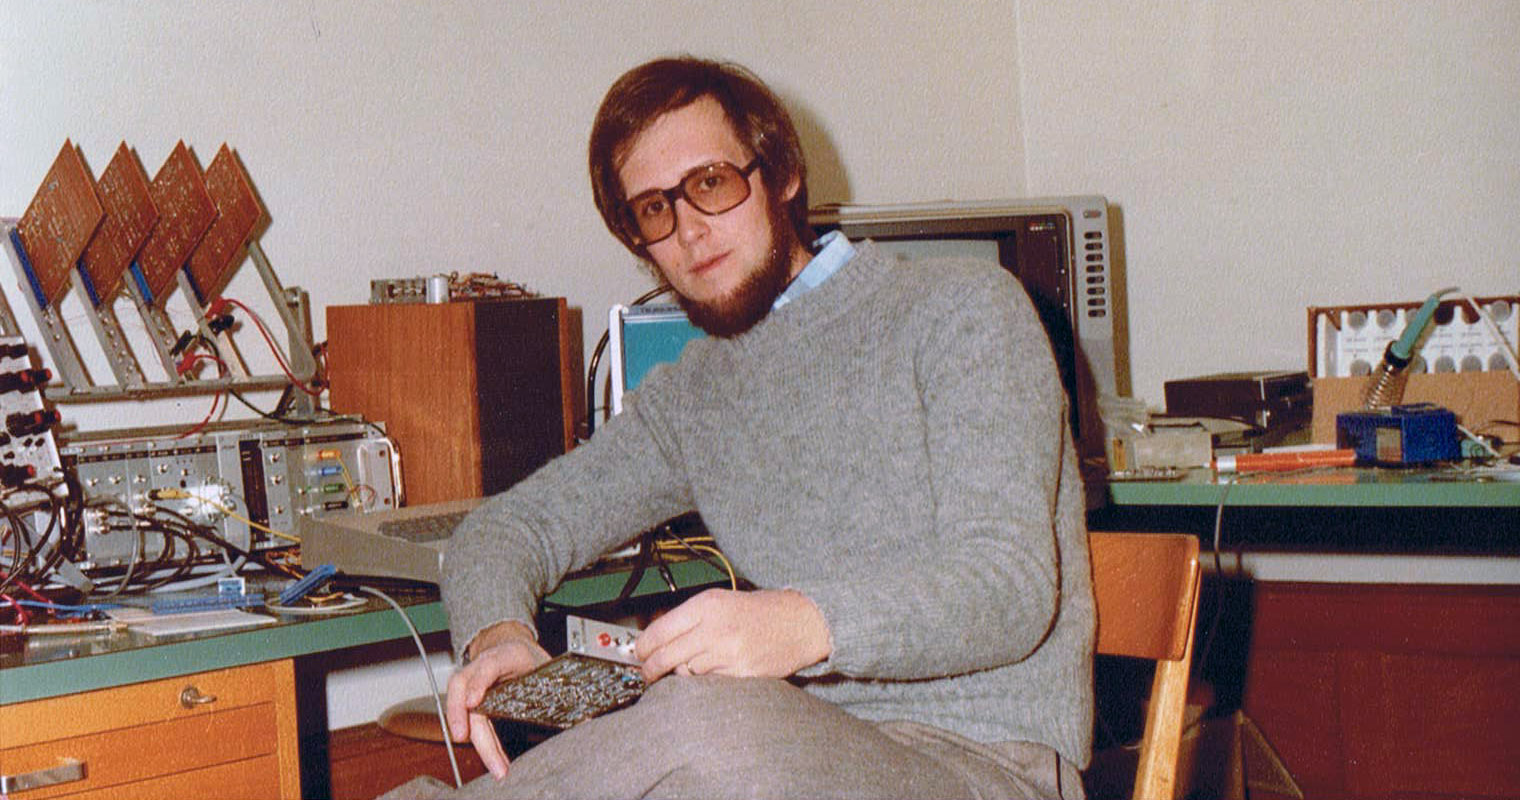
Mon bureau-laboratoire à l’Institut d’Électronique de l’École Polytechnique Fédérale à Zurich en 1976
En 1978, j’ai joint l’Administration des P&T comme ingénieur de télécommunications. Pour le rapport de gestion de 1978, les ingénieurs avaient rédigé un premier volet, appelé Les Nouveaux Services de Télécommunications. C’était la toute première tentative d’expliquer au grand public à quoi il pouvait s’attendre jusqu’à l’an 2000 en matière de création de prestations et de facilités additionnelles dans le domaine des télécommunications. La table des matières de ce volet, présentée ci-après, montre que la synthèse et la reconnaissance de la parole faisaient partie du chapitre 4.1.1.
Rapport de gestion des PT 1978 : Table des matières de la première partie -> Les nouveaux services de télécommunications
La synthèse vocale fait partie de la communication sonore, le moyen le plus efficace et le plus répandu de communication des êtres vivants. Dans sa forme la plus évoluée, elle permet aux humains la mise en place d’un langage construit, grâce à la richesse des phonèmes (éléments sonores distinctif du langage) produits.
3. Automates (têtes) parlants
Dans l’antiquité la parole était d’origine divine. Les colosses de Memnon en Égypte avaient la renommée d’être des têtes parlantes à cause du chant qu’émettait l’un d’eux au lever du soleil. Aujourd’hui on sait que ces sons étaient produits sous l’effet d’un brusque changement de température et d’hygrométrie qui faisait éclater la surface de la pierre. Une légende dit que des prêtres se cachaient à l’intérieur des statues.
Dans les récits du Moyen Âge on fait parfois référence à des têtes en métal (bronze, laiton) qui étaient capables d’émettre des sons ou qui pouvaient même parler comme des humains. Ainsi il est rapporté que Gerbert d’Aurillac, qui exerçait comme pape Sylvestre II de 999 à 1003, disposait d’une tête en bronze qui répondait par “oui” ou “non” à une question qu’on lui posait. Une autre tête parlante (en laiton) est attribuée à Roger Bacon, un moine et savant anglais qui vivait de 1214 à 1294. On cite également les noms de Robert Grosseteste (1175 – 1253) et de Albertus Magnus (Albert le Grand : 1193 – 1280).
Thomas d’Aquin casse la tête parlante construite par son maître Albert le Grand (Cyclopædic science simplified, John Henry Pepper, Google Books)
L’illustration ci-dessus est extraite de l’encyclopédie scientifique simplifiée éditée par John Henry Pepper en 1869. L’encyclopédie, qui publie plus que 600 illustrations, montre également une image de la fille parlante invisible.
Fille parlante invisible, (Cyclopædic science simplified, John Henry Pepper, Google Books)
Il faut penser qu’il s’agissait dans tous les cas des têtes parlantes du Moyen Âge de tricheries, soit moyennant des tubes vocaux comme représenté sur l’image ci-dessus, soit par la maîtrise de la ventriloquerie.
Un cas particulier plus récent d’un vrai mécanisme vocal constitue l’automate à deux têtes parlantes de l’abbé Mical. Né à côté de Lyon en 1727, il a construit, après ses études et son ordination, plusieurs automates musicaux et une tête parlante en bronze. Il semble qu’il ait détruit ces premières constructions parce qu’il n’était pas satisfait des résultats. En 1783, il a présenté son innovation de deux têtes parlantes qui pouvaient dialoguer entre eux.
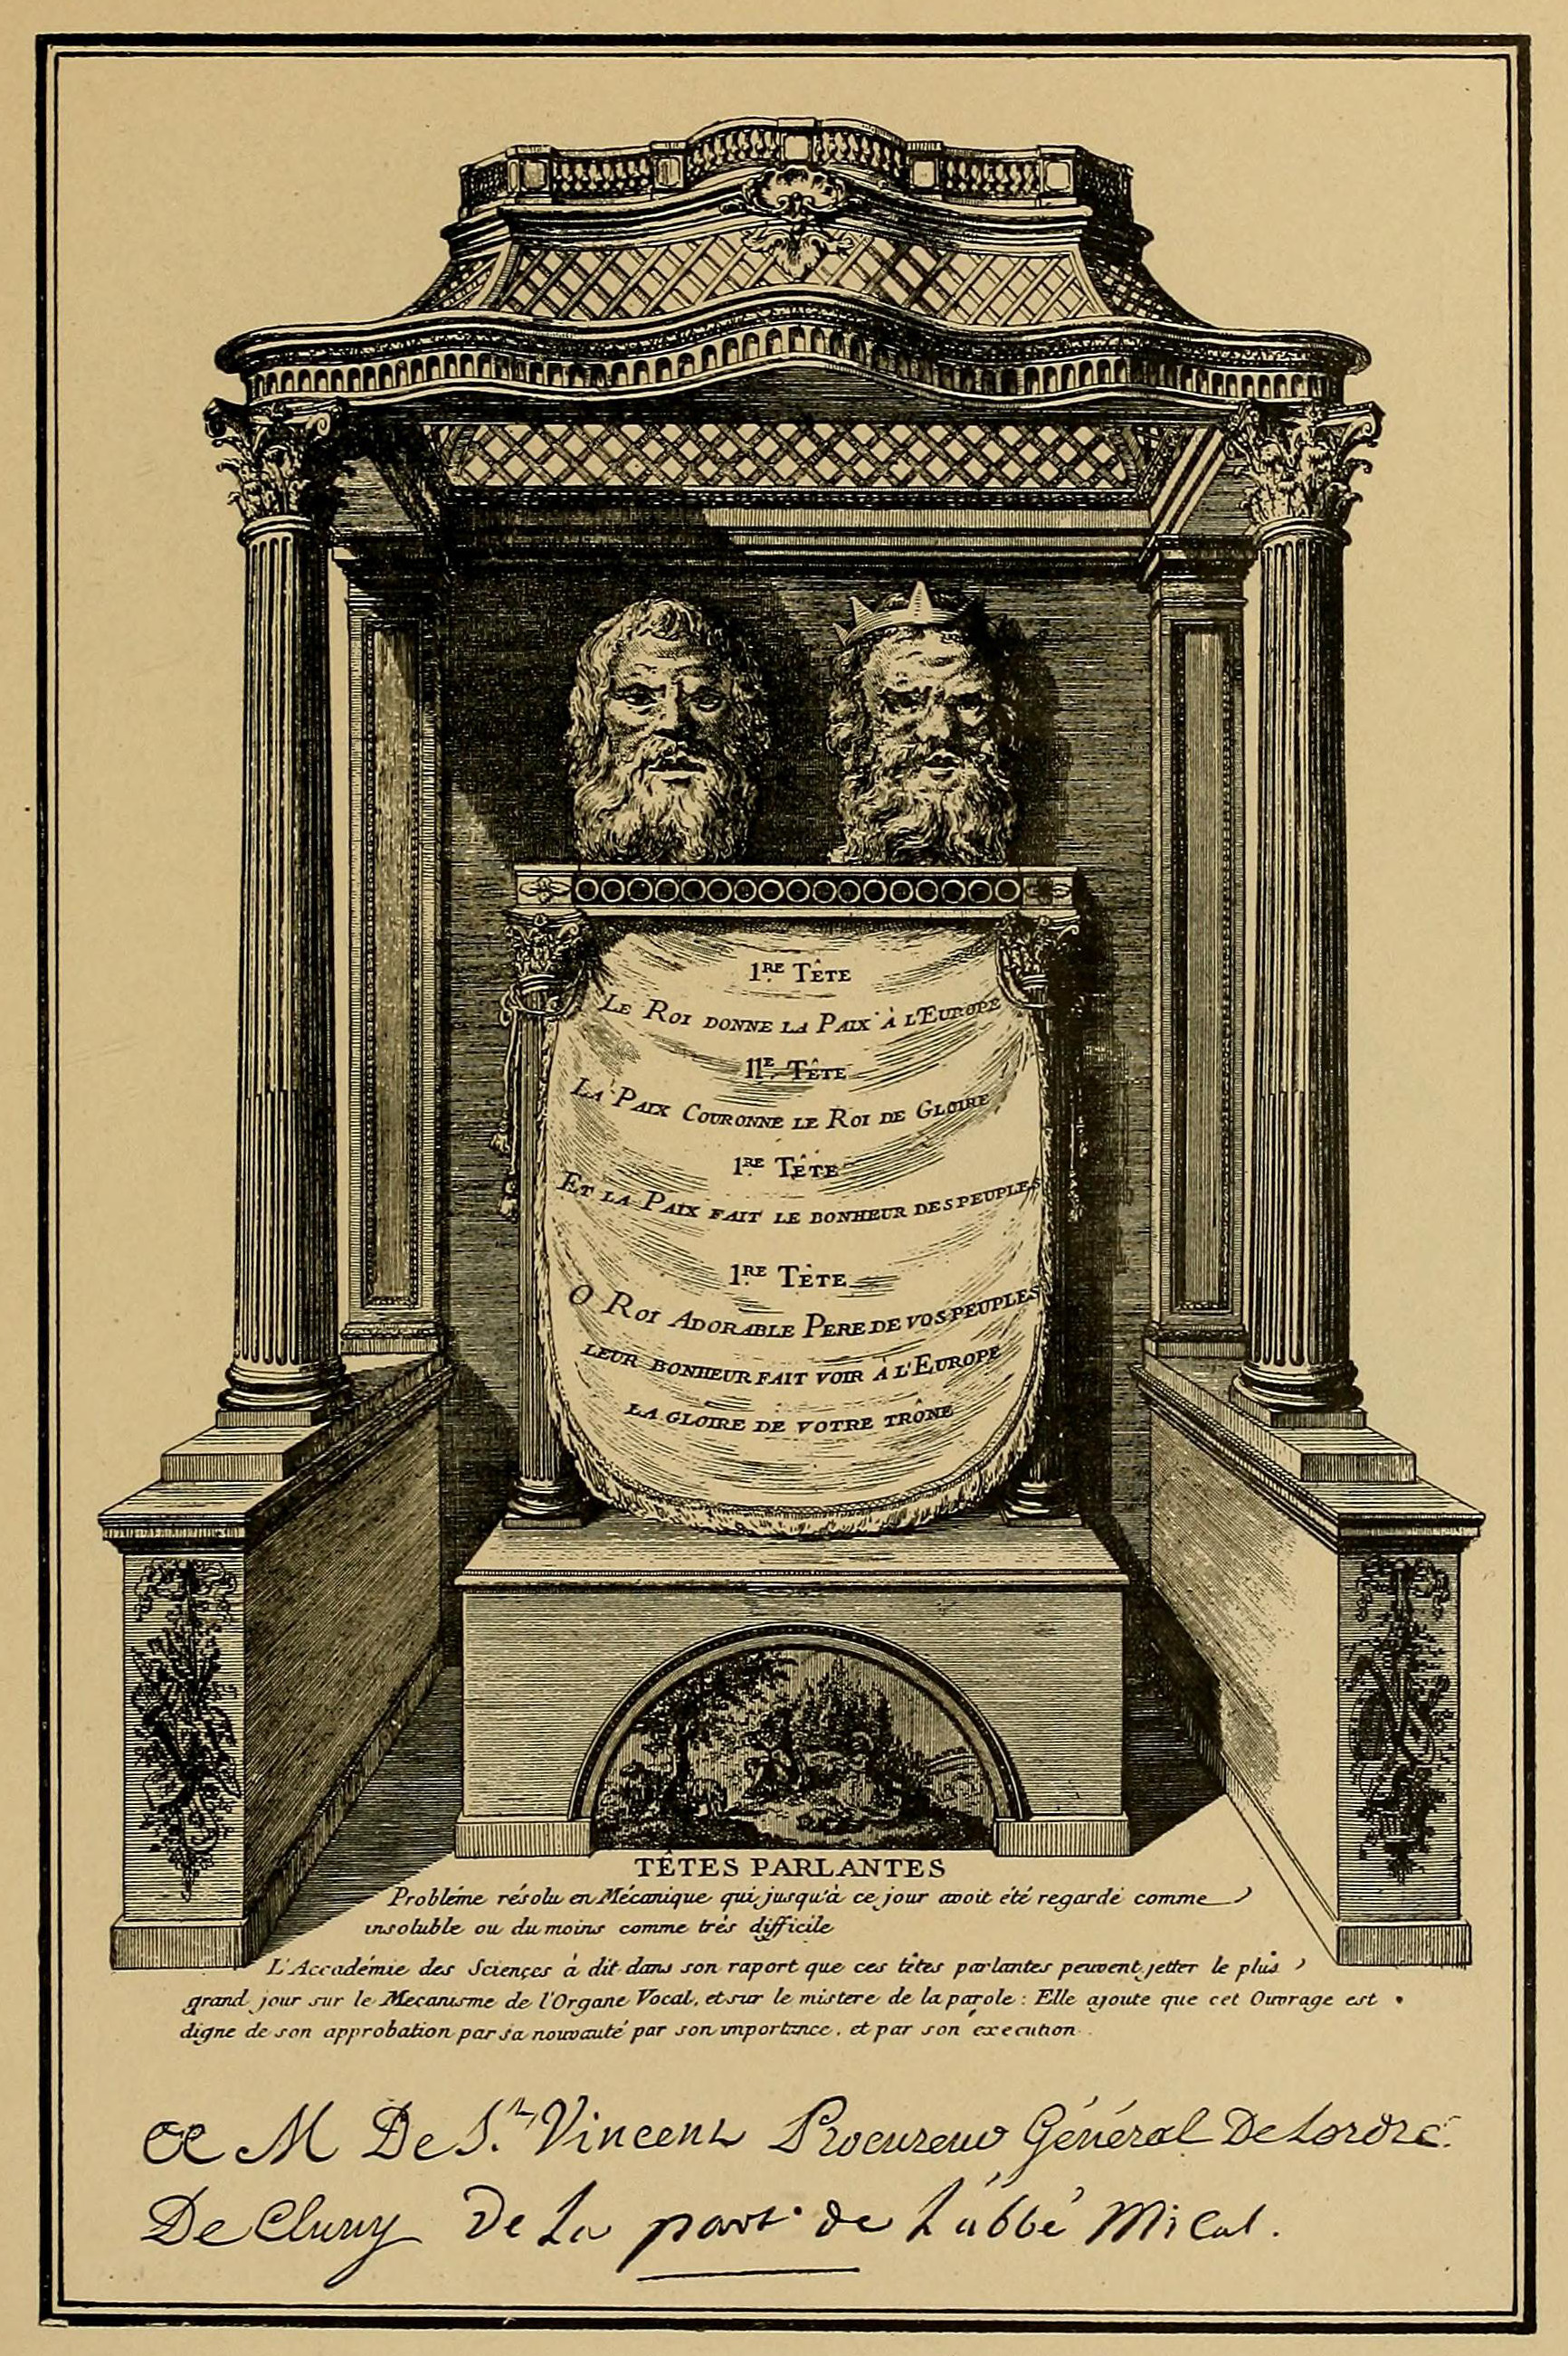
prospectus de l’exposition : Wikipedia
La première tête prononçait la phrase “Le Roi a donné la paix à l’Europe“, la deuxième tête répondait “La paix fait le bonheur des peuples“.
Dans les procès-verbaux de l’Académie Royale des Sciences du 2 juillet 1783 il est noté que, suite à une demande de l’abbé Mical d’examiner ses têtes parlantes, MM. Le Roy, de Lalande, de Milly, Laplace, Lavoisier, Ferrein et Vicq-d’Azier ont été nommés commissaires pour procéder à cette tâche.
Extrait du procès-verbal de la séance du 2 juillet 1783 de l’Académie Royale des Sciences (Bibliothèque Nationale de France)
Quelques-uns étaient franc-maçons appartenant au même Loge des Neufs Soeurs que Mical lui-même.
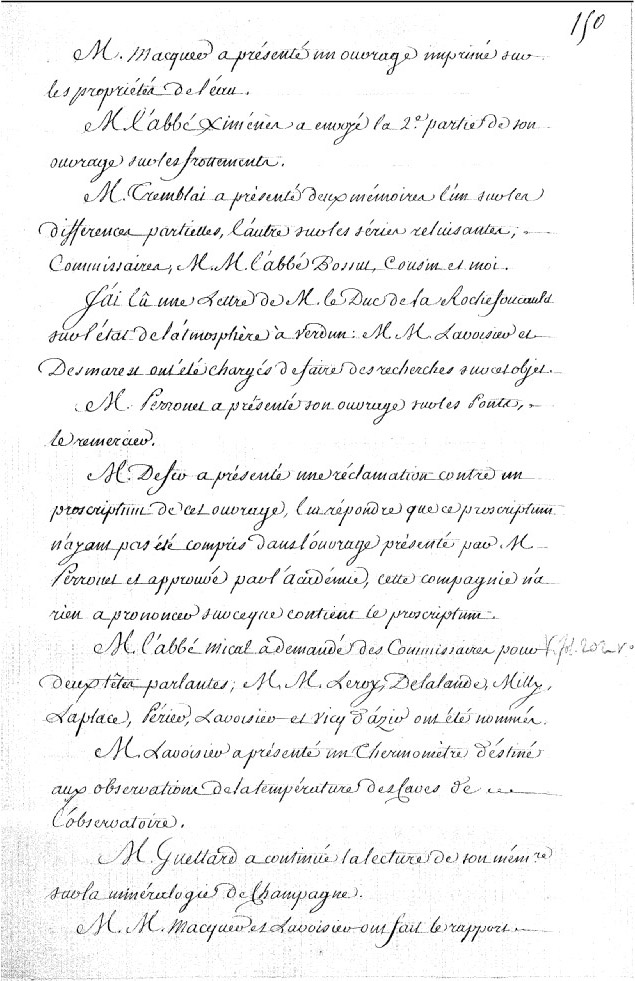
Les commissaires ont rendu compte de leur expertise dans la séance du 3 septembre 1783 de l’Académie Royale des Sciences.
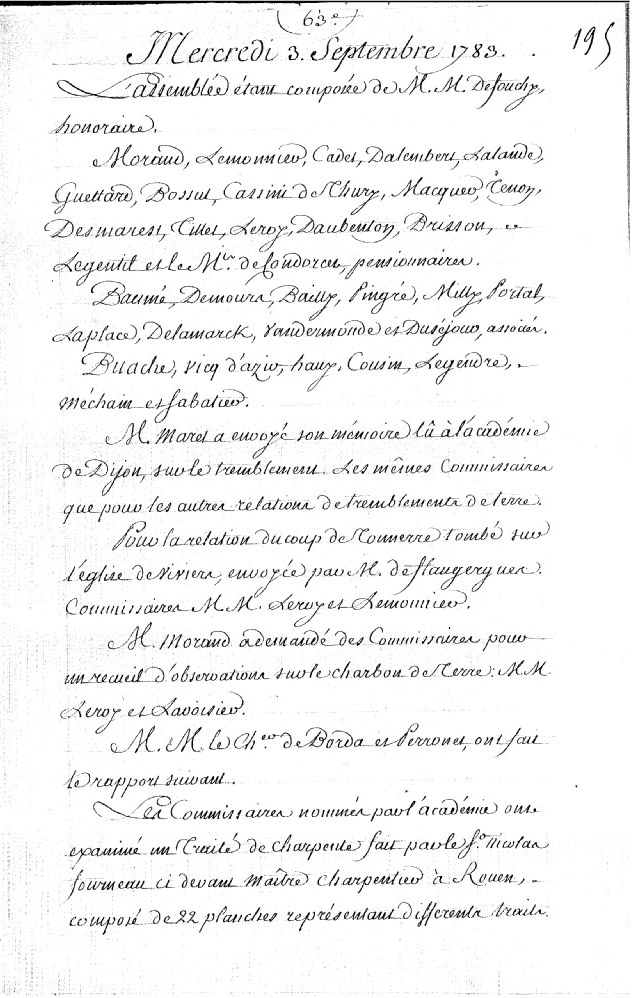
Première page du procès-verbal de la séance du 3 septembre 1783 de l’Académie Royale des Sciences (Bibliothèque Nationale de France)
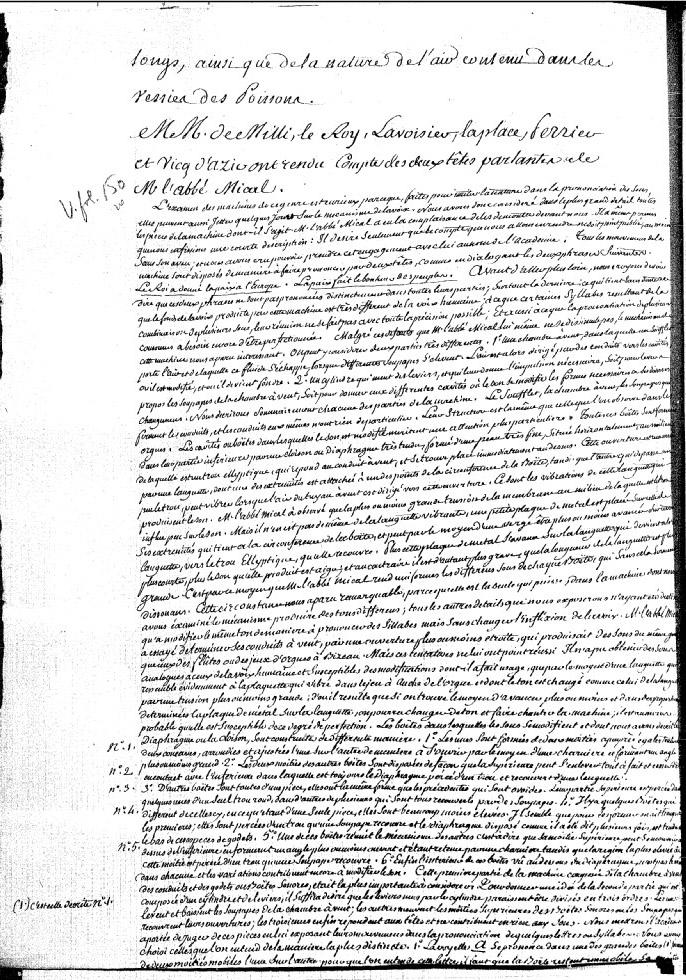
Compte rendu des commissaires de l’Académie Royale des Sciences en charge de l’examen des têtes parlantes de l’abbé Mical (Bibliothèque Nationale de France)
Dans ce rapport (voir mon texte converti), dont l’original est disponible en ligne à la Bibliothèque Nationale de France, les commissaires disent d’emblée que les phrases ne sont pas prononcées distinctement dans toutes leurs parties, que la réunion des syllabes ne se fait pas avec toute la précision possible et que plusieurs consonnes ont besoin d’être perfectionnés. Ils concluent que malgré ces défauts, le mécanisme de la machine leur a paru intéressant.
Le procès-verbal décrit la composition de la machine parlante. Une chambre à vent avec un soufflet, un cylindre qui actionne des leviers, un ensemble de différentes boîtes avec des conduits sonores, cavités et soupapes, des structures semblables à celles qu’on observe dans les orgues, des diaphragmes formés d’une peau très fine, des languettes vibrantes et des plaquettes de métal qui se déplacent.
Le premier quotidien français, le Journal de Paris, a rapporté plusieurs fois sur le projet de l’abbé Mical sous les rubriques “Arts” ou “Mécanique”. Le 1er mai 1778 le journal s’empressait à annoncer au Public un spectacle étonnant d’une tête en airain qui parle. Il était précisé que la modestie de l’auteur de l’ouvrage cache son nom. Le 6 juillet 1783 le journal rapportait que M. l’abbé M*** avait demandé à l’Académie Royale des Sciences de désigner des commissaires pour examiner son chef-d’oeuvre. Le 17 juillet 1783 une lettre anonyme, adressée aux auteurs du journal, était publiée au sujet des têtes parlantes. Le contenu et le style de cette lettre font penser que l’auteur était Antoine de Rivarol, un essayiste et pamphlétaire royaliste français. Il écrivait la même année sa lettre à M. le Président de *** Sur le Globe aérostatique, sur les Têtes parlantes, et sur l’état présent de l’opinion publique à Paris (pages 207 – 246). Le 1er avril 1784, le journal annonçait la présentation prochaine des têtes parlantes dans le cabinet de l’auteur, situé dans la rue de Marivaux, toujours sans mentionner son nom. Ce n’est que le 11 avril 1784 que le nom Mical est communiqué dans le journal de Paris qui signale qu’à partir du lendemain le public pourra visiter, au prix de 3 liv., les têtes parlantes lors de deux séances par jour (à midi et à 5 heures). Le 22 mai 1784 (page 625) une contribution signée Le Comte de *** au sujet des réactions du public lors des présentations des têtes parlantes a été publiée dans le journal (voir première page ci-après).
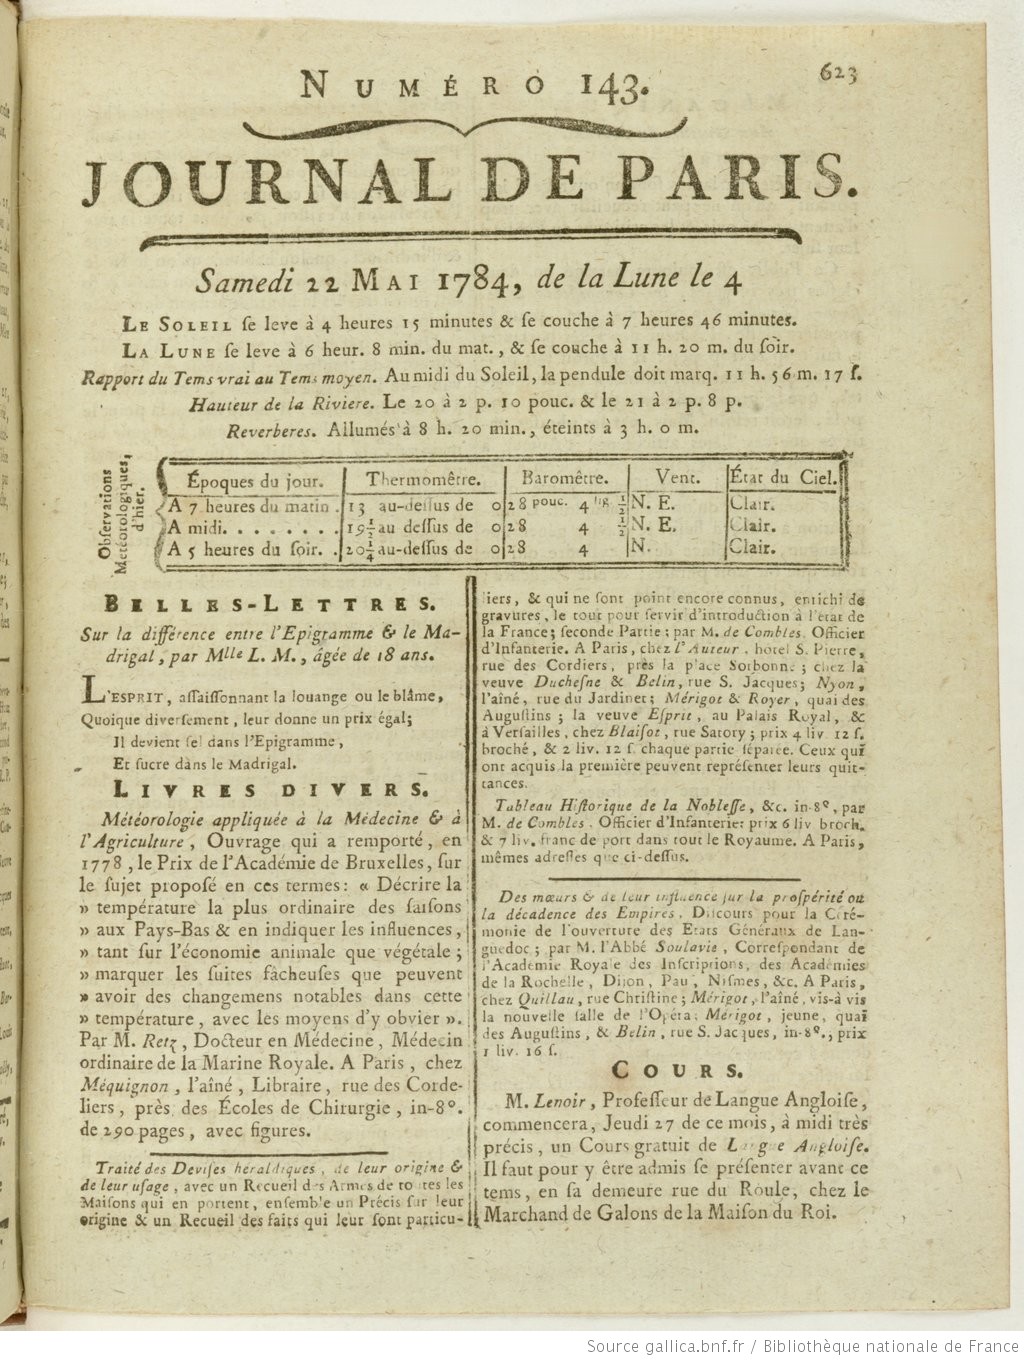
Journal de Paris No 143 – 22 mai 1784 (Bibliothèque Nationale de France)
On ne connaît pas grand-chose sur la biographie de l’abbé Mical, même pas son prénom. Une source non vérifiée rapporte qu’il avait abandonné sa carrière à la Cathédrale de St. Maurice à Vienne pour aller à Paris, qu’il était poursuivi en justice à cause de ses dettes (notamment par le sculpteur qui avait fabriqué les têtes) et que, accablé par des problèmes, il est arrivé à l’échec final de son projet vers 1787, deux ans avant le début de la révolution française.
Si on compare la construction de l’abbé Mical à celles des savants Gottlieb Kratzenstein (voir 6.1.2) qui ont réalisé des machines mécaniques de synthèse vocale à la même période (1780), il faut se demander pourquoi la technologie plus avancée du premier est restée une curiosité jusqu’à nos jours, tandis que les constructions des deux autres sont considérées comme des innovations qui ont contribué à faire avancer la science.
Une des raisons est certes la mauvaise réputation des têtes parlantes à l’époque qu’on associait d’emblée à des tricheries. Une autre raison est peut-être la personnalité modeste de l’abbé Mical et sa façon de présenter son innovation. Mais je pense que la raison principale de l’échec de l’abbé Mical est le fait qu’il était au mauvais endroit à la mauvaise date.
4. Appareil phonatoire humain
Le schéma ci-dessous présente la structure générale du système vocal humain :
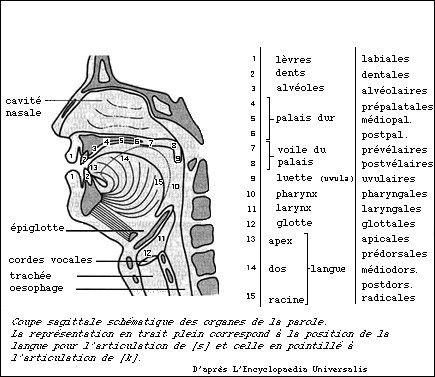
appareil vocal humain
Les poumons servent de soufflerie et font vibrer les cordes vocales. Cette vibration entraîne la création d’une onde sonore. Celle-ci va résonner dans un ensemble de cavités souples (pharyngienne et buccale). Les différents phonèmes sont produits en modifiant la géométrie des cavités.
On distingue les sons voisés (voyelles) et les sons non voisés (consonnes). La source des voyelles est la vibration périodique des cordes vocales en réponse au flux d’air dans les poumons. La source sonore des consonnes est une vibration apériodique causée par des flux turbulents dus à une constriction dans le conduit vocal. Dans les deux cas les phonèmes sont modulés par le même filtre, composé par les cavités pharyngiennes et buccales.
Les voyelles sont les composantes essentielles de l’intelligibilité du langage. Les différentes voyelles sont caractérisées par les fréquences des trois premiers formants qui se réfèrent à des pics dans le spectre harmonique du son.
L’ouverture de la mâchoire, qui resserre la cavité buccale du côté de la glotte et la dilate du côté des lèvres, est le facteur décisif de réglage du premier formant. Le second formant correspond à la forme du corps de la langue. Le troisième formant, plus sensible, se détermine soit par la position de la pointe de la langue, soit par l’intervention de la cavité nasale.
L’esquisse qui suit montre un schéma très simplifié pour la simulation de l’appareil vocal humain. Un générateur d’impulsions produit des impulsions périodiques pour créer des voyelles, un générateur de bruit produit les signaux pour créer des consonnes. Les impulsions et les signaux sont amplifiés et formés par un filtre.
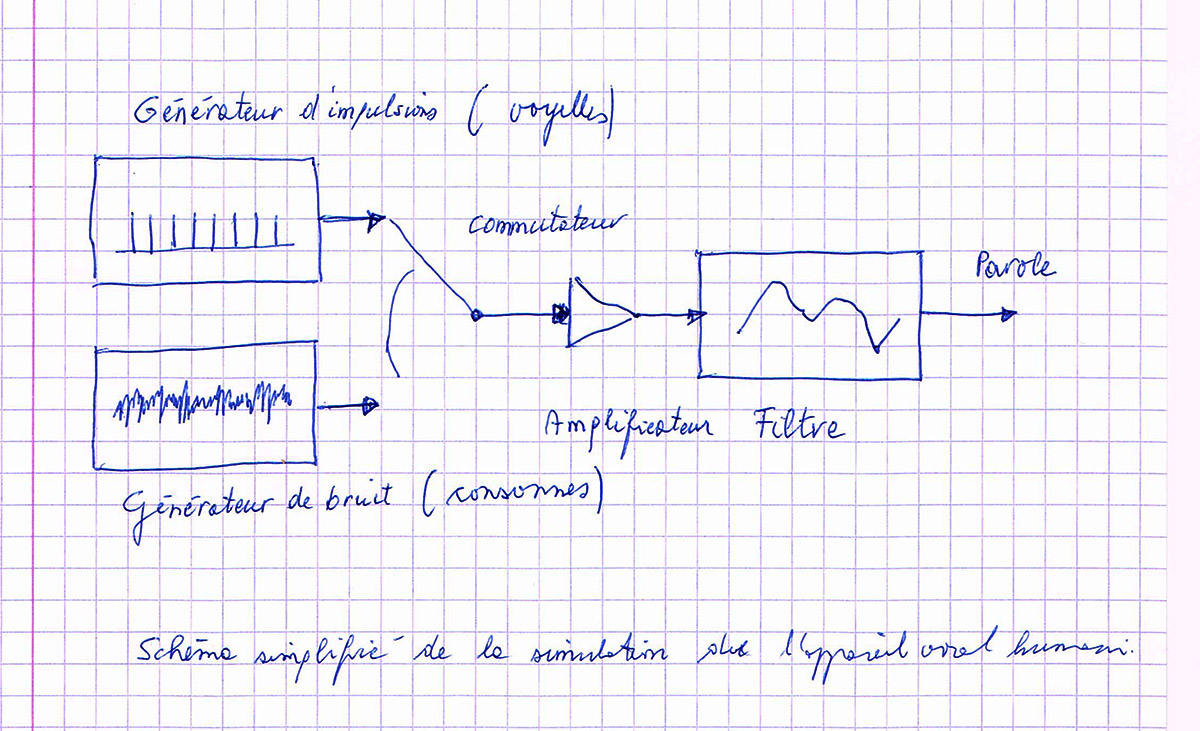
schéma simplifié pour simuler l’appareil vocal humain
Les sons de la parole qui sont les plus faciles à produire sont les consonnes bilabiales comme m, p et b et la voyelle ouverte a. Les premiers sons babillés par les bébés sont ma-ma, pa-pa respectivement ba-ba. Comme les parents tendent à associer les premiers mots de leurs enfants à eux-mêmes, les termes mama et papa ou baba désignent la mère, respectivement le père, dans presque toutes les langues du monde entier. On parle de cognats.
5. La voix humaine de l’orgue
On peut faire un parallèle entre la production de la parole et la pratique d’un instrument de musique à vent. Dans un tel instrument le son est produit grâce aux vibrations d’une colonne d’air provoquées par le souffle d’un instrumentiste (flûte, trompette, …), d’une soufflerie mécanique (orgue, accordéon) ou d’une poche d’air (cornemuse). La comparaison la plus pertinente peut se faire avec l’orgue. C’est un instrument qui produit les sons à l’aide d’ensembles de tuyaux sonores, accordés suivant une gamme définie et alimentés par une soufflerie. L’orgue se joue avec une console qui peut comporter jusqu’à sept claviers et avec un pédalier. Moyennant des registres qui actionnent un mécanisme propre à l’orgue on peut appeler un jeu qui change son timbre. Le nombre de registres peut varier de 1 à 400. Les tuyaux sonores se répartissent en deux grandes catégories: les jeux à bouche et les jeux d’anche. L’anche est une languette métallique qui vibre à la base du tuyau et dont les caractéristiques physiques conditionnent le son émis. Un grand orgue comprend des centaines de tuyaux allant de 10,4 mètres de haut jusqu’au plus petit de 1 cm. Les tuyaux sont groupés par famille en fonction des jeux sélectionnés.
La figure ci-après montre le schéma d’un tuyau d’orgue à anche :
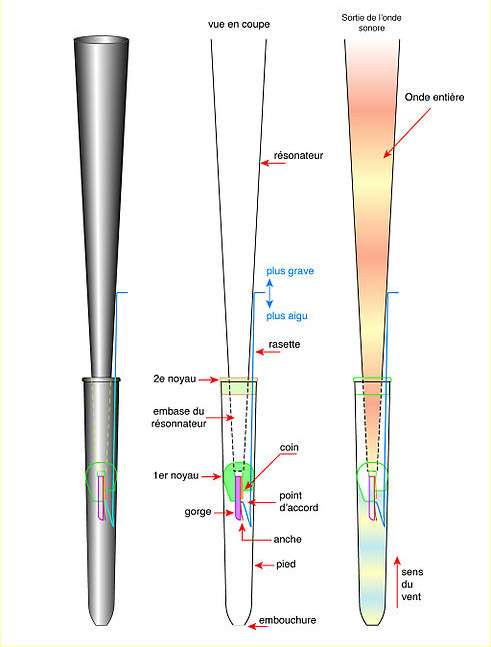
image de Wikipedia
Une soufflerie envoie un flux d’air sur une anche, placé au bas du tube. Sous l’action du flux d’air, l’anche (vibreur) est mise en vibration et génère ainsi une onde périodique qui se propage alors dans le tube (résonateur) générant un son. La fréquence du son dépend du diamètre et de la longueur du tuyau.
Avec les poumons comme soufflerie, les cordes vocales comme vibreur et les cavités buccale et pharyngienne déformables, l’appareil de production de la parole fonctionne donc selon un schéma proche de l’orgue.
Il y a un jeu d’orgue particulier appelé “vox humana” qui évoquait l’impression d’une chorale ou d’un soliste humain au Moyen Âge. Nous allons voir que cette voix humaine de l’orgue a joué un certain rôle dans la réalisation des premiers appareils de synthèse vocale mécanique.
6. Histoire de la synthèse vocale
Nous avons lu dans l’introduction que la synthèse vocale est aujourd’hui une science informatique, mais qu’elle était précédée par des techniques mécaniques, électriques et électroniques. Jusqu’à la fin du 19e siècle la synthèse vocale était basée uniquement sur des constructions mécaniques.
Suite à l’introduction du téléphone en 1876, les synthétiseurs vocaux ont évolué vers des équipements électromécaniques, pour devenir purement électriques dès la fin des années 1930, et des équipements électroniques 40 années plus tard. Pour manipuler les synthétiseurs mécaniques et électriques il fallait être un expert qui maîtrisait la génération de sons. Les synthétiseurs vocaux électroniques et informatiques disposaient d’une interface permettant d’entrer du texte et de le convertir en parole. On commençait à parler de synthèse de la parole et de TTS (Text to Speech). L’utilisation de ces équipements était à la portée de tout le monde, tandis que les développeurs de ces machines devaient avoir des connaissances approfondies en linguistique, phonologie, phonétique et sémantique.
À partir des années 1980 les scientifiques qui faisaient des recherches dans le domaine de la synthèse vocale, respectivement de la synthèse de la parole, se sont focalisés uniquement sur l’informatique. Depuis quelques années c’est l’intelligence artificielle qui domine le domaine. L’apprentissage approfondi permet aux ordinateurs d’apprendre à parler de la même manière que les petits enfants, sans se soucier de grammaire, d’orthographe ou de syntaxe.
Le revers de la médaille est qu’il faut des centaines, voire des milliers d’heures d’enregistrements audio, avec le texte annoté, pour faire de l’apprentissage approfondi, ce qui pose un problème pour les langues rares comme le luxembourgeois. À l’heure actuelle il faut donc se contenter de synthétiseurs de la parole luxembourgeoise qui utilisent les méthodes informatiques classiques, basées sur des phonèmes, règles et dictionnaires.
6.1. Synthétiseurs vocaux mécaniques
La thèse de doctorat rédigée en 2015 par Fabian Brackhane à l’université de la Sarre avec le titre Kann was natürlicher, als Vox humana, klingen ? Ein Beitrag zur Geschichte der mechanischen Sprachsynthese constitue une source exceptionnelle et précieuse sur les travaux de synthèse vocale réalisés après la fin du Moyen Âge.
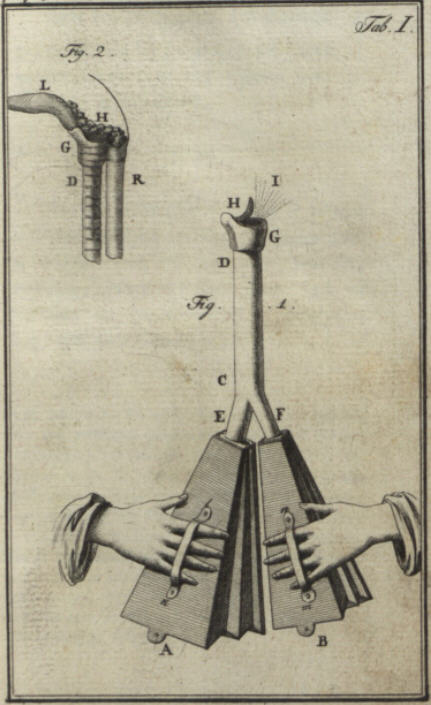
6.1.1. Christian Gottlieb Kratzenstein (1723 – 1795)
La première machine de synthèse vocale mécanique connue à ce jour a été construite par le scientifique allemand Christian Gottlieb Kratzenstein. Né le 30 janvier 1723 à Wernigerode, il obtenait à l’âge de 23 ans des doctorats en médecine et physique à l’université de Halle pour ses thèses Theoria fluxus diabetici et Theoria electricitatis mores geometrica explicata concernant la nature de l’électricité. Deux ans plus tard, il a été appelé à l’Académie des Sciences à Saint-Pétersbourg. En 1753, il est engagé comme professeur de physique expérimentale à l’université de Copenhague où il fût nommé recteur quatre fois de suite.
Gottlieb Kratzenstein était un proche (certains disent un protégé) du mathématicien renommé suisse Leonhard Euler qui exerçait également à l’Académie des Sciences à Saint-Pétersbourg. Dans sa correspondance (conservée aux archives de l’université de Bâle) avec le mathématicien Johann Heinrich Lambert, Leonhard Euler exprimait dès 1758 ses réflexions sur la nature des voyelles a, e, i, o, u et proposait la construction d’une machine parlante pour mieux comprendre l’organisme du langage humain. Sur initiative de Leonhard Euler, l’Académie des Sciences à Saint-Pétersbourg organisait en 1778 une compétition pour réaliser un appareil de synthèse des voyelles de la voix humaine.
Après son départ à Copenhague, Gottlieb Kratzenstein avait gardé de bonnes relations avec ses pairs à l’académie et il était très intéressé à cette compétition. En se basant sur les études afférentes de Leonhard Euler, il a parfait sa machine parlante construite dès 1773, en utilisant des tubes et des tuyaux organiques pour créer des cordes vocales artificielles. Il s’est surtout inspiré du jeu vox humana de l’orgue.
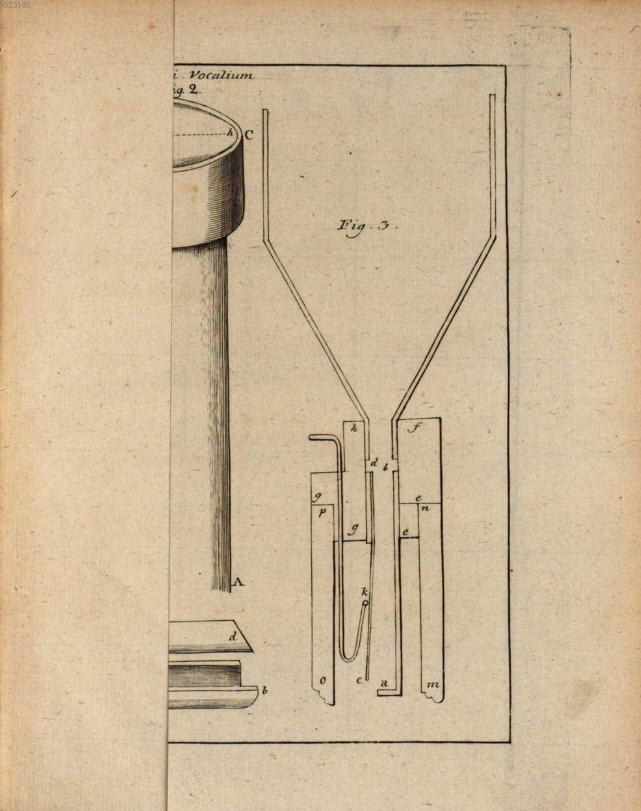
Tentamen Resolvendi Problema – fig 3 (Bayrische Staatsbibliothek)
En 1780, il a gagné le premier prix de la compétition avec son projet d’un orgue vocal. Une année plus tard il a publié une description en latin du projet : Tentamen Resolvendi Problema. Une version traduite en allemand de cette oeuvre a été publiée en 2016.
Tentamen Resolvendi Problema (Bayrische Staatsbibliothek)
Gottlieb Kratzenstein n’a pas seulement fourni une contribution appréciée pour la synthèse vocale, mais il a également fait avancer la science dans les domaines de la chimie, de la navigation, de l’astronomie, de la neurologie et de l’électricité. En 1743 il avait même rédigé une oeuvre philosophique Beweis, dass die Seele ihren Körper baue. Dans la suite il publiait Abhandlung von dem Nutzen der Electricität in der Arzeneiwissenschaft concernant l’électrothérapie.
Gottlieb Kratzenstein était marié et il avait quatre enfants. Il est décédé en 1795. Un de ses petits-fils est Christian Gottlieb Stub, un peintre danois renommé qui porte les prénoms de son grand-père et qui a ajouté dans la suite également le nom de famille Kratzenstein à son nom. Né en 1783, il est décédé en 1816 à l’âge de 33 ans.
Dans ce contexte il convient de mentionner également l’échange de lettres entre Gottlieb Kratzenstein et l’astronome renommé Johann III Bernouilli après la mort de l’épouse du premier. Susan Splinter a rédigé une contribution Ein Physiker auf Brautschau à ce sujet.
6.1.2. Johann Wolfgang von Kempelen (1734 – 1804)
Si on s’intéresse pour l’histoire de la synthèse vocale on pense d’abord à Johann Wolfgang von Kempelen. Né le 23 janvier 1734 à Presbourg (aujourd’hui Bratislava) et décédé le 26 mars 1804 à Vienne, Wolfgang von Kempelen (Farkas Kempelen en hongrois) était ingénieur et conseiller aulique à la Cour impériale de Vienne. Il est surtout connu sous le nom de Baron von Kempelen pour l’invention du Turc mécanique en 1769, un automate célèbre qui avait l’apparence d’un Turc et actionnait les pièces d’un jeu d’échecs.
Wolfgang von Kempelen a commencé au début des années 1770 à construire une machine parlante, c.à.d. à la même époque où Gottlieb Kratzenstein commencait à s’intéresser pour la synthèse vocale à Copenhague.
Wolfgang von Kempelen fabriquait plusieurs prototypes qui menaient à des échecs. Pour la première version il utilisait un soufflet de cuisine, une anche (roseau) de cornemuse et une cloche de clarinette.
Livre de von Kempelen, page 76 (digitalcommons.ohsu.edu)
Pour la seconde version il utilisait une console d’orgue avec un clavier où les différentes touches étaient associés à des lettres. Les sons étaient produits avec des tubes de différentes formes et longueurs. Le problème était toutefois le chevauchement (co-articulation) des différents sons qui empêchait la génération de syllabes.
Livre de von Kempelen, page 400 (digitalcommons.ohsu.edu)
Wolfgang von Kempelen concluait qu’il fallait mieux comprendre le fonctionnement de l’appareil phonatoire humain pour progresser. Ce n’est qu’au début des années 1780 que son modèle réalisé lui donnait satisfaction et qu’il le présentait au public. Contrairement à la machine de Gottlieb Kratzenstein, la construction de Wolfgang von Kempelen était la première à produire, non seulement certaines voyelles, mais surtout des mots entiers et des courtes phrases.
En 1791 Wolfgang von Kempelen a publié un livre Mechanismus der menschlichen Sprache nebst der Beschreibung seiner sprechenden Maschine pour expliquer aux personnes intéressées les principes de sa machine. Le livre comprenait 456 pages. L’objectif de cet ouvrage n’était pas seulement d’élucider le mystère de l’étonnant appareil, mais aussi d’inciter le lecteur à le perfectionner de sorte qu’on puisse enfin en obtenir ce pour quoi il fut imaginé. On peut considérer la description de Wolfgang von Kempelen comme un premier projet “open-source”.
Livre de von Kempelen, page 400 (digitalcommons.ohsu.edu)
L’auteur formule dans son livre quelques hypothèses essentielles sur la production de la parole humaine. Il proposait une conception de la langue qui n’était plus envisagée comme souffle de l’âme, mais tout simplement comme de l’air s’échappant à travers des fentes de formes variables. En s’observant lui-même, Wolfgang von Kempelen décrivait également les différents sons et les positions que devaient prendre les organes phonateurs pour les produire.
Le musée des sciences et de la technique à Munich (Deutsches Museum), créé en 1903, expose dans un coin du département des instruments de musique une machine parlante désignée comme celle construite par Wolfgang von Kempelen. Elle a été offerte au musée en 1906 par l’Académie de la Musique à Vienne. Suite à ses recherches, Fabian Brackhane conteste qu’il s’agit de l’original de Wolfgang von Kempelen. Il estime plutôt qu’il s’agit d’une réplique construite par Charles Wheatstone (voir 6.1.4).
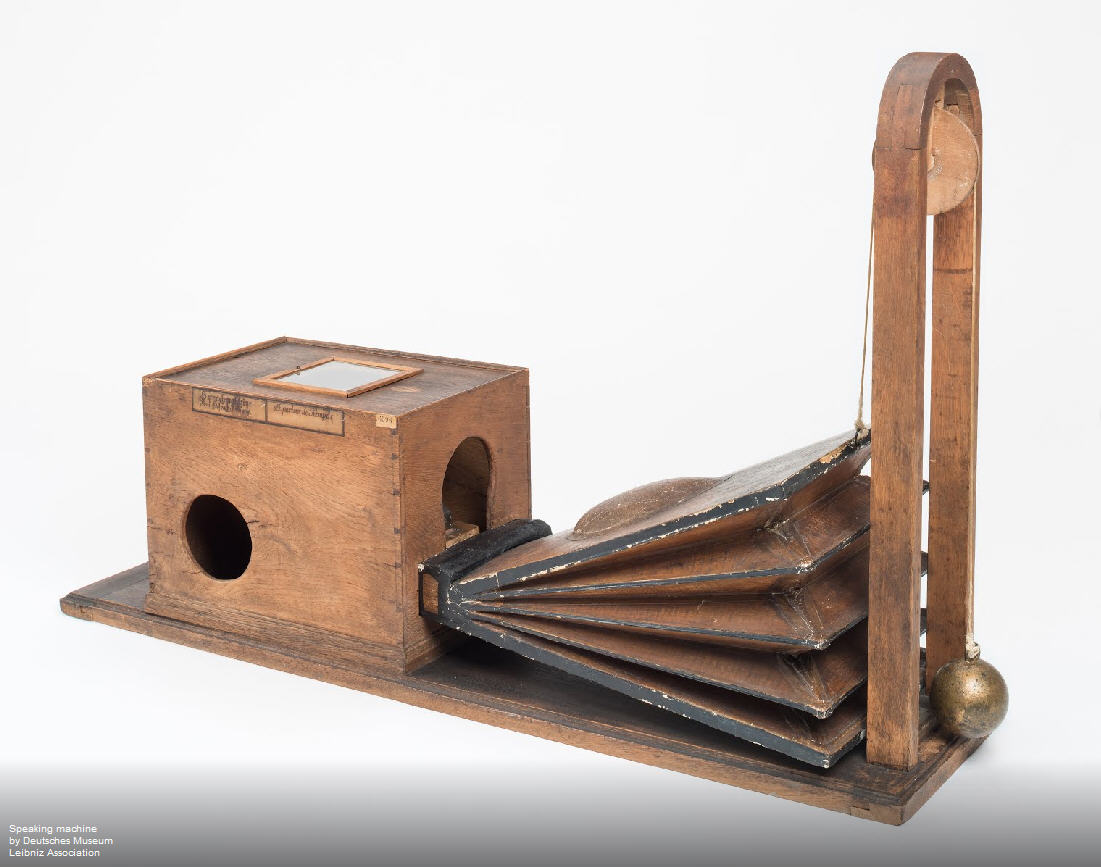
Deutsches Museum : exposition 8 objets, 8 musées (Leibniz Association)
Il s’agit d’une construction composée d’un caisson en bois, d’un entonnoir en caoutchouc qui faisait office de bouche et d’un second, plus petit, divisé en deux, qui remplissait les fonctions d’un nez. Le mécanisme interne était un soufflet qui simulait les poumons. Le flux d’air était conduit dans la “bouche” par l’intermédiaire d’un couloir très étroit. Une hanche vibrante, sorte de glotte et de cordes vocales réunies, produisait un son. Celui-ci était ensuite modulable par différents petits leviers et l’utilisation des doigts de l’opérateur pour modifier l’air à la sortie de la “bouche” afin de simuler le mouvement des lèvres.
Grâce au livre de Wolfgang von Kempelen, plusieurs chercheurs ont réussi à construire une réplique de sa machine parlante. Un exemple a été créé au département des sciences et technologies du langage à l’université de la Sarre.
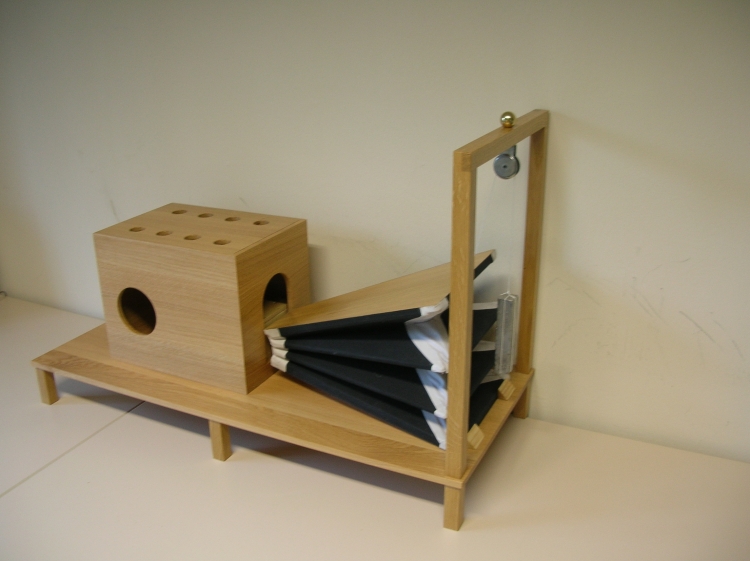
Réplique de la machine parlante de von Kempelen à l’université de la Sarre : Wikipedia
Le lecteur intéressé trouve dans la bibliographie quelques liens vers des vidéos qui montrent la manipulation de la machine parlante du Baron von Kempelen.
L’association allemande Leibniz a organisé du 7 novembre 2016 au 30 juin 2017 une exposition simultanée des musées de recherche Leibniz, intitulée 8 Objekte, 8 Museen. Le musée des sciences et de la technique à Munich y a présenté sa machine parlante de von Kempelen. Cette exposition virtuelle peut encore être visitée sur la plate-forme Arts & Culture de Google qui était partenaire de l’exposition.
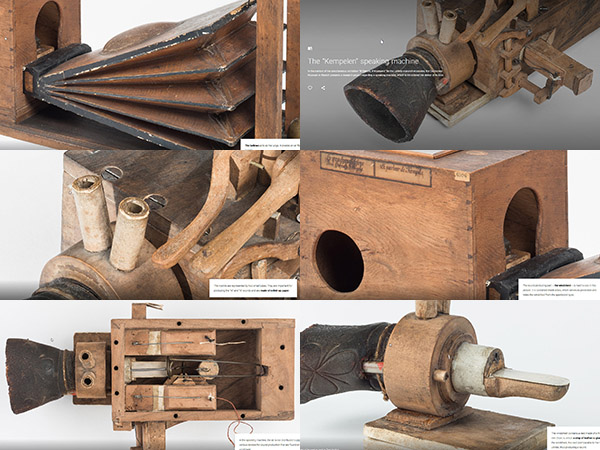
Extraits de l’exposition virtuelle 8 Objekte, 8 Museen sur Google Arts & Culture
6.1.3. Robert Willis (1800 – 1875)
Né en 1800, Robert Willis était un académicien anglais, renommé comme ingénieur en mécanique et pour ses publications au sujet de l’architecture. Il a été ordonné prêtre en 1827. Le révérend Willis a publié deux contributions très appréciées sur la mécanique de la parole humaine dans le journal Transactions of the Cambridge Philosophical Society : On vowel sounds, and on reed-organ pipes en 1828 et On the Mechanism of the Larynx en 1829.
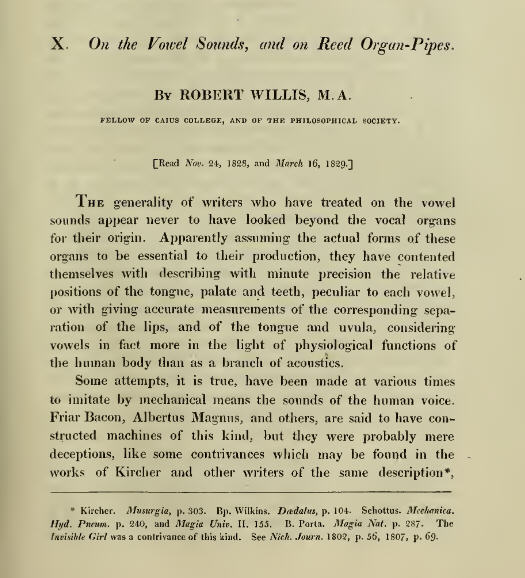
Transactions of the Cambridge Philosophical Society, 1830, Vol III (digilib)
La contribution de Robert Willis a été traduite en allemand en 1832 dans le journal scientifique Annalen der Physik und Chemie.
Robert Willis a repris les travaux pratiques de Gottlieb Katzenstein et il a testé plusieurs variantes de résonateurs pour parfaire la génération des voyelles.
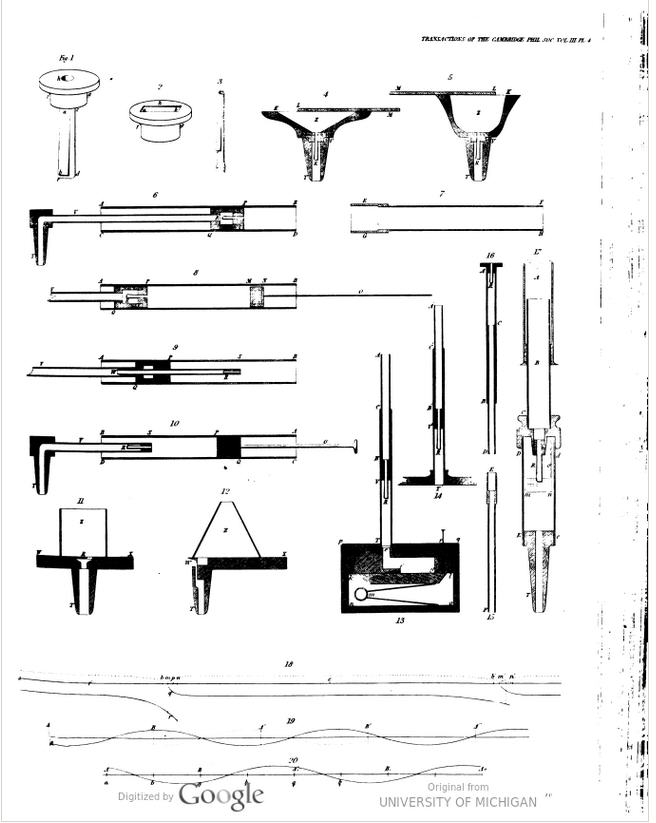
Transactions of the Cambridge Philosophical Society, 1830, Vol III (Hathi Trust Digital Library)
6.1.4. Charles Wheatstone (1802 – 1875)
Né en 1802, Charles Wheatstone est un physicien et inventeur anglais. On lui doit le premier télégraphe électrique au Royaume-Uni, le pont de Wheatstone, le stéréoscope, un microphone, et l’instrument de musique Concertina.
En 1835, Charles Wheatstone présentait une réplique de la machine parlante de Wolfgang von Kempelen. Il profitait des progrès technologiques réalisés dans les dernières décennies pour parfaire la construction. En 1837 il publiait un article au sujet des inventions de Gottlieb Kratzenstein et de Wolfgang von Kempelen ainsi que sur la contribution “On vowel sounds” de Robert Millis, dans le journal The London and Westminster Review.
The London and Westminster review, Vol 28, october 1837 (Hathi Trust Digital Library)
Deux années plus tôt, Charles Wheatstone avait déjà exposé ses études et présenté sa réplique d’une machine parlante à l’association britannique pour l’avancement des sciences lors de son assemblée à Dublin en août 1935.
Rapport de la réunion à Dublin en 1835 (Google Books, page 302)
En 1930 Richard Paget, un avocat anglais et amateur des sciences, publiait son livre Human Speech. C’est le dernier qui rapportait au sujet de la réplique de la machine parlante réalisé par Charles Wheatstone sur base de la description de Wolfgang von Kempelen. Dans son livre il a publié l’esquisse suivante de l’engin :
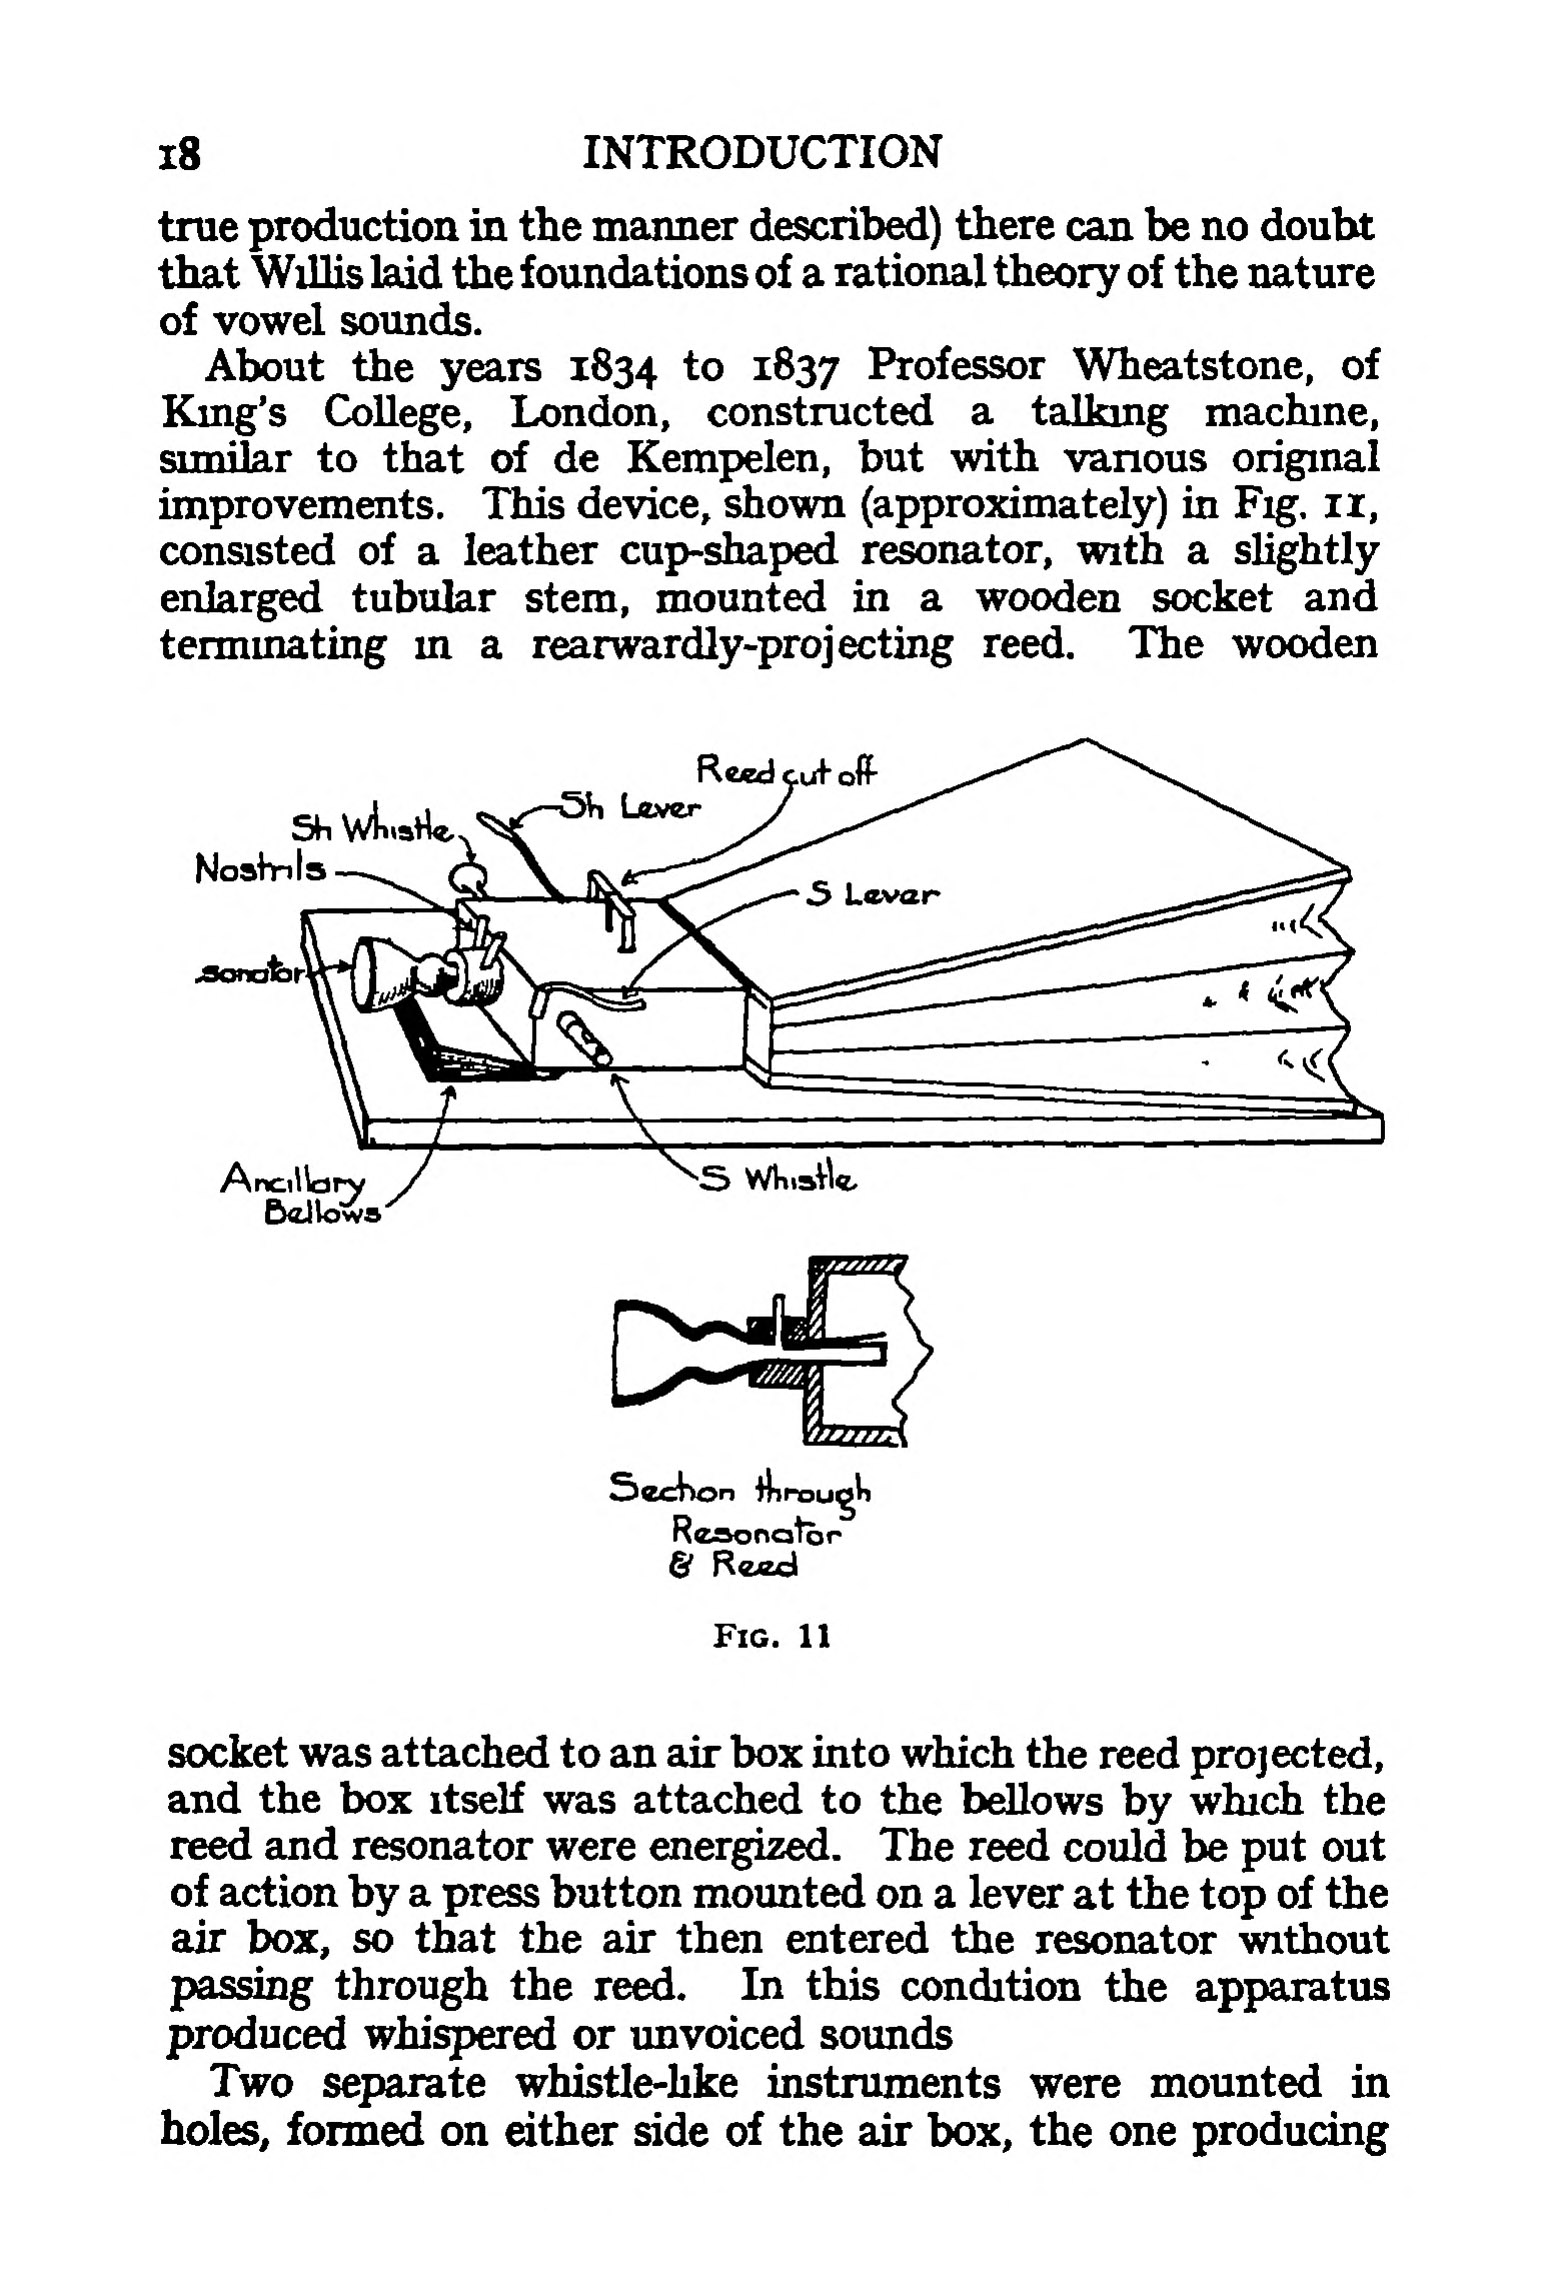
Livre Human Speech de Richard Page, 1930, page 18 (archive.org)
Fabian Brackhane a signalé dans sa dissertation Kann was natürlicher, als Vox humana, klingen ? de 2015 que la réplique de Charles Wheatstone se trouve aujourd’hui dans un dépôt du Musée des Sciences à Londres avec l’attribution Wheatstone’s arti ficial voice box. Il a même réussi à obtenir des photos de la construction qu’il a publiée dans sa dissertation (page 87).
Wheatstone’s artificial voice box (Fabian Brackhane)
Une recherche dans la collection des objets du musée avec le mot clé Wheatstone fournit 133 résultats, mais hélas sans mentionner la voice box.
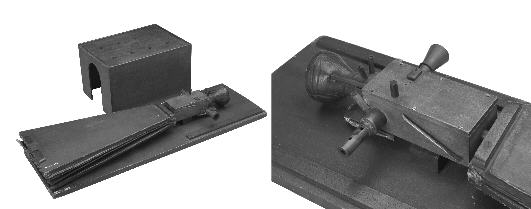
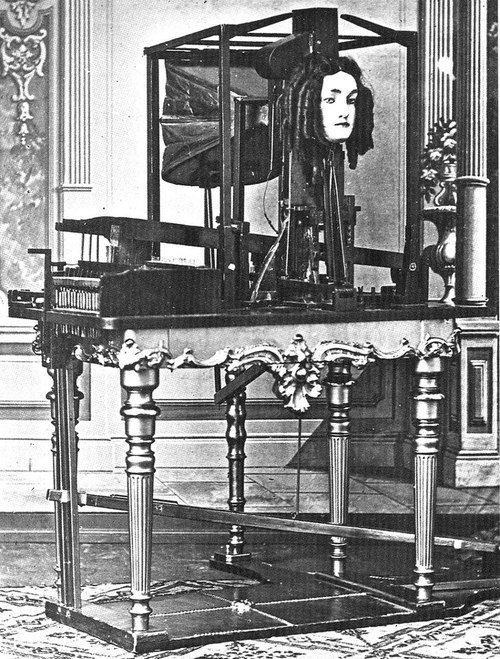
6.1.5. Joseph Faber (1800 – 1850)
Joseph Faber est né aux environs de 1796 à Fribourg-en-Brisgau. Il a fait des études de physique, mathématiques et musique à l’Institut polytechnique impériale et royale à Vienne. Pour se remettre d’une grave maladie, il est retourné à sa ville de naissance en 1820. Pendant sa reconvalescence, il s’est mis à construire pendant 17 ans une machine parlante améliorée sur base du livre de Wolfgang von Kempelen.
Une ancienne gravure, dont on ignore l’auteur et la date de création (éventuellement 1835), montre une jeune dame (probablement l’épouse de Joseph Faber) qui manipule le clavier à 16 touches de la machine parlante. La face de la tête est posée sur la table et on peut voir la bouche de la machine avec des lèvres et une langue.
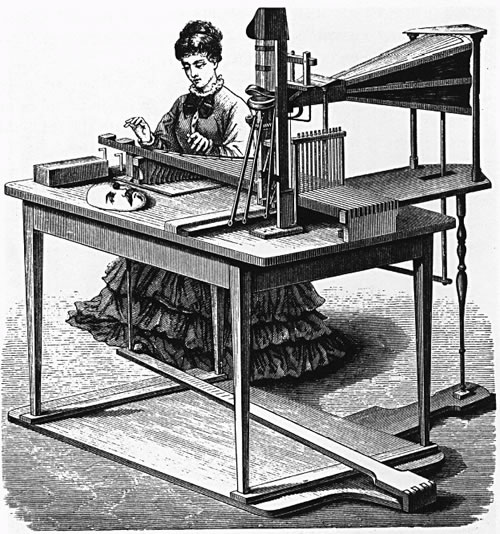
Gravure ancienne de la machine parlante Euphonia (domaine public)
En 1840, il a présenté son invention, qu’il appelait Euphonia, au public à Vienne et au Roi de Bavière en 1841. L’instituteur Schneider de Bauernwitz décrit en 1841 dans un journal pédagogique (Der katholische Jugendbildner) le fonctionnement de la machine qu’il a pu voir lors de sa visite à Vienne la même année. L’existence de cette machine a été signalée en janvier 1841 dans le même journal.
En 1842 il exposait la machine à Berlin et à Dresde, une année plus tard à Leipzig. Comme il ne rencontrait pas l’intérêt souhaité, il décidait de l’exposer aux États-Unis. En 1844 il la présentait à New York, une année plus tard à Philadelphia (Musical Fund Hall), sans succès. Ce fût Phineas Taylor Barnum, l’entrepreneur américain de spectacles (cirque Barnum) qui la rendit célèbre. Il amena Joseph Faber à Londres et présenta la machine à l’Egyptian Hall à partir de 1846.
Le périodique Illustrated London News du 8 août 1846 (page 16) rapportait sur cette nouvelle attraction exposée à Londres.
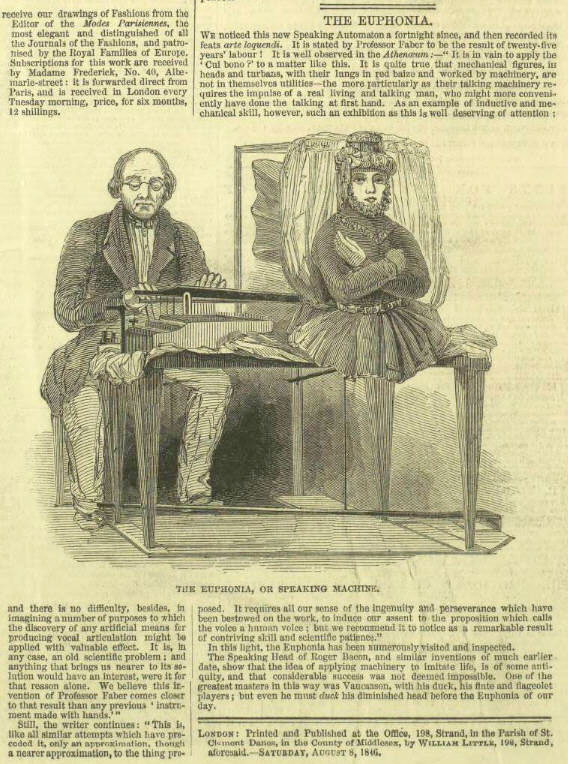
extrait de Illustrated London News, 8.8.1846, page 16 (The British News Paper Archive)
La face de la tête a été appliquée et le mécanisme de la machine a été caché par un rideau et un buste de poupée pour faire ressembler la machine à un vrai personnage.
Le journal satirique anglais Punch (The London Charivari) a publié dans son volume 11, 1846, page 83, une contribution Speaking Machine avec un dessin humoristique au sujet de la machine parlante Euphonia de Joseph Faber.
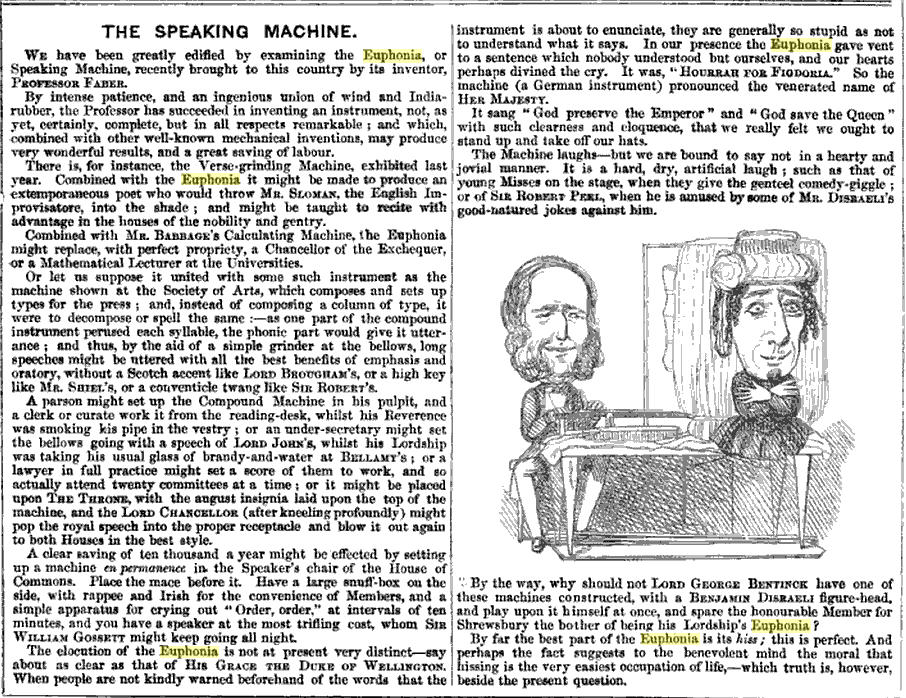
extrait du journal satirique anglais Punch Vol XI 1846 (Google Books)
Le dessin est attribué à l’auteur anglais William Makepeace Thackeray qui se moque des parlementaires Lord George Bentinck et Benjamin Disraeli. Richard Daniel Altick a repris dans son livre The Shows of London, publié en 1978, ces illustrations.
Après Londres, P. T. Barnum a exposé la machine parlante de Joseph Faber dans son musée américain des curiosités à New York. C’est là que le photographe américain Mathew Brady prenait la photo suivante vers 1860.
En novembre 1870, le périodique The London Journal a publié une nouvelle contribution sur la machine parlante.
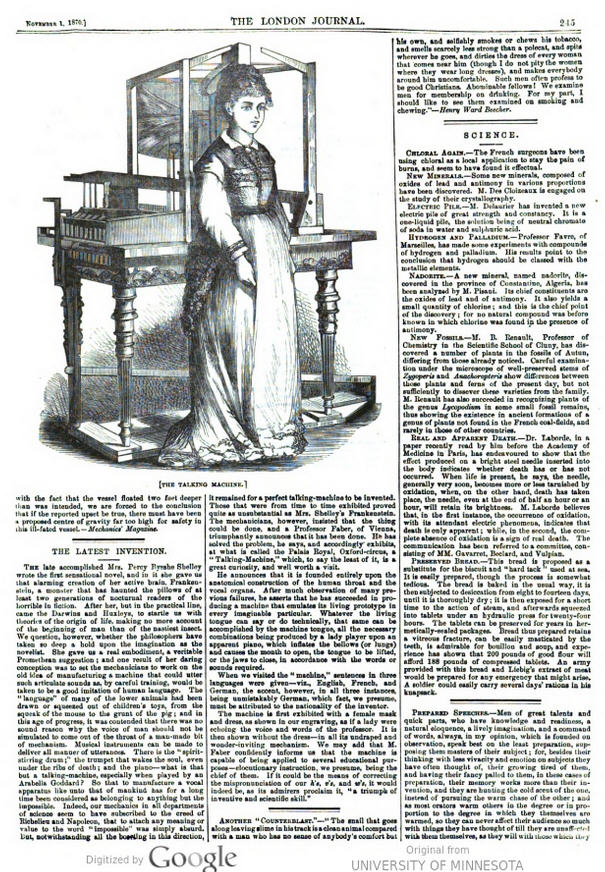
extrait du The London Journal, november 1870 (Hathi Trust Digital Library)
L’article précise qu’une Talking Machine du Professeur Faber de Vienne est exposée au Palais Royal, Oxford-Circus, et qu’une visite vaut la peine. Il semble donc que la machine a été retournée des États-Unis à Londres. L’affiche suivante qui fait partie de la collection de Ricky Jay date probablement de cette époque.
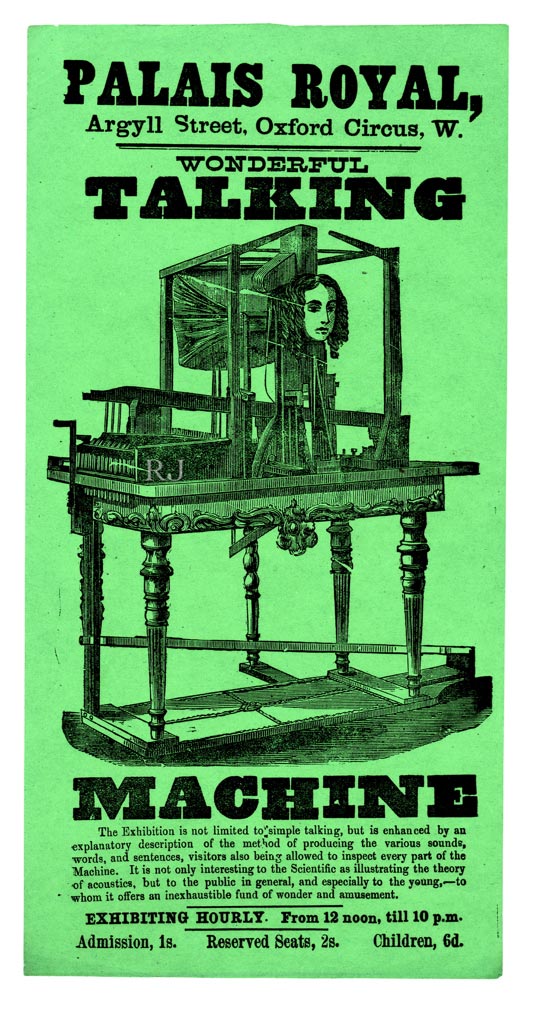
Poster from the Euphonia exhibition (Collection de Ricky Jay)
En 1873, les affiches, courriers et annonces dans la presse concernant le nouveau cirque itinérant de P. T. Barnum, sous le nom de P. T. Barnum’s Great Traveling World’s Fair, incluaient des images de la machine parlante de Joseph Faber.
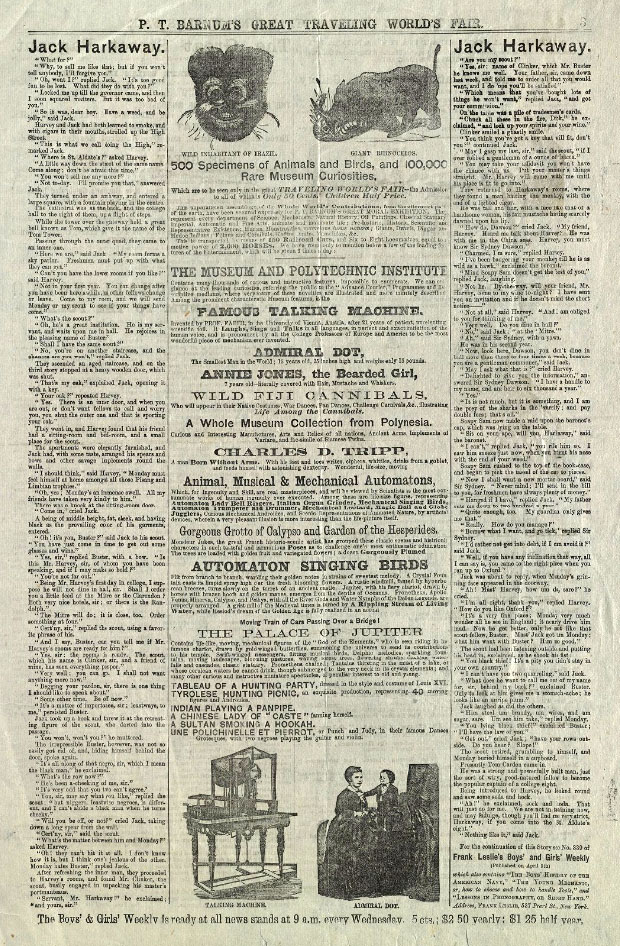
Courier for P.T. Barnum’s Great Traveling World’s Fair at Boston, Mass., May 12, 1873 (Connectitute Digital Archive)
P. T. Barnum mettait la machine parlante en évidence avec les attributs wonderful, marvelous, amazing, greatest invention of modern times. P. T. Barnum se vantait même d’avoir payé 20.000 $ pour la présentation exclusive de cette attraction durant 6 mois.
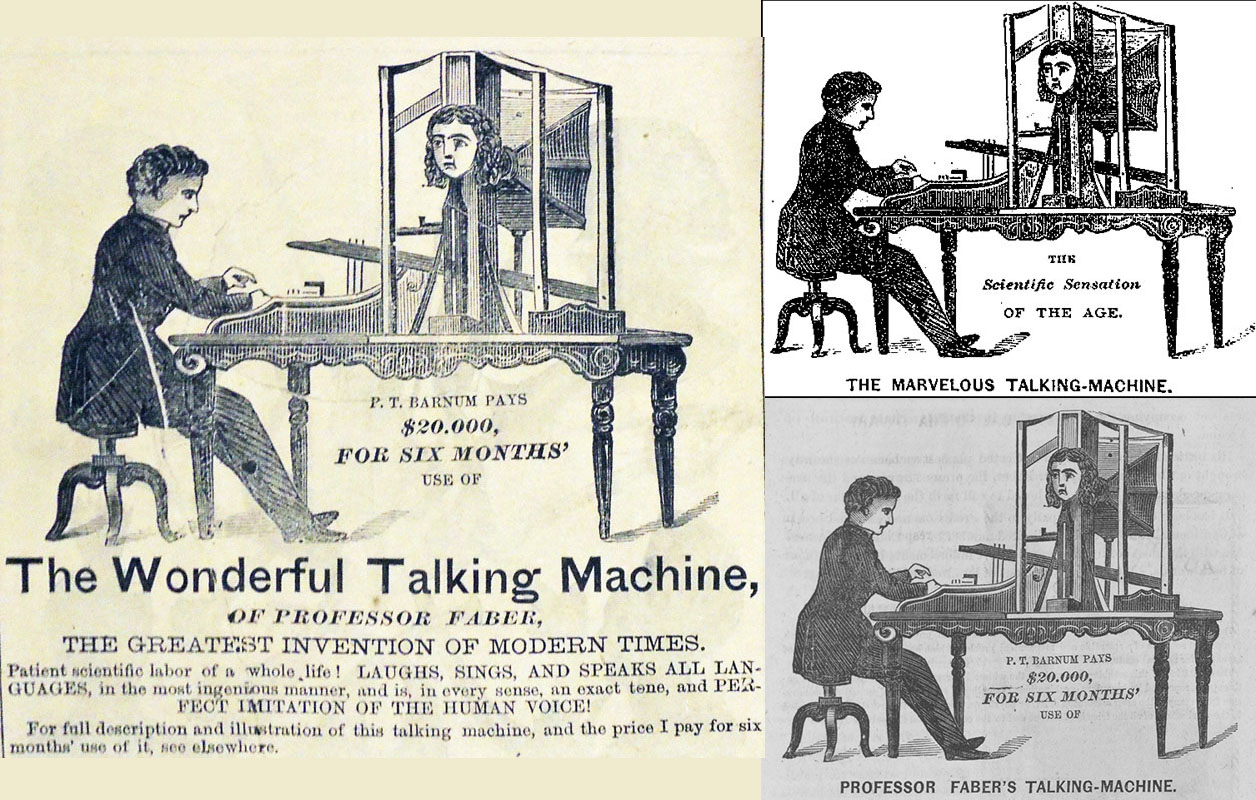
Publicités de Barnum (domaine public)
Sur les publicités de P. T. Barnum pour la machine parlante du Professeur Faber on voit un jeune homme qui manipule le clavier. Il s’agit probablement du mari de la nièce de Joseph Faber. Après le décès de celui-ci le 2 septembre 1866 à Vienne, sa nièce avait hérité la machine parlante et son mari se faisait passer pour le professeur Faber. Le cirque Barnum exposait la machine jusqu’en 1875. Ensuite la nièce, avec la complicité de son mari, continuait à la présenter jusqu’en 1885 à Londres et Paris (Grand-Hôtel en 1877, salle à proximité du théâtre Robert-Houdin en 1879) sous le nom de Amazing Talking Machine.
Après 1885, on ne trouve plus trace de la machine.
Malgré tous les efforts, l’Euphonia n’a jamais dépassé le stade d’une curiosité. En réalité l’invention de Joseph Faber était vraiment une version améliorée de la machine parlante de Wolfgang von Kempelen. Un clavier de 16 touches actionnait un mécanisme comprenant une série de six plaques de métal coulissantes qui avaient des ouvertures de formes variées à leurs extrémités. Quand ces plaques étaient soulevées ou rabaissées, elles créaient un courant d’air finement nuancé envoyé par un soufflet. L’air atteignait ensuite une cavité qui imitait l’anatomie humaine du palais avec des joues en caoutchouc, une langue en ivoire et une mâchoire inférieur. Avec cette construction Joseph Faber pouvait produire des voyelles et consonnes dans différentes langues. Il est rapporté que la machine pouvait même chanter “God save the Queen”.
Parmi les visiteurs des présentations de la machine parlante de Joseph Faber figurent des personnalités comme Frédéric Chopin (lettre du 11.10.1846 à ses parents), Robert W. Patterson, Joseph Henry, Graham Bell et le Duc de Wellington.
Aujourd’hui Joseph Faber est considéré comme un vrai pionnier de la synthèse vocale.
6.1.6. Hermann Ludwig Ferdinand von Helmholtz (1821 – 1894)
Né le 31 août 1821 à Potsdam, Hermann von Helmholtz était un physiologiste et physicien prussien qui a commencé sa carrière comme médecin militaire. Dans la suite il devenait professeur d’anatomie et de physiologie, puis professeur de physique à Berlin en 1871. Il est surtout connu pour ses contributions à l’étude de la thermodynamique, de la thermochimie, de l’optique et de la musique. Son nom reste associé à l’équation de Helmholtz, le théorème de Gibbs-Helmholtz et la loi de Lagrange-Helmholtz. Il est l’auteur du livre Die Lehre von den Tonempfindungen als physiologische Grundlage für die Theorie der Musik, paru en 1863.
Hermann von Helmholtz est moins connu pour sa contribution à la synthèse vocale. Il a synthétisé les voyelles à l’aide de diapasons d’accord, lesquels ont été réglés sur les fréquences de résonance du tractus vocal dans certaines positions de voyelles.
Helmholtz Resonator (Wikipedia)
6.1.7. Robert R. Riesz (1903 – )
Né en 1903 à New-York, Robert R. Riesz a été engagé dans les laboratoires Bell Téléphone en 1925, après avoir effectué des études en mathématiques et physique. En 1929 son innovation Artificial Larynx a été breveté au profit de Bell. Il s’agissait d’une prothèse pour des personnes ayant subi une ablation du larynx. Le projet a été décrit en 1930 dans le journal de la société acoustique américaine.
Brevet d’un larynx artificiel introduit par R.R. Riesz en 1929 (Google : Patents)
En 1937 Robert Riesz présentait un modèle réaliste de l’appareil vocal humain. Abstraction faite de quelques projets récents entrepris au Japon dans le domaine de la robotique, le modèle vocal de Robert Riesz est la dernière tentative de construire une machine de synthèse vocale mécanique.
Modèle de la tête parlante de R.R.Riesz (Haskins Laboratories) – SIMULACRUM
Dans la suite Robert Riesz contribuait au développement des premiers projets de synthèse vocale électroniques.
6.2. Histoire : synthétiseurs vocaux électriques et électroniques
Pour tracer l’histoire de la synthèse vocale électrique, il faut retourner dans la seconde moitié du 19e siècle. Après l’introduction de la télégraphie électrique, l’invention du téléphone en 1876 et du phonographe en 1877 a interrompu l’intérêt pour la synthèse vocale d’un jour à l’autre, et ceci pendant une longue période. Il convient donc de jeter également un regard sur les pionniers de la téléphonie et de la reproduction du son pour comprendre la renaissance de l’intérêt pour la synthèse vocale soixante ans plus tard, à la fin des années 1930.
6.2.1. Joseph Henry (1797 – 1878)
Joseph Henry est un physicien américain qui découvrit l’auto-induction et le principe de l’induction électromagnétique des courants induits, ce qui contribuait à la fabrication du premier télégraphe électromagnétique.
L’invention du télégraphe électromagnétique est attribuée à Samuel Morse qui présentait sa première version opérationnelle le 6 janvier 1838 à Speedwell Ironworks près de Morristown aux États-Unis. Toutefois l’idée du télégraphe électromagnétique revient à Joseph Henry qui montrait dès 1831 aux étudiants du collège à Albany, où il enseignait, un concept d’un télégraphe qui fonctionnait avec un aimant électrique.
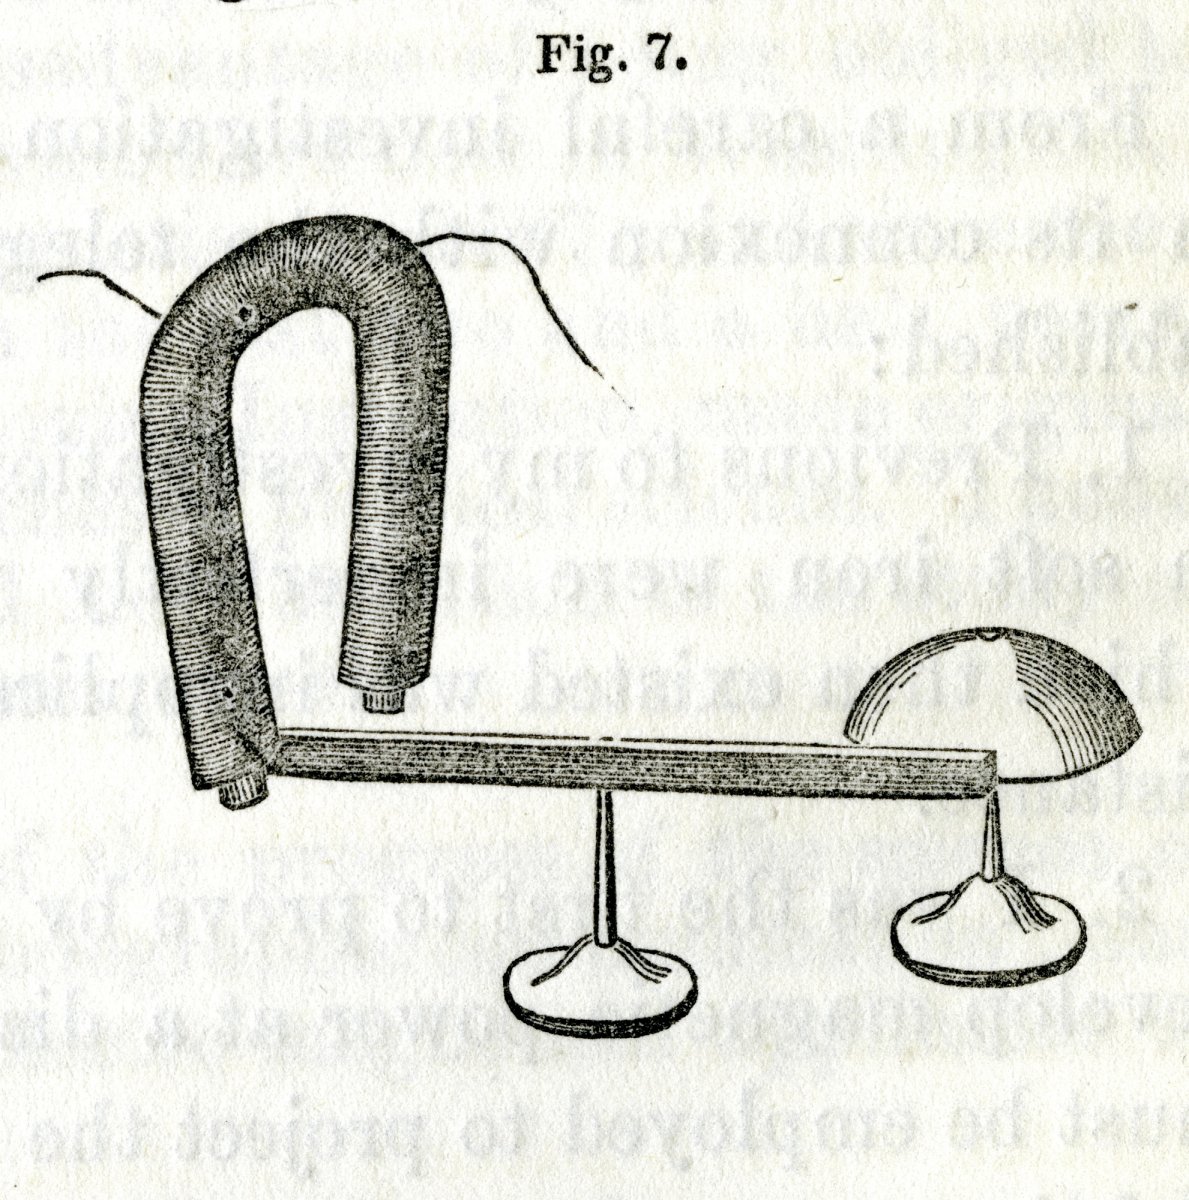
Esquisse du modèle d’un télégraphe de Joseph Henry (Smithsonian annual report for 1857, p. 105)
En décembre 1845, juste avant l’exposition publique de la machine parlante de Euphonia au Musical Fund Hall à Philadelphia, Joseph Henry avait visité Joseph Faber en privé, accompagné de son ami Robert M. Patterson. Joseph Henry était impressionné par l’ingéniosité de la machine et il envisageait de transmettre des mots via le télégraphe en actionnant les touches par des électro-aimants. Avec une petite astuce, des mots générés moyennant le clavier à une extrémité du télégraphe pourraient être reproduits à l’autre extrémité.
Alors qu’il avait les compétences requises, Joseph Henry n’avait jamais mis en pratique cette idée. Trente ans plus tard, en février 1875, le jeune Alexandre Graham Bell, qui avait l’idée du téléphone en tête, venait demander conseil à Joseph Henry, qui à l’époque approchait ses 80 ans. Devenu en 1846 le premier secrétaire de la Smithsonian Institution, une institution américaine de recherche et d’éducation scientifique, Joseph Henry était alors reconnu comme sommité dans le domaine de l’électromagnétisme et de la télégraphie. Il encourageait Graham Bell de persévérer et confirmait qu’il était sur le bon chemin.
6.2.2. Alexandre Graham Bell (1847 – 1922)
Le jeune Alexandre Graham Bell, né en 1847 à Édimbourg en Écosse, a hérité l’intérêt pour l’acoustique de son père, Alexandre Melville Bell, qui était enseignant et chercheur dans le domaine de la phonétique. Il est l’inventeur du Visible Speech, une méthode créée afin d’enseigner la parole aux sourds.
En 1863, Graham Bell a été emmené par son père à une visite à Londres de la machine parlante reconstruite par Charles Wheatstone. Il était fasciné par la machine. Charles Wheatstone lui prêtait la description de Wolfgang von Kempelen et, avec son frère Melville, il réalisa sa propre version de cet automate. Dans la suite, Alexandre Graham Bell pratiqua des expériences sur la physiologie de la parole et étudia la hauteur et la formation des voyelles à l’université d’Édimbourg. La fascination par la machine parlante semble donc être à l’origine de l’intérêt pour la parole humaine qui ont conduit Graham Bell à faire breveter le téléphone en 1876.
Brevet du 7 mars 1876 attribué à Graham Bell (Wikipedia) Google : Patents
Il convient toutefois de signaler que la paternité de Graham Bell dans l’invention du téléphone a donné lieu de suite à des controverses qui persistent encore aujourd’hui. À côté de Graham Bell, les personnes suivantes se considèrent comme les inventeurs du téléphone : Antonio Meucci, Johann Philipp Reis, Innocenzo Manzetti, Charles Bourseul, Amos Dolbear, Daniel Drawbaugh et Elisha Gray. Un collectionneur français de téléphones, Jean Godi, a écrit la véritable histoire du téléphone sur son site web.
6.2.3. Thomas Edison (1847 – 1931)
Né le 11 février 1847 à Milan dans l’Ohio, Thomas Edison a travaillé au début comme télégraphiste. À l’âge de 19 ans il déposait son premier brevet pour l’invention d’un transmetteur-récepteur duplex automatique de code Morse. En 1874 il devenait patron de sa première entreprise grâce aux fonds récoltés pour son brevet. Avec deux associés, il dirigeait un laboratoire de recherche avec une équipe de 60 chercheurs salariés. Il supervisait jusqu’à 40 projets en même temps, et se voyait accorder un total de 1.093 brevets américains. Sa société a donné naissance à la General Electric, aujourd’hui l’une des premières puissances industrielles mondiales.
En 1877, Thomas Edison a achevé la mise au point de son phonographe, capable non seulement d’enregistrer mais aussi de restituer toute forme de sons, dont la voix humaine. Les premiers phonographes étaient munis d’un cylindre phonographique d’acier en rotation, couvert d’une feuille d’étain, et la gravure était effectuée par une aiguille d’acier. L’enregistrement était lu par la même aiguille dont les vibrations sur un diaphragme mince étaient amplifiées par un cornet acoustique.
Phonographe d’Edison au musée des sciences à Madrid (Wikipedia)
6.2.4. Homer Dudley (1896 – 1980)
Né en 1896 en Virginie, Homer Dudley était un pionnier de l’ingénierie acoustique. Après ses études il a joint la division téléphonie des laboratoires Bell en 1921. Quelques années plus tard le premier service téléphonique commercial transatlantique entre l’Amérique du Nord et l’Europe a été établi. C’était le 7 janvier 1927, la liaison passait par ondes radio.
Le premier câble transatlantique a déjà été posé en 1858 et il était utilisé pour la télégraphie. Le premier message a été envoyé le 16 août 1858. Le câble s’est rapidement détérioré et la transmission d’un message d’une demi-page de texte prenait jusqu’à un jour. Après 3 semaines, le câble est tombé en panne et n’a pas pu être réparé. Dans la suite d’autres câbles ont été posés qui étaient plus durables. En 1866 on arrivait à transmettre 8 mots par minute sur un câble télégraphique transatlantique. Au début du XX siècle la vitesse dépassait 120 mots par minute.
La performance des câbles télégraphiques a été améliorée par l’alliage magnétique permalloy qui compense ll’induction électromagnétique. Inventé par le physicien Gustav Elmen en 1914 dans les laboratoires Bell sur base des théories de Oliver Heaviside, un nouveau procédé de fabrication de câbles sous-marin afférent a été testé avec succès en 1923. Les nouveaux câbles télégraphiques construits avec ce procédé ont atteint des bandes passantes de 100 hertz, ce qui permettait de transmettre jusqu’à 400 mots par minute.
L’objectif de Homer Dudley était de comprimer la voix humaine de façon à pouvoir la transmettre sur un tel câble télégraphique ayant une bande passante de 100 hertz. Homer Dudley se disait que la langue, les lèvres et les autres composants du conduit vocal ne sont rien d’autre que des clés télégraphiques qui bougent à une cadence maximale de quelques dizaines de hertz. Il suffit d’analyser les principales composantes spectrales de la voix et de fabriquer un son synthétique à partir du résultat de cette analyse.
Il faut se rappeler que Joseph Henry faisait les mêmes réflexions 80 ans plus tôt.
Aujourd’hui on sait que la limite théorique minimum de débit pour un codage conservant l’information sémantique contenue dans la parole est d’environ 60 bits par seconde, si l’on compte environ 60 phonèmes dans une langue et une vitesse d’élocution moyenne d’une dizaine de phonèmes par seconde. Pour un débit aussi faible, les informations concernant le locuteur et ses émotions sont perdues.
Homer Dudley a pu profiter des études effectuées par les chercheurs Harry Nyquist et Ralph Hartley qui travaillaient également dans les laboratoires Bell. Le premier est à l’origine du théorème d’échantillonnage de Nyquist-Shannon, le deuxième a contribué à la fondation de la théorie de l’information. En octobre 1928, il a esquissé les premiers circuits et édité une description de sa future invention : le VOCODER.
Démonstration du VOCODER par Homer Dudley (Bell System Technical Journal No 4, October 1940)
Le nom VOCODER résulte de la composition des termes codeur et décodeur. Le codeur analyse le signal pour en extraire un nombre réduit de paramètres pertinents qui sont représentés par un nombre restreint de bits pour la transmission. Le décodeur utilise ces paramètres pour reconstruire un signal de parole synthétique. Le principe du codeur de Homer Dudley consistait à évaluer l’énergie, le voisement, le formant F0 et les puissances relatives du signal dans un ensemble de douze bandes de fréquences adjacentes. Le décodeur générait la parole synthétique en passant le signal d’excitation dans un banc de filtres passe-bande dont les sorties étaient pondérées par les puissances relatives du signal original dans ces différentes bandes. Les sorties des filtres ont été ajoutées ensuite et cette somme a été mise à l’échelle en fonction de l’énergie de la trame originale.
La qualité de la voix reproduite par le vocodeur de Homer Dudley (aujourd’hui connu sous le nom de spectrum channel vocoder) était insuffisante pour envisager une introduction commerciale. Avec l’aide de Robert R. Riesz, Homer Dudley s’est alors focalisé sur la partie décodeur avec la parole synthétique. Le codeur a été remplacé par une console avec un clavier pour générer les paramètres de la voix. Cet appareil a été nommé VODER et breveté en 1937 au profit de Homer Dudley et des laboratoires Bell. Il a été présenté au grand public lors de l’exposition mondiale à New York en 1939.
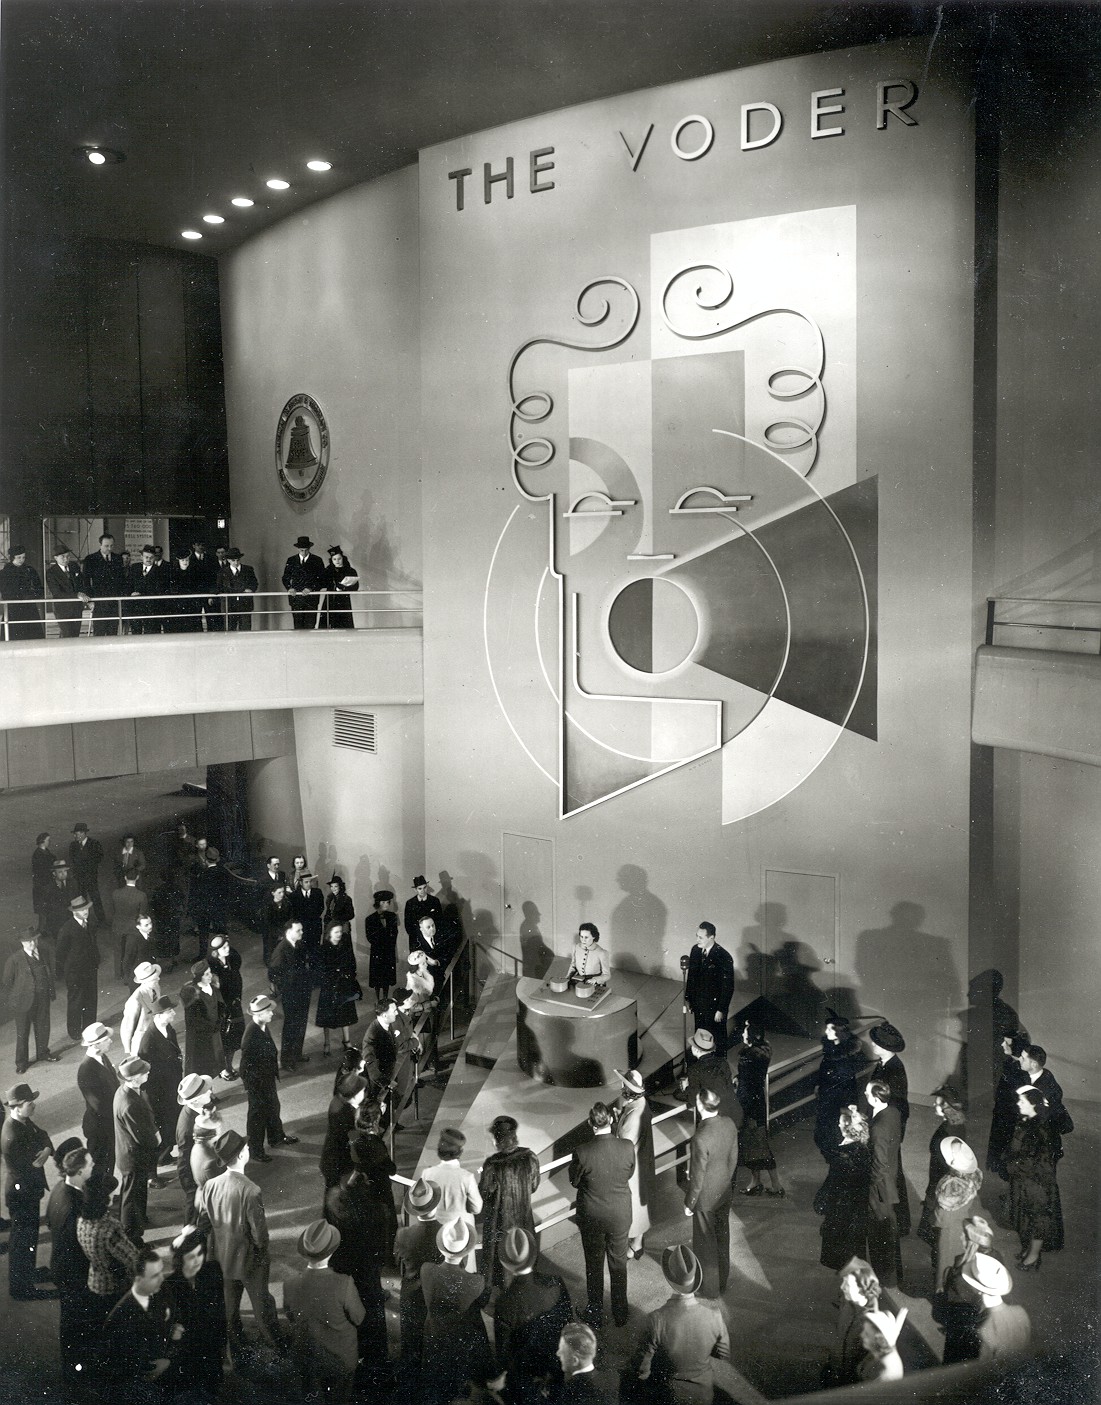
Présentation de PEDRO the VODER au stand de Bell à l’exposition mondiale 1939 à New York
Le VODER découpait le spectre vocal en 10 bandes et comprenait des oscillateurs et des générateurs de bruit pour produire des signaux électriques qui passaient ensuite par des filtres pour produire les différents sons. Les oscillateurs et filtres étaient commandés par 10 touches. La manipulation était complexe et il fallait entraîner des opératrices (vodettes) pendant plusieurs mois pour produire une synthèse vocale intelligible.
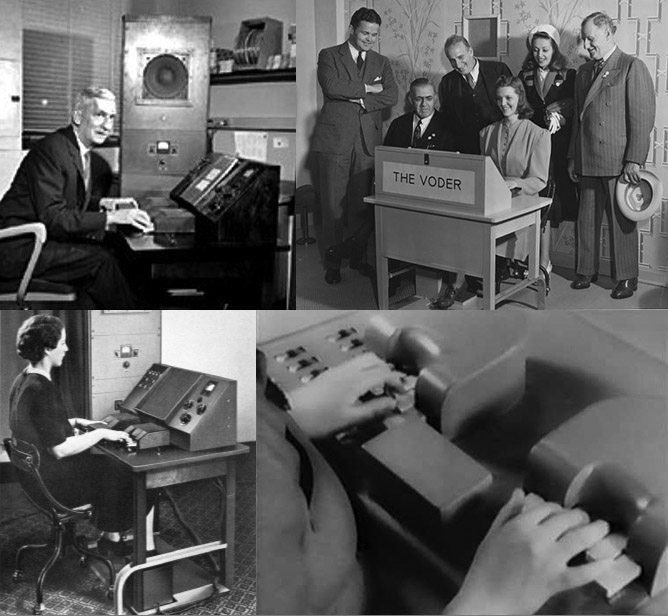
assemblage de photos du VODER ; Homer Dudley en haut à gauche
Pendant la deuxième guerre mondiale, Homer Dudley a contribué aux recherches du projet SIGSALY concernant les transmissions sécurisées sur base du vocodeur. Il est resté auprès de Bell jusqu’au début des années 1960. Le dernier projet de Homer Dudley était le développement d’un kit de synthèse vocale pour des étudiants et hobbyistes. Fabriqué à partir de 1963, le kit a été commercialisé jusqu’à la fin des années 1960.
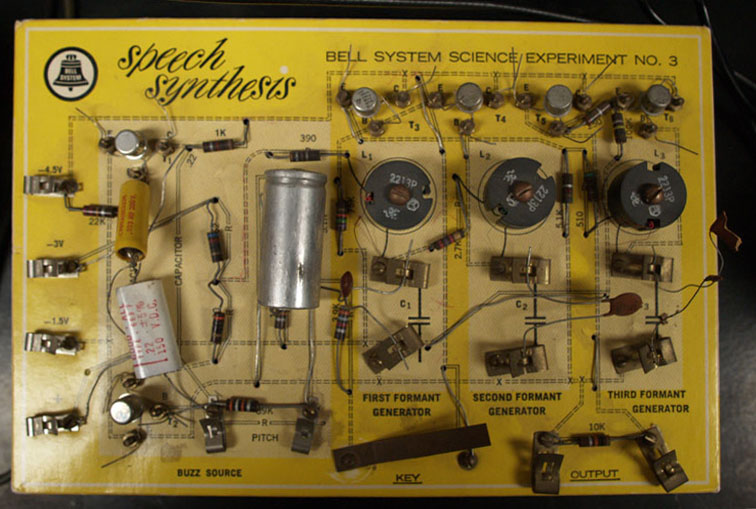
Kit de synthèse vocale de Bell
La recherche sur la synthèse vocale a été poursuivie dans les laboratoires Bell. Au début des années 1960 c’étaient John L. Kelly, Carol Lockbaum, Cecil Coker, Paul Mermelstein et Louis Gerstman qui étaient engagés dans le développement de systèmes de simulation de l’appareil vocal humain.
Le vocodeur inventé par Homer Dudley est devenu célèbre dans les années 1970 comme instrument de création sonore utilisé par des groupes de musique électronique comme Kraftwerk, The Buggles et d’autres. En réalité, Kraftwerk utilisait surtout le synthétiseur Votrax, inventé par Richard T. Gagnon (voir 6.2.10), comme sa fille a témoigné en 2013.
6.2.5. Franklin S. Cooper (1908 – 1999)
En 1941, pendant la deuxième guerre mondiale, les chercheurs W. Koenig, H. K. Dunn et L. Y .Lacy des laboratoires Bell ont inventé le premier spectrographe acoustique qui convertit une onde sonore en spectre sonore.

Sound Spectrograph D-165529 (Griffonage-dot-com)
Si vous êtes intéressé à obtenir plus de détails sur les spectres sonores, veuillez lire ma contribution Spectrograms and speech processing sur le présent site web.
Franklin Seaney Cooper a eu l’idée de faire le processus inverse, c’est-à-dire convertir un spectre sonore en onde sonore. Né en 1908, il a obtenu un doctorat en physique au MIT en 1936. Une année plus tôt, il a fondé ensemble avec Caryl Parker Haskins les laboratoires Haskins, une institution de recherche sans but lucratif, spécialisée dans le langage oral et écrit. Franklin S. Cooper a été le président et directeur des recherches des laboratoires Haskins de 1955 à 1975.
À la fin des années 1940, Franklin S. Cooper, assisté de John M. Borst et Caryl P. Haskins, a développé la machine appellée Pattern Playback pour convertir des spectrogrammes en paroles.
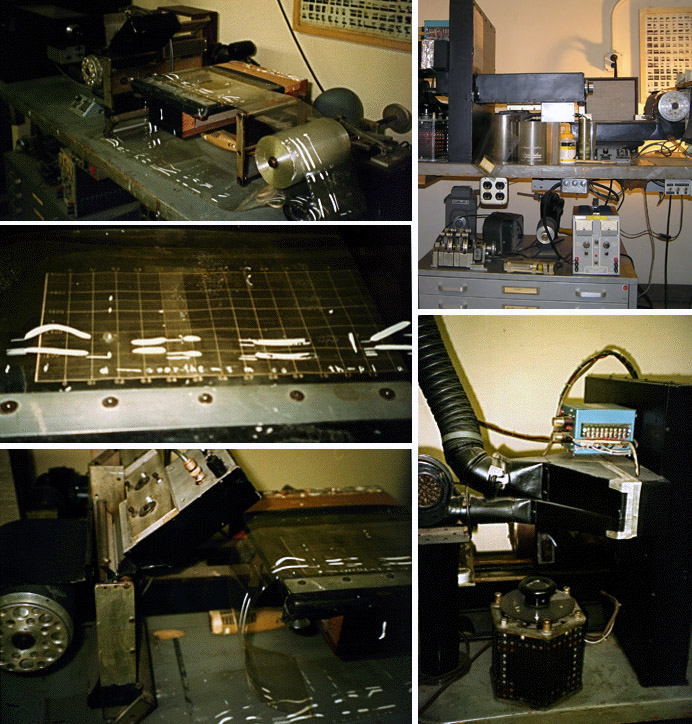
Assemblage de photos de la machine Pattern Playback (laboratoires Haskins)
L’appareil pouvait reproduire des images de spectrogrammes réels ou bien des modèles artificiels recomposés à la main avec une peinture blanche sur une base d’acétate de cellulose. La production des sons se faisait par l’intermédiaire d’un faisceau lumineux modulé par une roue tonale et réfléchie par les parties blanches du spectrogramme. Comme le spectrogramme se déroulait dans l’appareil à une vitesse uniforme, on pouvait dessiner sur le modèle synthétique les trois paramètres fondamentaux du son : le temps (axe horizontal), la fréquence (axe vertical) et l’amplitude (épaisseur des traits). Un spectrogramme synthétique de la phrase These days a chicken leg is a rare dish est présenté dans la figure suivante :
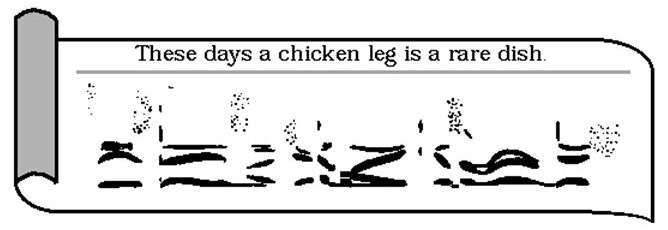
La machine Pattern Playback a été perfectionnée au fur et à mesure et a servi à faire de nombreuses recherches au sujet de la perception de la voix et de la synthèse et reconnaissance de la parole, notamment par Alvin Liberman, Pierre Delattre et d’autres phonéticiens.
La machine a été utilisée une dernière fois en 1976 pour une étude expérimentale réalisée par Robert Remez et elle se trouve maintenant au musée des laboratoires Haskins.
6.2.6. Gunnar Fant (1919 – 2009)
Carl Gunnar Michael Fant était professeur émérite à l’Institut royal de technologie de Stockholm (KTH). Gunnar Fant obtint une maîtrise en génie électrique en 1945. Il s’était spécialisé dans l’acoustique de la voix humaine, en particulier dans la constitution des formants des voyelles. Il a effectué ses recherches auprès de Ericsson et du MIT à ce sujet et créait un département des sciences vocales (Speech Transmission Laboratory) auprès du KTH. Gunnar Fant développait en 1953 le premier synthétiseur par formants Orator Verbis Electris (OVE-1). Des résonateurs ont été connectés en série, le premier résonateur pour le formant F0 a été modifié avec un potentiomètre, les deux autres pour les formantes F1 et F2 avec un bras mécanique. En 1960 Gunnar Fant publiait la théorie associée à ce synthétiseur, le modèle source-filtre pour la production de la parole.
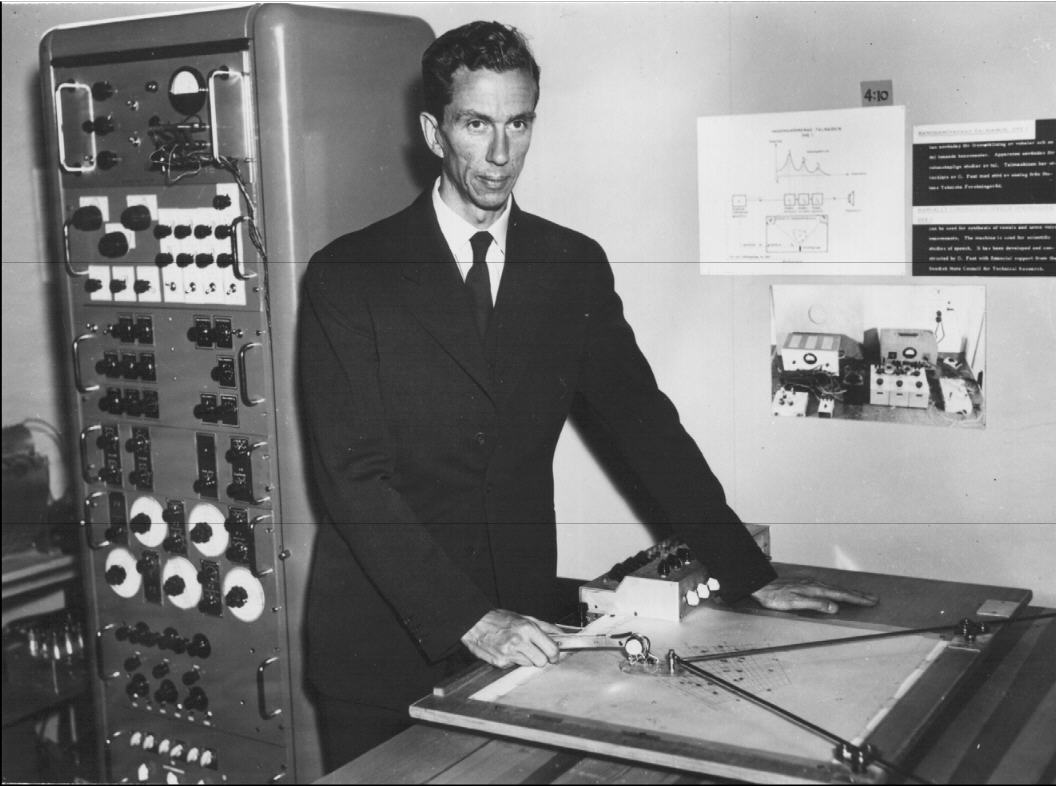
Gunnar Fant avec le synthétiseur OVE-I en 1953 (KTH)
Après sa retraite, Gunnar Fant a continué ses recherches dans le domaine de la synthèse vocale en se focalisant notamment sur la prosodie. Pour son 60e anniversaire en 1979 ses collaborateurs avaient édité un numéro spécial du journal interne de son département.
En 2000 Gunnar Fant a tenu un discours au congrès FONETIK à Skövde en Suède sur ses travaux effectués dans le domaine de la phonétique durant un demi-siècle. Il a décrit sa fascination pour la machine Pattern Playback de Franklin S. Cooper qu’il a pu voir en 1949. Son propre synthétiseur en cascade OVE II utilisait une technique similaire pour générer les signaux d’entrée qui varient les fréquences et amplitudes des oscillateurs et des générateurs de bruits afin de produire des voyelles et des consonnes pour parler des phrases complètes. Cette deuxième machine, réalisée en collaboration avec Janos Martony et qui fonctionnait avec des tubes à vide électriques, a été présentée en 1961.
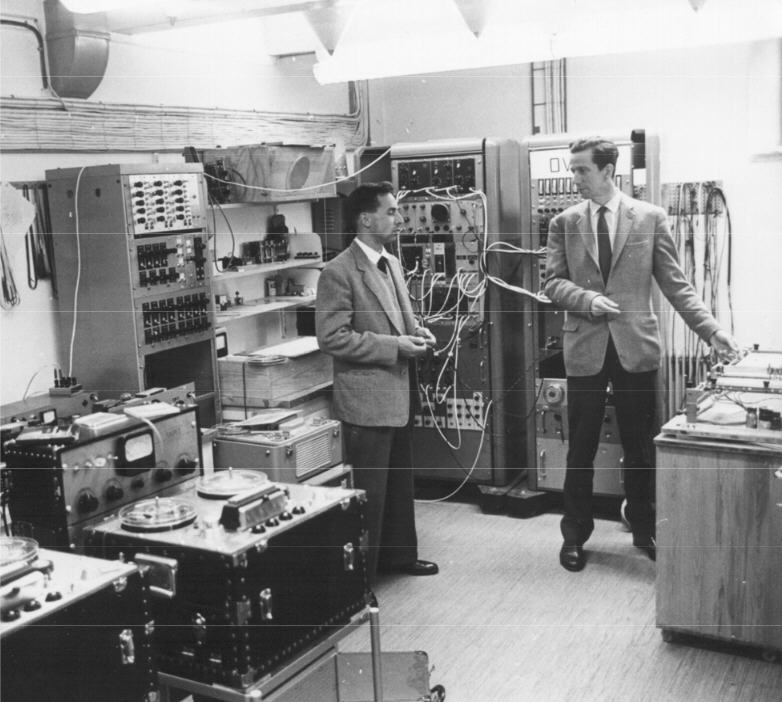
Janos Martony et Gunnar Fant (à droite) avec le synthétiseur OVE-II en 1958 (KTH)
Une troisième version électronique du synthétisuer OVE III a été réalisée par Johan Liljencrants en 1967 avec des transisteurs. Elle a été raccordée à un ordinateur et gérée par un programme informatique.
Après sa mort en 2009, un portrait en mémoire de Gunnar Fant a été publié sur le site web du KTH.
6.2.7. Walter Lawrence ( – 1984)
Walter Lawrence était un ingénieur anglais qui a travaillé après ses études au SRDE (Signals Research and Developement Establishment), une institution militaire créée en 1943 (pendant la deuxième guerre mondiale) par le ministère de l’approvisionnement du gouvernement britannique. Walter Lawrence était en charge d’examiner des moyens de réduction de la bande passante pour améliorer la sécurité de l’encryption des messages militaires. Un deuxième objectif était de rendre la transmission des communications téléphoniques plus efficace et plus économique sur les grandes distances, en particulier sur les nouveaux câbles transatlantiques.
Pour ce faire, il s’est basé sur l’invention du vocodeur de Homer Dudley et il se focalisait sur la partie VODER. Il publiait en 1953 un article The Synthesis of Speech from Signals which have a low Information Rate dans lequel il proposait six paramètres pour transmettre et restituer la parole : les trois fréquences des résonances dominantes (formants), l’amplitude et la fréquence de l’excitation du larynx et l’intensité de l’excitation fricative.
Walter Lawrence appelait son synthétiseur basé sur ces principes Parametric Artificial Talker, abrégé en P.A.T. Aux fins de parfaire sa première construction réalisée en 1952 au SRDE qui n’exploita que quatre paramètres, il contacta l’université d’Edimbourg qui avait une bonne renommée dans le domaine des sciences linguistiques. Un synthétiseur qui utilisait les six paramètres décrits était opérationnel en 1956 dans les laboratoires de l’université. L’entrée des paramètres se faisait par des plaques en verre sur lesquelles on dessinait le flux des six paramètres qui étaient scannées par un faisceau lumineux.
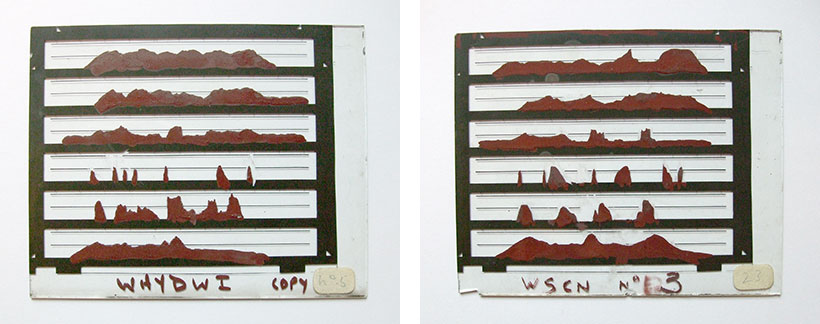
Plaques en verre avec des paramètres pour le synthétiseur P.A.T. pour dire les phrases “What have you done with it?” et “What sound comes next?” (National Museums Scotland)
L’installation est conservée aujourd’hui dans le musée national de l’Ecosse.
La même année (1956), Walter Lawrence et Gunnar Fant ont présenté leurs projets respectifs à une conférence au MIT à Cambridge. Le sommet de la présentation a été une conversation en temps réel entre les deux synthétiseurs P.A.T. et OVE.
Le P.A.T. a évolué en une version avec huit paramètres au début des années 1960, notamment grâce à l’apport de Frances Ingemann qui assistait le constructeur principal de la machine, James Tony Anthony, à la parfaire. Frances Ingemann a publié en 1960 une contribution Eight-Parameter Speech Synthesis dans le journal de la société acoustique américaine.
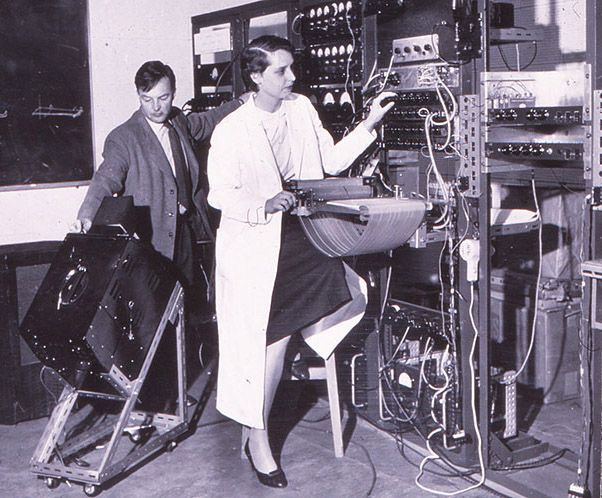
James Tony Anthony et Frances Ingemann avec le P.A.T. en 1958 (University of Kansas)
Le synthétiseur P.A.T. a connu une certaine notoriété auprès du grand public suite à la diffusion d’un film afférent à la télévision. Eye en Research était une série de télévision produite par la BBC au sujet de la recherche scientifique dans les années 1957 à 1962. La transmission se faisait en direct à partir des laboratoires de recherche avec une caméra mobile. Un journaliste de la BBC présentait et commentait le sujet. Le 28 octobre 1958 le sujet portait sur les six paramètres du synthétiseur P.A.T., développé dans les laboratoires de l’université d’Édimbourg.
Images extraites du film (de gauche à droite, de haut en bas) : Baxter, Strevens, Anthony, Lawrence, Abercrombie, Lagefoged, mesure de la force de la voix avec un ballon introduit dans le larynx, mesure des vibrations de la voix au cou, visualisation des cordes vocales avec un miroir introduit dans la bouche, coloration de la langue avec de la poudre, observation des taches colorées dans la bouche causées par les mouvements de la langue, mesure des fréquences de la voix avec un oscilloscope, démonstration du P.A.T. par Strevens et Anthony, présentation d’un spectrogramme, schéma du P.A.T., carte postale à envoyer par les spectateurs à BBC pour répondre aux questions de Walter Lawrence.
L’introduction est faite par le journaliste Raymond Baxter dans le studio à Londres. Le synthéthiseur P.A.T. est présenté par Peter Strevens et James Tony Anthony du départment phonétique de l’université. Walter Lawrence explique pourquoi il s’est adressé à l’université d’Edimbourg dans le cadre de ses travaux d’optimisation de la transmission de la parole sur les câbles téléphoniques transatlantiques. Le directeur du département David Abercrombie relève l’intérêt de combiner la recherche fondamentale effectuée à l’université avec la recherche appliquée pratiquée par Walter Lawrence. Le linguiste Peter Ladefoged, ensemble avec son assistante Lindsay Criper, présente de manière brillante comment mesurer et évaluer dans le palais vocal humain les six paramètres requis pour manipuler le synthétiseur P.A.T. A la fin du film, Walter Lawrence demande aux spectateurs d’écouter quelques mots synthétisés par la machine et de les noter sur une carte postale à adresser à la BBC afin d’examiner l’intelligibilité de la voix artificiel.
Cette vidéo montre d’une façon très pertinente le fonctionnement de la synthèse vocale.
Après sa retraite au SRDE en 1965, Walter Lawrence a rejoint l’université d’Édimbourg comme maître de conférences. Il est décédé en 1984.
6.2.8. John N. Holmes ( – 1999)
John N. Holmes est un ingénieur en génie électrique britannique qui a obtenu son diplôme en 1953 à Londres. En 1956 il a rejoint la Joint Speech Research Unit (JSRU) qui a été formée la même année par la fusion de plusieurs agences gouvernementales en charge de la recherche dans le domaine vocal. L’intérêt de la JSRU se focalisait sur les télécommunications, aussi bien pour des applications militaires que civiles. La JSRU était affiliée administrativement au Post Office qui était responsable à l’époque pour la téléphonie.
L’analyse de la parole était l’activité principale de la JSRU. La synthèse vocale était un outil important à ces fins. John Holmes visitait en 1960 le KTH à Stockholm pour se familiariser avec le synthétiseur OVE II de Gunnar Fant. Après son retour à Londres en 1961 il a construit son propre synthétiseur désigné dans la suite comme JSRU formant synthesizer. Au lieu de la cascade de résonateurs connectés en série appliquée pour OVE, il utilisait un arrangement parallèle qui fournissait une meilleure qualité de la voix synthétique. Avec un jeu de paramètres optimisés manuellement à partir de valeurs déduites de la voix naturelle, John Holmes était capable de reproduire des phrases pour lesquelles des interlocuteurs ne pouvaient plus faire la distinction entre la parole naturelle originale et la parole synthétique.Il appelait ce principe la copie-synthèse.
Un schéma du synthétiseur de John Holmes est présenté dans la figure qui suit :
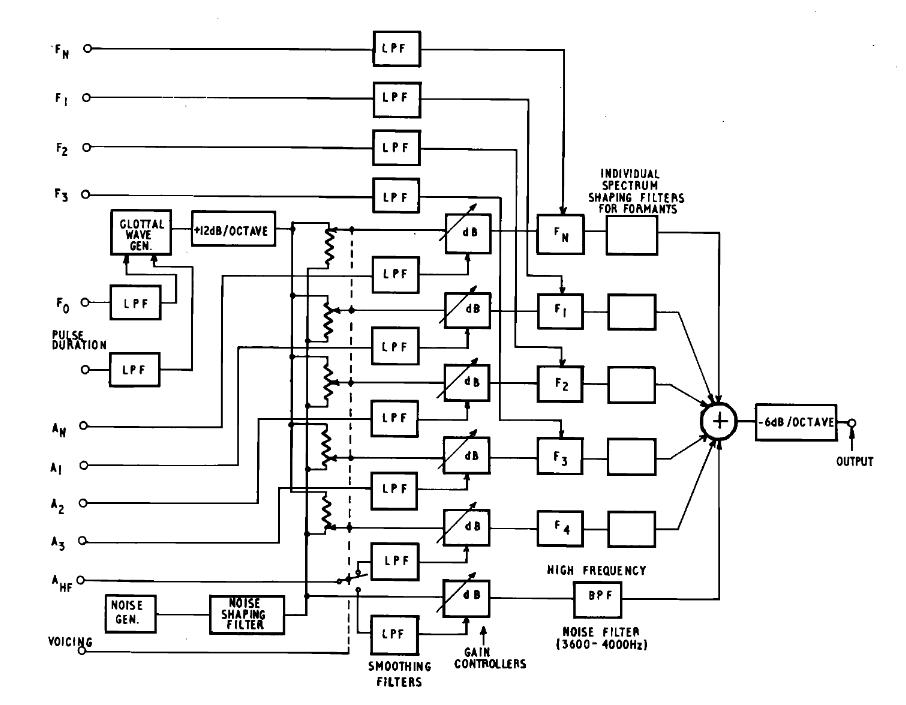
Schéma du synthétiseur parallèle de formants de John Holmes (semanticscholar.org)
En 1970 John Holmes est devenu directeur de la JSRU. À l’occasion de la conférence internationale sur la communication vocale qui a eu lieu en avril 1972 à Boston, il a présenté les conclusions de ses travaux. Il était d’avis qu’avec la technologie actuelle il suffisait d’avoir les bons paramètres d’entrée pour produire de la parole synthétique qu’on ne peut plus distinguer de la parole naturelle. Pour le prouver il faisait des démonstrations lors de la conférence. Avec des paramètres configurés manuellement (peintes à la main) les phrases prononcées étaient très proches de la parole naturelle, mais avec des paramètres extraits à partir des enregistrements de la parole naturelle la situation était une autre.

Invitation à la conférence internationale sur la communication vocale en 1972 à Boston
À partir du début des années 1970 les scientifiques concentraient leurs recherches sur la production automatique des paramètres de contrôle des synthétiseurs vocaux à formants. On commençait à générer les paramètres à partir de textes et la linguistique prenait un rôle de plus en plus important. En outre le but de la synthèse vocale changeait. Au lieu d’être un outil d’analyse de la voix humaine pour comprendre comment fonctionne l’appareil phonatoire humain, le nouvel objectif était de produire des interfaces pour faciliter la communication avec les ordinateurs qui faisaient leur entrée à grands pas dans les entreprises et institutions.
En 1977 John Holmes publiait l’article Extension of the JSRU synthesis by rule system, en 1984 l’article Use of flexible voice output techniques for machine-man communication. Après son départ de la JSRU en 1985 John Holmes travaillait comme consultant indépendant et il continuait à publier des articles et livres au sujet de la synthèse et reconnaissance vocale. Il est décédé en 1999. Sa dernière contribution porte le nom de Robust Measurement of Fundamental Frequency and Degree of Voicing.
6.2.9 Forrest S. Mozer (1929 – )
Forrest Mozer est un physicien expérimental, inventeur et entrepreneur américain, reconnu pour ses travaux novateurs sur les mesures de champ électrique dans un plasma spatial. Il est en outre le développeur de circuits électroniques pour la synthèse et la reconnaissance de la parole.
Auteur de plus de 300 publications et détenteurs de 17 brevets, il a reçu de nombreuses reconnaissances pour ses travaux scientifiques. Né en 1929 à Lincoln au Nebraska, il a travaillé comme chercheur nucléaire dans différentes institutions après ses études et son doctorat. En 1970 il a été nommé professeur en physique à l’université de Californie à Berkeley.
Parmi ses étudiants se trouvait un aveugle qui demandait son assistance, ce qui incitait Forrest Mozer à s’intéresser pour la synthèse de la parole. Il a alors inventé le codage de la parole connu sous le nom de Mozer Compression pour comprimer la voix enregistrée par microphone de façon à pouvoir la reproduire moyennant les microprocesseurs à 8 bits, disponibles en mi-1970. Cette technique était un précurseur de l’ADPCM.
Le brevet américain afférent (US4214125A) a été introduit en 1974 et modifié plusieurs fois. Le brevet a été licencié d’abord à Telesensoriy Systems Inc pour l’utilisation dans le calculateur TSI Speech+, destiné aux personnes aveugles. Le circuit intégré S14001A, développé en 1975 par Silicon Systems Inc. pour ce calculateur est considéré comme le premier circuit intégré de synthèse vocale.
Dans la suite le brevet a été licencié à l’entreprise National Semiconductor qui a créé le circuit intégré DigiTalker MM54104 qui a été utilisé dans différents ordinateurs personnels, des jeux d’arcade et des interfaces de synthèse de la parole.
En 1984, Forrest Mozer a co-fondu l’entreprise Electronic Speech System pour commercialiser son système de synthèse de la parole breveté. Dix ans plus tard, il a fondé, ensemble avec son fils Todd Mozer, l’entreprise Sensory Circuits Inc., qui est spécialisée dans la reconnaissance de la parole.
Dans un entretien vidéo sur Skype avec le fondateur du magazine Scene World, Joerg “Navcom” Droge, Forrest Mozer raconte pendant plus d’une heure l’historique de ses travaux sur la synthèse de la parole.
6.2.10 Richard Thomas Gagnon (1939 – 2017)
Richard Thomas Gagnon était un ingénieur électronique qui a travaillé pour l’entreprise Federal Screw Works. Cette entreprise a été fondée en 1917 comme fournisseur de pièces métalliques pour l’industrie automobile. Depuis sa jeunesse Richard Gagnon était fasciné par les sciences et les technologies audio.
Il s’est intéressé tôt à la synthèse de la parole parce qu’il avait des problèmes avec la vue et il craignait de devenir aveugle.
Pendant son temps libre, il développait à partir de 1970 un appareil de synthèse vocale dans son laboratoire, situé au sous-sol de sa maison à Michigan. Il s’est basé sur sa propre voix pour définir les phonèmes. Il a réalisé plusieurs versions comme prototype et comme modèle de démonstration sous les noms VS1, VS2 et VS3. Il s’agissait de synthétiseurs à formants avec architecture parallèle.
Il avait soumis une demande de brevet auprès des autorités compétentes en 1971 pour son invention qui a été approuvée en 1974, après quelques modifications, sous le numéro US 3.836.717.
Richard Gagnon licenciait le brevet à son patron qui créa la division Vocal Interface au sein de l’entreprise Federal Screw Works pour fabriquer la version VS4 du synthétiseur au nom de VOTRAX. Les circuits électroniques fabriqués étaient encapsulés par de la résine pour éviter une rétro-ingénierie du produit. Une centaine d’équipements a été vendue. La division a été renommée dans la suite en Votrax Division.
D’autres versions ont été réalisées, dont les modèles VS6.x qui ont été vendues à plusieurs milliers d’exemplaires jusqu’à la fin des années 1970. Les versions supportaient entre 32 et 128 phonèmes.
En 1980, la fabrication d’un circuit intégré SC-01 a été commandée auprès de la société Silicon Systems Inc. pour le synthétiseur vocal, suivi du circuit SC-02 en 1983. Ces circuits ont été utilisés par des producteurs tiers pour la fabrication de terminaux parlants et de consoles arcades. A côté de l’anglais, quelques autres langues ont été supportées. À partir de 1984 le synthétiseur Votrax a été commercialisé comme carte PC sous la désignation Votalker pour les ordinateurs IBM PC, Appel II et Commodore 64. L’œuvre de Richard Gagnon est considéré comme une One Man Show. C’est le dernier inventeur dans le domaine de la synthèse vocale qui a agi seul et sous sa propre responsabilité. Il détenait 18 brevets et il était également l’auteur de quelques publications scientifiques.
En 1994, Richard Gagnon a subi un accident vasculaire cérébral et il ne pouvait plus communiquer avec ses proches, ce qui explique que ses contributions à la synthèse de la parole étaient longtemps ignorées par la communauté scientifique et par le public.
Grâce au témoignage de la fille de Richard Gagnon, Sheila Janis Gagnon, qui a établi en 2013 l’inventaire des documents et équipements qui se trouvaient encore dans le laboratoire au sous-sol de la maison familiale, pour les remettre au musée de l’institution Smithsonian, il a été possible de donner le crédit mérité au développeur ingénieux du Votrax.
6.2.11. Speak & Spell (1976)
En juin 1978 Texas Instruments (TI) présentait à la CES un équipement, appelé Speak & Spell, destiné aux enfants pour apprendre l’orthographie. Ce jouet prononçait environ 200 mots qu’il fallait épeler correctement moyennant le clavier intégré.
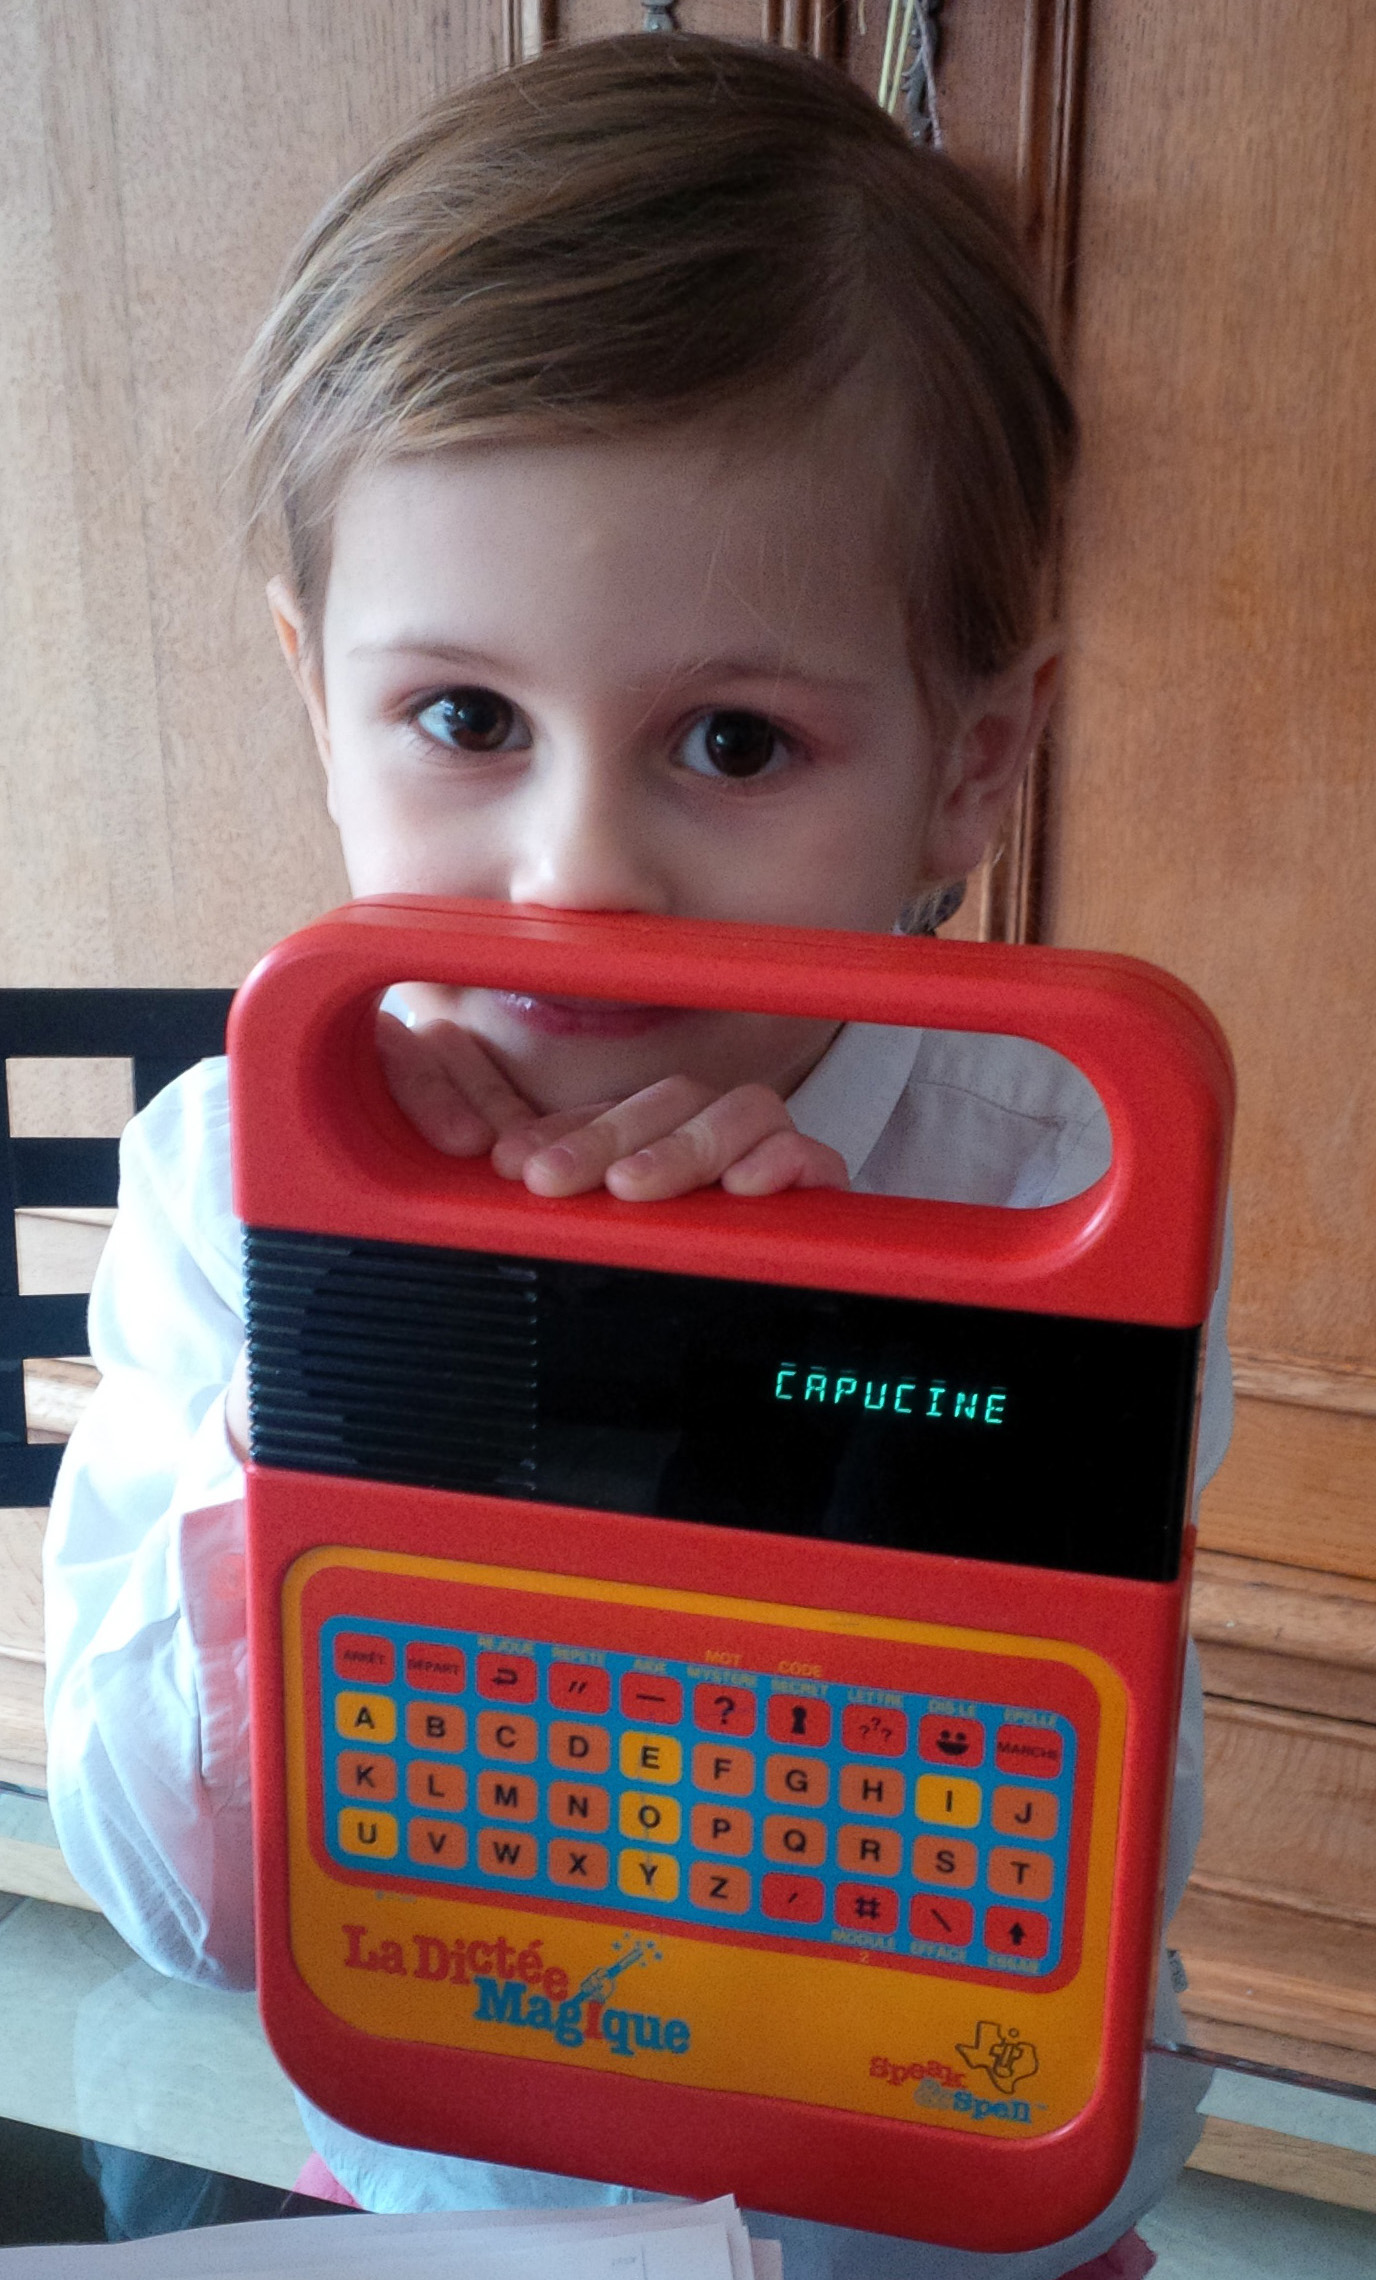
Capucine avec la Dictée Magique (Speak & Spell de TI) en 2017
Speak & Spell marque la transition entre la synthèse vocale électronique et informatique et constituait une étape importante (milestone) dans l’évolution des circuits intégrés. Le premier circuit intégré a été développé par Jack Kilby auprès de Texas Instruments en 1958. Il a reçu le prix Nobel de physique en 2000 pour son invention.
Au milieu des années 1970, les ingénieurs du département Produits de Consommation de Texas Instruments cherchaient une idée pour créer un équipement grand public pour mettre en valeur les mémoires à bulles, une technologie de stockage électromagnétique miniaturisée, sans parts mouvantes, qui était en vogue à l’époque, mais qui a été abandonnée à la fin des années 1980. L’ingénieur Paul Breedlove de TI proposait le développement d’un jouet didactique utilisant la synthèse de la parole, dans la tradition de la calculette Little Professor qui a connu un grand succès, suite à son introduction par TI en 1976.
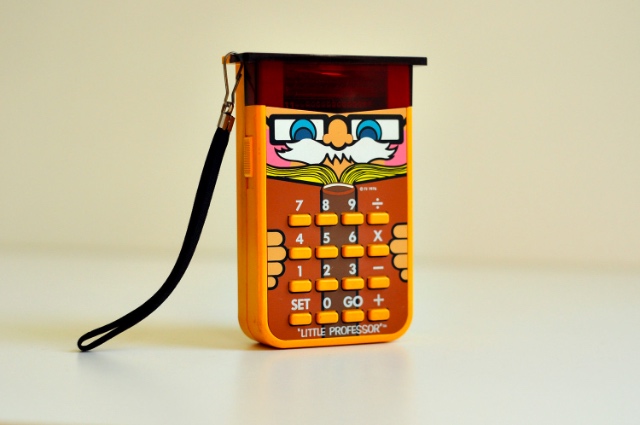
Calculette “Little Professor” de Texas Instruments
L’idée a été approuvée et une équipe projet de quatre ingénieurs a été constituée au sein de TI sous la direction de Paul Breedlove; les autres membres étaient Gene Frantz, Richard Wiggins et Larry Branntingham.
Richard Wiggings était en charge de concevoir le système de synthèse de la parole, Larry Branntingham était responsable pour le développement des circuits intégrés et Gene Frantz gérait la collaboration avec d’autres développeurs de TI qui contribuaient au projet. Il s’est avéré rapidement que la digitalisation et le stockage de mots parlés dans des mémoires bulles ou dans des ROM’s (Read Only Memories) était trop couteux et qu’il fallait recourir aux méthodes de synthèse existantes à l’époque. La solution retenue était basée sur le codage prédictif linéaire (LPC) qui permet de comprimer sensiblement la voix, de stocker pour chaque mot à prononcer un nombre très limité de données et de reproduire la parole enregistrée moyennant un circuit intégré de traitement numérique du signal (DSP).
Fondamentalement il s’agissait toujours d’une simulation du fonctionnement de l’appareil phonatoire humain, sauf que les dispositifs pour synthétiser des sons à partir de paramètres spécifiques étaient mécaniques il y a 250 ans, puis électriques analogiques il y a 100 ans, dans la suite électroniques analogiques il y a 50 ans, et donc pour la première fois numériques dans le cas de Speak & Spell. Bien sûr le nombre et la qualité des paramètres de commande pour produire un son a augmenté au fil des années, mais le principe de base restait le même.
Le circuit intégré LPC développé par TI pour réaliser la synthèse vocale portait la désignation TMC0281, renommé plus tard en TMS5100. L’architecture a fait l’objet de plusieurs brevets et le circuit a été inclus dans le temple de la renommée (hall of fame) des circuits intégrés de l’IEEE en 2017, bien que ce n’était pas le premier circuit intégré de synthèse vocale. A côté de ce circuit le jouet Speak & Spell comportait un microprocesseur TMS1000 pour gérer le clavier, l’affichage, le processus LPC et l’interface avec l’usager. Les paramètres des mots à prononcer étaient stockés dans deux ROM’s à 128 Kbits. C’était la capacité de ROM la plus élevée disponible à l’époque. Pour enregistrer ces mots on faisait recours à un modérateur radio, Hank Carr.
Speak & Spell comportait également un dispositif pour connecter des cartouches de jeu échangeables. Son prix de lancement était de 50 $ US. Le jouet a été commercialisé avec grand succès pendant plus de 10 ans au monde entier, en plusieurs variantes (Speak & Read, Speak & Math), avec des voix pour différents langages et avec de nombreuses cartouches de jeux. En France, le jouet a été vendu sous le nom de Dictée magique. En 2009 Speak & Spell a été nommé comme milestone IEEE.
En 1982, l’équipement Speak & Spell a été utilisé par E.T. dans le film culte de Steven Spielberg pour téléphoner avec les habitants de sa planète. C’est une des raisons pourquoi le jouet lui-même est devenu un objet culte qui bénéficie encore aujourd’hui d’une large communauté de fans qui maintiennent des émulateurs du synthétiseur, des cartouches de jeu et des instructions comment pirater le système pour l’utiliser à d’autres fins.
Le circuit intégré TMC0281 et ses successeurs ont également été vendus séparément par Texas Instruments sous la désignation TMS5100, etc. Ils ont été implémentés dans des ordinateurs personnels, des consoles de jeu et des voitures. La technique LPC constituait la base pour le codage et la compression de la voix dans les terminaux GSM au début des années 1990 et elle est encore utilisée aujourd’hui.

Team de développement du Speak & Spell : Gene Frantz, Richard Wiggins, Paul Breedlove, and Larry Branntingham
6.3. Synthétiseurs vocaux informatiques
Le lecteur attentif a certainement compris que les inventeurs des synthétiseurs vocaux mécaniques et électriques ont tous essayé de simuler le fonctionnement de l’appareil phonatoire humain. Bien qu’il y a eu des progrès dans la qualité de la voix synthétique au fil du temps, le principe de base est resté le même. Il n’est donc pas étonnant que le portage de la synthèse vocale sur les premiers ordinateurs est resté au début dans la même lignée. Les oscillateurs et résonateurs sont devenus numériques et ont été réalisés moyennant des programmes informatiques pour générer les formants des voyelles et les sons des consonnes. Au lieu d’une cascade sérielle ou d’un arrangement parallèle on distinguait la synthèse sonore additive, soustractive ou FM. Comme la génération des sons est commandée par les valeurs de plusieurs paramètres on parle de synthèse par règles.
L’évolution des ordinateurs avec des processeurs de plus en plus puissants et des capacités de stockage de plus en plus grandes a permis de remplacer la simulation classique de l’appareil phonatoire humain par des procédés plus modernes. Une première méthode consistait à enregistrer des bribes de parole (phonèmes) et de les enchaîner. Les phonèmes sont les éléments minimaux de la parole. La langue luxembourgeoise comporte par exemple 55 phonèmes, en tenant compte des mots étrangers. Mais comme la parole est un processus temporel continu, les phonèmes sont trop courts et inappropriés pour obtenir une synthèse vocale par concaténation de qualité acceptable. La prochaine étape consistait à utiliser des diphones qui sont définis comme la portion du signal de parole comprise entre les noyaux stables de deux phonèmes consécutifs. Le nombre de diphones est théoriquement le carré du nombre de phonèmes, c’est-à-dire 3.025 pour la langue luxembourgeoise. Mais comme certaines transitions n’ont pas lieu en pratique, on obtient environ 2.000 diphones à considérer. Si on utilise des unités plus longues que les diphones, on parle de synthèse par sélection d’unités. Ces unités sont extraites automatiquement par des programmes utilisant des méthodes statistiques, à partir d’enregistrements vocaux avec annotation des textes correspondants, pour les sauvegarder dans une base de données indexée. Le nombre d’unités peut dépasser les 15.000 pour une voix.
Schéma simplifié de synthèse de la parole par sélection d’unités
La voix artificielle résultante est proche d’une voix humaine. La plupart des systèmes de synthèse vocale commerciaux est basée sur la synthèse de concaténation par sélection d’unités. Le désavantage de cette méthode est que le contrôle sur la voix est presque nul; la synthèse est peu flexible : elle restitue bien ce qui est dans la base mais ne permet guère d’aller au-delà.
Une méthode plus récente est appelée synthèse paramétrique statistique (HMM : Hidden Markov Model). Elle repose de nouveau sur le modèle source-filtre et le vocodeur qu’on a rencontré dans le passé pour simuler le fonctionnement de l’appareil phonatoire humain. Mais contrairement à la synthèse par règles ou les paramètres sont définis explicitement par un expert de façon déterministe, ici les paramètres sont appris grâce à des modèles statistiques, sur un gros corpus de parole, sous forme de chaînes de Markov, et générés de façon probabiliste.
Le recours à des réseaux neuronaux permet de remplacer l’apprentissage par des modèles statistiques du type HMM par un apprentissage profond issu de l’intelligence artificielle. Ce type de synthèse vocale est actuellement à la une de tous les laboratoires de recherche actifs dans ce domaine.
Jusqu’au début des années 1990 il était possible de désigner des particuliers ayant le mérite d’une nouvelle invention dans le domaine de la synthèse vocale. Ensuite c’est devenu de plus en plus difficile. C’est pour cette raison que je vais présenter dans les derniers chapitres concernant la synthèse vocale informatique des centres de compétences afférents, sans oublier toutefois de mentionner les chercheurs individuels qui jouent un rôle important au sein de ces institutions.
6.3.1. Dennis H. Klatt (1938 – 1988)
Dennis H. Klatt était un chercheur américain spécialisé dans les sciences de l’audition et de la parole. Il est né en 1938 à Milwaukee. Après ses études universitaires accomplies en 1961 et son doctorat obtenu en 1964, il a joint le MIT comme assistant-professeur une année plus tard. En 1978 il est devenu chercheur principal au MIT où il est resté jusqu’à sa mort en 1988. En 1979 il a publié dans le journal de la société américaine d’acoustique un article intitulé Software for a cascade/parallel formant synthesizer.
Dennis Klatt est considéré comme le pionnier de la synthèse de la parole informatisée. Il était le premier à développer un système de conversion d’un texte écrit en parole sans intervention d’un spécialiste. Il appelait son programme KlatTalk et le présentait à la communauté scientifique en mai 1982 lors de la conférence internationale du IEEE concernant l’acoustique, la parole et le traitement des signaux. Sa contribution portait le nom de The klattalk text-to-speech conversion system. Le mot KlatTalk est un palindrome, c’est l’inversion de l’ordre des lettres du nom Klatt.
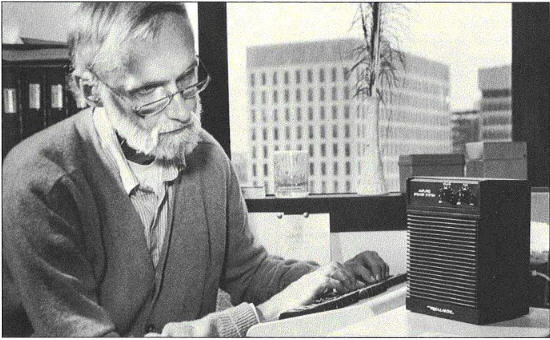
Dennis Klatt avec son synthétiseur en 1987 (RLE MIT)
Bien que le système utilisait une méthode de synthèse vocale basée sur la génération de formants pour les voyelles et sur des règles de conversion spécifiques, Dennis Klatt avait utilisé sa propre voix pour extraire les paramètres de synthèse. La voix synthétique résultante ressemblait donc à la voix réelle de Dennis Klatt.
En 1984, la société américaine Digital Equipment Corporation (DEC) démarrait la commercialisation d’une unité de synthèse de la parole autonome qu’on pouvait raccorder par une connexion asynchrone RS-232 à un ordinateur. Pour cet équipement, appelé DECTalk, DEC avait négocié une licence exclusive pour l’utilisation du système Klattalk.
Pour la conversion de textes en phonèmes un jeu de règles avait été développé par Sharon (Sheri) Hunnicutt à l’Institut Royal des Technologies Suédois (KHT). La théorie adjacente a été présentée en 1985 dans le rapport interne périodique du KHT avec le titre Lexical prediction for a text-to-speech system. Pour l’intégration du jeu de 625 règles pour la langue anglaise DEC n’avait reçu qu’une licence non-exclusive.
L’équipement DECTalk disposait également de connecteurs pour le raccordement au réseau téléphonique, ce qui permettait de créer les premiers répondeurs téléphoniques assistés par ordinateur. DECTalk a été vendu pendant plus de dix ans, sous différentes formes de hardware et de software et en plusieurs versions. Le premier modèle DCT01 coutait environ 4.000 $ US lors du lancement. Un des premiers gros usagers était le service national américain de météorologie (wheather infos).
DECTalk comme équipement autonome et comme carte PC
Au début le système comprenait plusieurs voix américaines intégrées qui portaient des noms fantaisistes comme Beautiful Betty, Kit the Kid, Uppity Ursula, Doctor Dennis et Whispering Wendy. La voix la plus populaire était la voix par défaut, appelée Perfect Paul, du fait qu’elle a été utilisée par le fameux scientifique britannique Stephen Hawking qui, depuis 1985, était incapable de parler à cause d’une trachéotomie, pratiquée suite à l’aggravation de sa maladie neurologique.
Dennis Klatt s’était très tôt engagé à faire profiter les personnes handicapées de l’utilisation de son système Klattalk, respectivement de DECTalk, pour communiquer avec leur environnement. Les personnes aveugles s’en servaient pour lire des livres, et plus tard pour surfer sur Internet. Des personnes incapables de parler, comme Stephen Hawkins, l’utilisaient pour s’entretenir avec leurs proches.
Par l’ironie du sort, Dennis Klatt, qui a donné une voix aux ordinateurs, a perdu sa propre voix au milieu des années 1980, suite à un cancer de la gorge. Il a rapidement perdu la lutte contre la maladie et il est décédé en décembre 1988.
Dennis Klatt a laissé un héritage précieux aux historiens par sa publication Review of text-too-speech conversion for English en 1987 qui comprend une archive de 36 enregistrements audio de synthétiseurs vocaux, segmentée dans 4 sections (A, B, C et D) pour la période de 1939 à 1985.
En juillet 2013, BBC Radio diffusait un entretien entre Laura Fine, la fille de Dennis Klatt, et Lucy Hawking, la fille de Stephen Hawking, au sujet de la synthèse de la parole en général et en particulier sur l’utilisation de la voix du père de l’une par le père de l’autre. Cette émission faisait partie de la documentation Klatt’s Last Tapes de BBC Radio 4.
Au début de l’année 2000 la licence DECTalk a été vendue à Force Computers Inc, ensuite revendue à Fonix Speech qui est devenue SpeechFX. À l’heure actuelle la dernière version du kit de développement (SDK) de DECTalk est toujours commercialisée par la société SpeechFX. Il existe également une large communauté de fans de la technologie DECTalk, un exemple est le projet 80speak de LixieLabs.
6.3.2. Jonathan Duddington (1995)
Jonathan Duddington est le développeur du logiciel de synthèse de la parole Speak. Il s’agissait d’une suite d’outils pour les ordinateurs ACORN avec le système opératoire RISC. À côté du module TTS (text-to-speech) il y avait un éditeur de parole, un éditeur de phonèmes, un module Talk as you Type et un outil de vérification des règles phonétiques. Les débuts du développement de ce logiciel remontent à 1995.
Sur la Internet Wayback Machine on trouve l’ancienne page web de Jonathan Duddington (version du 14 juin 1997) où il annonce la disponibilité d’une nouvelle version pour les ordinateurs RiscOS 3.0 au prix de 19,50 £. Une version 2 améliorée a été annoncée en 1999.
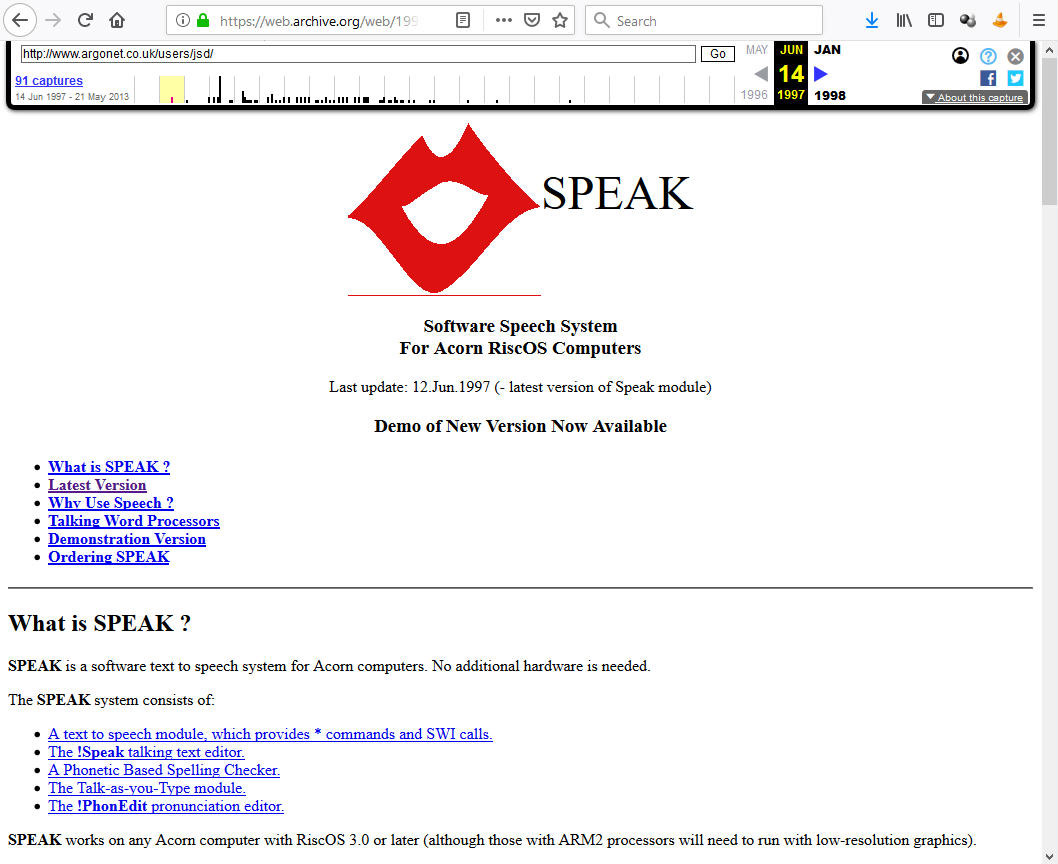
Page web Speak de Jonathan Duddington sur l’Internet Wayback Machine
A l’époque Jonathan Duddington a présenté son logiciel aux membres de différents clubs d’utilisateurs d’ordinateurs ACORN dans la région du Coventry au Royaume-Uni, par exemple au Derbyshire Acorn RISC Club (DARC), au ARM Club, au Manchester Acorn User Group et à la RISC OS 99 Show.
Speak utilisait la méthode de synthèse par formants. L’application comprenait plusieurs voix masculines et féminines, mais seulement pour la langue anglaise. Vers 2006 Jonathan Duddington portait Speak sur Linux et offrait le code en source libre sur la plateforme Sourceforge. La première version disponible était speak-1.5 publiée le 17.2.2006. À côté de la langue anglaise cette version supportait l’Esperanto et l’allemand. Plusieurs nouvelles versions ont été ajoutées au fil de l’année. En août 2006 l’application a été renommée eSpeak et un site web dédié afférent a été mis en ligne. eSpeak supportait des langues supplémentaires, l’africain, le grec, l’espagnol, l’italien et le polonais.
À partir de la version 1.16 les fichiers avaient également été renommées espeak. Des nouvelles versions ont été publiées à un rythme effréné jusqu’à la version espeak-1.48.4 en mars 2014. Cette version supportait 45 langues ainsi que les voix Mbrola.
eSpeak jouissait d’une très grande communauté et Jonathan Duddington était très engagé à fournir son aide aux utilisateurs et développeurs inscrits sur les listes de messages du projet. Pendant les quelques années il avait édité plusieurs centaines de réponses et d’annonces. Son dernier message date du 16 avril 2015.
Suite à l’allongement du silence de Jonathan Duddington, la communauté eSpeak commençait à s’inquiéter. Malgré plusieurs tentatives, personne n’a réussi à savoir ce qui s’était passé avec le développeur et on ne trouvait plus trace d’aucune biographie sur lui sur le net.
Après de longs débats au sein de la communauté eSpeak vers la fin de l’année 2015, la candidature de Reece Dunn comme nouveau coordinateur du projet eSpeak, rebaptisé eSpeakNG (nouvelle génération), a été approuvée. Reece Dunn était un contributeur de longue date au projet eSpeak et il l’avait porté sur Android. Son répositoire sur la plateforme Github, créé en mars 2013 pour le développement d’eSpeak pour Android, a été utilisé dans une première phase pour héberger le projet eSpeakNG. Un autre développeur, Alon Zakai alias kripken, a converti eSpeak en Javascript moyennant l’outil Emscripten.
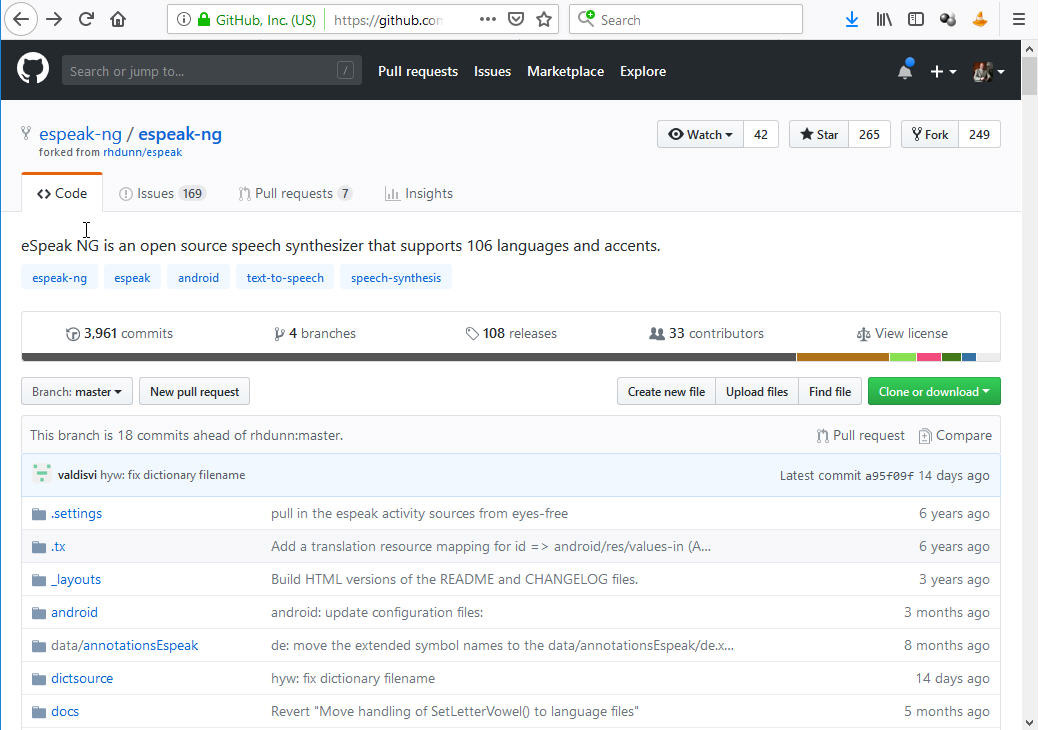
Page de dépôt GitHub du projet espeak-ng
Récemment le projet eSpeakNG a été transféré sur un propre repositoire de la communauté eSpeakNG sur Github. La version la plus récente est 1.49.2, publiée en septembre 2017. Après cette date, plus de 850 modifications ont été apportées jusqu’à ce jour dans la version de développement. L’application supporte actuellement 106 langues et accents. Je suis en train de finaliser une version pour le luxembourgeois que je me propose d’ajouter comme 107e langue.
Il reste à signaler que la version eSpeak pour les anciens ordinateurs RISC est maintenue par Martin Avison.
6.3.3. University of Edinburgh ( > 1984)
L’université d’Edimbourg a été fondée en 1583. Nous avons vu dans le présent historique qu’elle a une longue tradition dans le domaine de la linguistique, notamment suite à la création du département phonétique en 1948 par David Abercrombie. Elle range actuellement dans les premiers rangs au niveau mondial de notoriété QS World University Rankings by Subject 2018 concernant la linguistique.
En 1984 le centre interdisciplinaire CSTR (Center for Speech Technology Research), combinant la linguistique et l’informatique, a été créé à l’université. Depuis 2011 le CSTR est dirigé par le professeur Simon King.
Page web de présentation de la librairie des outils Edinburgh Speech du CSTR
Les projets phares du CSTR sont la librairie des outils Edinbourg Speech ainsi que Festival et Merlin. Le CSTR contribue en outre aux projets Kaldi et HTS. Les outils et logiciels de tous ces projets sont disponibles gratuitement en source libre (open source).
6.3.4. Carnegy Mellon University ( > 1986 )
L’université Carnegy Mellon à Pittsburgh porte le nom de Andrew Carnegie qui est né en Ecosse en 1835 et qui a immigré en 1848 avec ses parents aux Etats-Unis. Il est devenu un riche industriel et a fondé en 1900 une école technique, Carnegie Tech. En 1967, Carnegie Tech a fusionné avec l’institution Mellon pour devenir la Carnegy Mellon University (CMU). En 1986 la School of Computer Science a été créée au CMU, elle figure actuellement au 3e rang des universités dans ce domaine, derrière le MIT et la Stanford University. En 1996 l’institut des technologies du langage (LTI : Language Technologies Institute) a été créé, basé sur l’ancien centre de traduction machinelle, et a réussi rapidement à se forger un nom auprès de la communauté scientifique.
Un des pionniers au LTI est le professeur Alan W. Black. Né en 1937 en Écosse, il est le père du système de synthèse Festival qu’il a développé de 1996 à 1999 à l’université d’Édimbourg. Il a joint le LTI en 1999 et a continué à faire évoluer Festival, notamment en créant le site web festvox.org qui fournit tous les documents, outils et logiciels pour faciliter l’utilisation de Festival. En 2000 Alan Black a créé, ensemble avec d’autres spécialistes du LTI, l’entreprise privée Cepstral à Pittsbourgh qui fournit des systèmes de synthèse vocale commerciales. Dans la suite il a développé Flite, un synthétiseur vocal dérivé de Festival, optimisé pour être intégré dans des équipements à ressources limitées comme les premiers téléphones mobiles.
Professor Alan W. Black, Language Technologies Institute, CMU (Youtube)
Alan Black a contribué au développement d’un autre projet phare de l’université Carnegy Mellon : CMU-Sphinx, un système de reconnaissance de la parole dont le code est également à source libre. Ensemble avec Keiichi Tokuda de l’Institut des Technologies Nagoya au Japon, Alan Black a lancé en 2005 un concours annuel international, sous le nom de Blizzard Challenge, pour évaluer la qualité des voix synthétiques développées par les participants à partir d’une même base de données audio et texte, mise à disposition par les organisateurs.
Aujourd’hui âgé de 82 ans, Alan Black a présenté en décembre 2018 son projet le plus récent : la constitution d’une base de données contenant les textes et les enregistrements vocaux de la bible pour des centaines de langues, permettant la création de voix synthétiques pour les langues rares. Malheureusement le luxembourgeois n’est pas inclus.
Le LTI vient de publier un catalogue avec toutes les ressources disponibles en relation avec les projets réalisés par les membres et étudiants de l’institut.
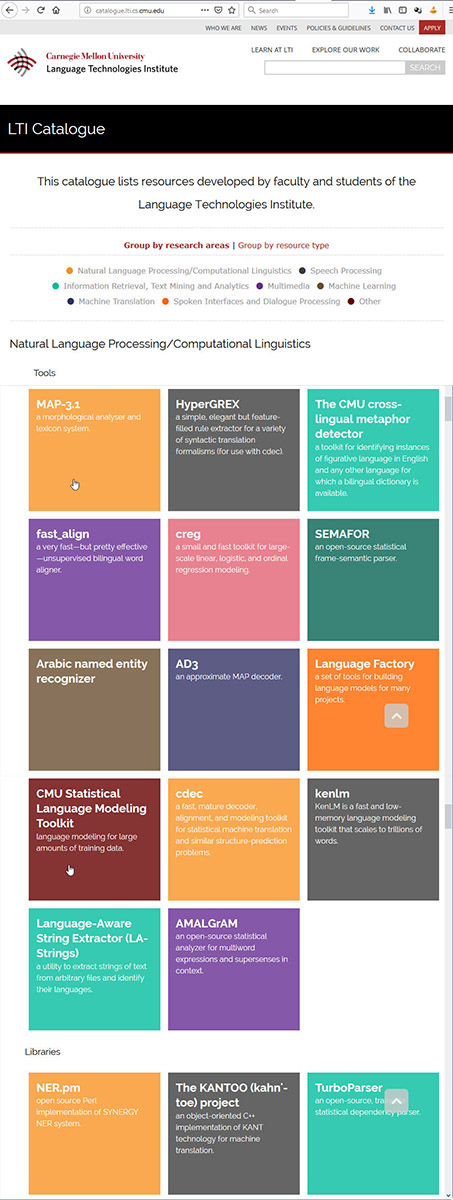
Page web de présentation du catalogue des ressources vocales du LTI
6.3.5. Université de Mons ( > 1995 )
L’université de Mons (UMons) en Belgique a été établie en 2009 par la fusion de l’université de Mons-Hainaut et de la Faculté polytechnique de Mons. Cette dernière était la première école d’ingénieurs créée en Belgique, en 1836. Un des centres de recherche de la faculté était le Service de Théorie des Circuits et de Traitement du Signal (TCTS Lab), spécialisé dans les filtres digitaux, la synthèse et reconnaissance de la parole, le codage de la parole et la reconnaissance d’images.
Le responsable du TCTS était Thierry Dutoit, aujourd’hui professeur ordinaire à l’université de Mons et président du nouvel institut Numediart à l’université. En 1996 il a passé 15 mois aux laboratoires Bell aux Etats-Unis. Il est l’initiateur des ateliers européens eNTERFACE qui regroupent chaque année plus de 70 chercheurs pendant un mois complet autour de la thématique des interfaces multimodales.
Dans la synthèse vocale, sa majeure contribution est la coordination du projet MBROLA à partir de 1995, un système de synthèse vocale à base de diphones pour plusieurs langues européennes. La première version a été développée par Thierry Dutoit en 1996 et mise à disposition gratuitement pour des applications non-commerciales et non-militaires. Ce n’est que récemment, en octobre 218, que le code afférent a été publié par Numediart en source libre sur le réseau de développement Github. Plus que 70 voix synthétiques pour 40 différentes langues du monde entier ont été développés pour MROLA et peuvent également être téléchargées à aprtir de Github. Le luxembourgeois ne figure pas parmi les voix disponibles.
The MBROLA project, Thierry Dutoit et autres, 4e conférence internationale au sujet du traitement des langues parlées, Philadelphia, 3 – 6 octobre 1996 (ISCA)
La ville de Mons a été longtemps un centre renommé européen de la synthèse vocale. En 1996, Thierry Dutoit a été un des fondateurs de la société Babel Technologies comme spin-off de la Faculté Polytechnique. Cette société a fusionné en 2003 avec les sociétés ELAN (FR) et INFOVOX (SWE) pour former le groupe ACAPELA dont le siège se trouve toujours à Mons.
Page web d’accueil du groupe Acapela
À l’époque il existait une autre entreprise spécialisée dans le traitement de la parole en Belgique, à savoir Lernout & Hauspie (L&H). Fondée en 1987 par Jo Lernout et Paul Hauspie, elle était domiciliée à Ypres. Après un début difficile, L&H devenait un fleuron industriel en Flandre et elle faisait l’acquisition de plusieurs compétiteurs comme Berkeley Speech Technologies, Dictaphone et Dragon Systems. À cause d’une fraude des dirigeants, l’entreprise a fait faillite en 2001 et toutes les technologies ont été achetées par Nuance Communications. Les procès afférents ne sont pas encore terminés.

Cour d’appel de Gand en mars 2017 pour traiter le volet civil de l’affaire Lernout & Hauspie. Plus de 15.000 parties civiles demandent un dédommagement.
On trouve encore aujourd’hui les voix synthétiques L&H Michelle et à L&H Michel dans des anciens logiciels bureautiques.
6.3.6. Nagoya Institute of Technology ( > 1995 )
L’université de technologie de Nagoya est un établissement japonais d’enseignement supérieur, issue en 1949 de l’unification de plusieurs établissements, dont la composante la plus ancienne date de 1905. Au niveau de la recherche l’université comprend 17 laboratoires, parmi eux celui du traitement de la parole et des langues, dirigé par le professeur Tokuda Keiichi.
Il a été introduit dans le chapitre 6.3.4. du présent historique en sa qualité de co-organisateur des Blizzard Challenges, ensemble avec Alan W. Black. En 1995 il a publié un article concernant l’application des modèles de Markov Cachés (HMM : Hidden Markov Models) pour la synthèse de la parole.
Page de présentation du Blizzard Challenge co-organisé par Tokuda Keiichi
En 2012 Tokuda Keiichi a été promu professeur honoraire à l’université d’Édimbourg. Deux ans plus tard il reçoit le prix de réussite pour ses travaux sur la synthèse vocale basée sur des modèles statistiques de la part du IEICE (Institute of Electronics, Information and Communication Engineers) au Japon.
Tokuda Keiichi est un des contributeurs principaux aux projets HTS (HMM/DNN-based Speech Synthesis System), HTK (Hidden Markov Model Toolkit) et SPTK (Speech Signal Processing Toolkit).
6.3.7. Université de la Sarre ( > 2000)
Le lecteur averti se rappelle que l’Université de la Sarre a été mentionné dans le chapitre 6.1.2. concernant Wolfgang von Kempelen. Cette université a été fondée en 1948 et elle a une longue tradition dans la linguistique informatique. Aujourd’hui les activités dans ce domaine sont regroupées dans le département des sciences et technologies du langage (LST) qui travaille en étroite collaboration avec le cluster d’excellence Multimodal Computing and Interaction (M2CI). Un groupe de recherche de cette grappe technologique est l’équipe Multimodal Speech Processing, créée en décembre 2012 et dirigée par Ingmar Steiner. Il a accompli une partie de sa thèse de doctorat au CSTR à Édimbourg.
Ingmar Steiner, avec son groupe de recherche, est en charge de la maintenance et de l’évolution du systéme de synthèse de la parole multilingue MaryTTS (MARY Text-to-Speech). Disponible en source libre sur Github, MaryTTS est actuellement un des systèmes de synthèse de la parole les plus universels et performants au niveau mondial. Une démonstration de MaryTTS est disponible sur le web et accessible avec tout navigateur Internet.
Le développement de MaryTTS remonte à 2000. À l’époque c’était l’institut de phonétique de l’Université de la Sarre et le laboratoire des technologies du langage du centre de recherche allemand pour l’intelligence artificielle (DFKI) qui étaient à l’initiative du projet. Marc Schröder et Jürgen Trouvain ont présenté le projet lors du 4e atelier de travail de l’association internationale des communications vocales (ISCA) qui a eu lieu du 29 août au 1er septembre 2001 à Pertshire en Ecosse. Le DFKI continue à supporter le projet.
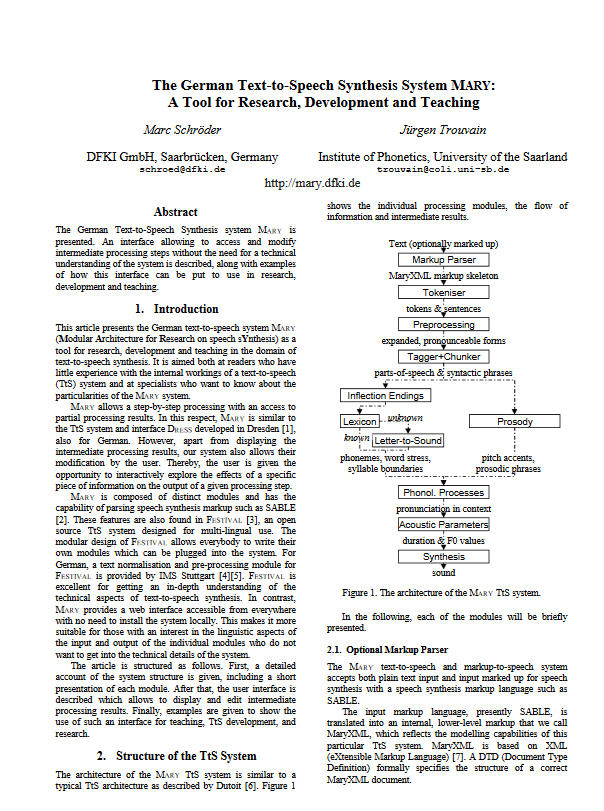
MaryTTS est programmé en Java et supporte la synthèse par sélection d’unités, la synthèse paramétrique statistique (HMM) et l’apprentissage moyennant des réseaux neuronaux. Au début le système ne comprenait que les voix MBROLA. Dans la suite l’anglais a été ajouté en utilisant une partie du code du projet à source libre FreeTTS, qui lui-même est un portage du projet FLITE de Alan W. Black.
D’autres langues ont été ajoutées et aujourd’hui MaryTTS est le seul système de synthèse de la parole qui supporte le luxembourgeois. Le projet MaryLux a été présenté lors du 5e congrès de l’IGDD (Internationale Gesellschaft für Dialektologie des Deutschen) qui a eu lieu du 10 au 12 septembre 2015 à l’université du Luxembourg. Les auteurs étaient Ingmar Steiner, Jürgen Trouvain, Judith Manzoni et Peter Gilles. Le projet MaryLux a en outre été présenté le 10 novembre 2015 dans un colloque interne à l’université et en avril 2016 sur le portail sciences.lu.
La voix synthétique de MaryLux est celle de Judith Manzoni. Elle a enregistré en 2014 des textes en luxembourgeois et français, d’une durée de trois heures, qui ont été ensuite traités par les différents outils informatiques du système MaryTTS pour créer le modèle de la voix, avec la méthode de sélection d’unités.
Judith Manzoni lors de la présentation de MaryLux en 2015 (portail sciences.lu)
6.3.8. GAFAM ( > 1995 )
GAFAM est l’acronyme de Google, Apple, Facebook, Amazon et Microsoft. J’ai déjà présenté sur mon site web ces cinq géants du web dans une autre contribution au sujet de l’intelligence artificielle en mars 2017. Microsoft est le doyen dans ce groupe.
Ces cinq sociétés utilisent la synthèse vocale pour donner une voix à leurs assistants personnels qui ne savent pas seulement parler, mais également écouter et comprendre la voix de leur maître.
Dès 1995, Microsoft a développé une interface de synthèse et de reconnaissance de la voix appelé SAPI (Speech Application Programming Interface) pour son système d’exploitation Windows 95. Cette interface a évolué vers la version SAPI 5.4 qui reste compatible avec la version Windows 10 actuelle. En 2014 Microsoft a introduit son assistant personnel intelligent CORTONA qui fait partie de Windows 10.
Apple a été le premier à présenter un assistant personnel avec SIRI le 4 octobre 2011. Tout comme Microsoft, Apple offre un cadre de développement (framework) pour la synthèse et la reconnaissance de la parole.
Facebook est le moins avancé dans l’application de la synthèse vocale dans ses produits. Parmi les domaines de recherche de Facebook se trouve le groupe Natural Language Processing & Speech, mais son assistant virtuel M, lancé en août 2015 et intégré dans son service de messagerie Facebook Messenger, a été arrêté le 19 janvier 2018.
L’assistant personnel intelligent ALEXA et l’enceinte y associée ECHO, annoncés par Amazon en novembre 2014, sont probablement les outils vocaux les plus connus par le grand public. Il est moins connu que Amazon propose aux développeurs dans son portefeuille des services cloud AWS des outils très performants en relation avec la parole : Amazon Polly, un service qui transforme le texte en paroles réalistes, Amazon Lex, un service de reconnaissance automatique de la parole (RAP) et de compréhension du langage naturel (CNL), Amazon Translate, un service de traduction automatique neuronale offrant des traductions linguistiques rapides, Alexa Voice Services, un service de synthèse et reconnaissance vocale et Alexa Skills Kit, un service d’intelligence derrière les appareils de la gamme Amazon Echo.
Dispositif Echo pour Amazon Alexa et dispositif Home pour Google Assistant
Google dispose également d’une large infrastructure cloud avec des services vocaux offerts aux développeurs qu’elle a démarré en avril 2008. Parmi les produits d’intelligence artificiel et d’apprentissage machine se trouvent les services suivants : Cloud Text-to-Speech, Cloud Speech-to Text, Cloud Natural Language API et Cloud Translation API.
Lors de la conférence INTERSPEECH 2017 qui a eu lieu du 20 au 24 août à Stockholm, Google a présenté un nouveau système de synthèse vocale appelé TACOTRON. La publication académique afférente porte les noms de 14 auteurs. En décembre 2017 Google a annoncé sur son blog l’évolution du système vers Tacotron 2 qui produit des résultats qui sont très proches d’une prononciation par un humain. La publication afférente a été publiée en février 2018. La technologie de Tacotron 2 repose sur la superposition de deux réseaux neuronaux : un qui divise le texte en séquences, et transforme chacune d’elles en spectrogrammes MEL et un autre qui génère des fichiers sonores (WaveNet).
Architecture Tacotron 2 : le spectre Mel rappelle les spectrogrammes utilisés par Cooper et Lawrence
À l’heure actuelle Tacotron 2 est le système de synthèse vocale le plus performant (et le plus complexe). Le code de Google est propriétaire, mais de nombreux développeurs essayent de créer leurs propres applications à libre source sur base des articles académiques publiés par Google. Une recherche sur le site de développement Github, avec la clé tacotron, fournit en janvier 2019 152 résultats.
Il reste à signaler que l’assistant personnel de Google s’appelle Google Assistant et que la famille des enceintes y connectées est nommée Google Home. Ces outils ont été annoncés par Google en mai 2016 pour concurrencer Amazon Alexa et Echo.
6.3.9. Les autres ( > 1950)
À côté des cinq entreprises GAFAM in convient de mentionner quelques autres géants qui sont actives dans le domaine de la synthèse vocale, à commencer par Baidu, IBM et AT&T.
Baidu, le géant chinois de l’Internet, a ouvert en 2013 un laboratoire de recherche en intelligence artificielle dans la Silicon Valley et s’est lancé dans un travail sur la synthèse de la parole. Parmi les projets afférents figurent ClariNet et DeepVoice 3. L’apprentissage de DeepVoice 3, présenté fin 2017, se faisait moyennant des échantillons vocaux d’une durée totale de 800 heures, enregistrés par 2.400 différentes personnes. Baidu affirme pouvoir cloner maintenant la voix de n’importe quelle personne avec un échantillon de quelques secondes moyennant ce système.
La solution IBM Watson fournit un ensemble de composants et de technologies d’intelligence artificielle avec synthèse vocale pour développer des assistants virtuels qui comprennent le langage naturel et interagissent avec les clients comme le ferait un humain et ceci dans plusieurs langues.
AT&T (American Telephone and Telegraph Company) est issue en 1885 de l’entreprise Bell Telephone Company, fondée par Alexandre Graham Bell en 1877. Elle fut la plus grande entreprise mondiale de télécommunications et profita d’un long monopole, appelé Bell System.
En 1925 AT&T créa l’unité de recherche de développement Bell Labs dont les activités dans le domaine la synthèse la parole ont été mises en évidence dans le présent historique.
En 1982 le système Bell a été démantelé. AT&T a été rachetée par une de ses filiales qui reprit le nom de AT&T Inc.
AT&T commercialisait les produits vocaux développés par les laboratoires Bell. D’une part il s’agissait de la plateforme AT&T Natural Voices, lancée en 2001. Les voix synthétiques afférentes sont utilisées dans de nombreux systèmes de synthèse de la parole. Depuis 2011 la vente de ces voix est cédée à des partenaires comme Wizzard Software.
Courriel reçu de AT&T en mars 2016 pour annoncer la suppression de mon compte de développement sur sa plateforme vocale
D’autre part il s’agissait de la plateforme de reconnaissance et de synthèse de la parole Watson, à ne pas confondre avec la technologie du même nom d’IBM. En 2014 AT&T a vendu cette plateforme à Interactions Corporation et a cessé ses propres activités dans ce domaine.
Quant aux laboratoires Bell, ils sont passés en 1996 à Lucent Technologies, 10 ans plus tard à Alcatel-Lucent et en 2016 à Nokia pour devenir les Nokia Bell Labs.
7. Le mot de la fin
Les recherches que j’ai effectuées pour le présent historique m’ont confirmé que la synthèse de la parole est une technologie, et j’estime même que c’est la seule, qui a fasciné les humains depuis l’antiquité jusqu’à nos jours. Les progrès réalisés étaient graduels. Ce n’est que récemment que l’apprentissage profond a permis de perfectionner la synthèse vocale de telle manière qu’il est aujourd’hui Impossible de faire la distinction entre une voix enregistrée et une voix synthétisée pour une même personne, ce qui va causer pas mal de problèmes dans l’avenir.
Un autre aspect à relever est la nostalgie de la génération 68, dont une partie a eu le privilège de posséder un ordinateur personnel dans la période de fin 1970 à fin 1980. Comme ces ordinateurs disposaient en général d’une interface de synthèse de la parole distinctive, les anciens propriétaires associent cette voix synthétique à la personnalité de leur premier ordinateur. Les musées virtuels d’anciens calculateurs et d’ordinateurs en témoignent parfaitement. Une société canadienne, Plogue, vient de créer des applications multiplateformes qui permettent de recréer la voix de ces équipements et elle a un grand succès avec ces produits.
Cette société a rendu un hommage aux principaux chercheurs de l’époque, actifs dans la synthèse vocale, avec son produit ChipSpeech, qui permet de simuler la voix des anciens synthétiseurs. J’ai assemblé la figure ci-dessous qui montre les caractères définis pour sélectionner les différentes voies disponibles dans cette application.

Caractères ChipSpeech (de gauche à droite et de haut en bas) : Bert Gotrax -> Richard Gagnon; Voder -> Homer Dudley; Dee Klatt -> Dennis Klatt; Otto Mozer -> Forrest Mozer; SAM -> SoftVoice Inc.; Terminal 99 -> Larry Brantingham, Paul S. Breedlove, Richard H. Wiggins, and Gene A. Frantz
Toutefois, à côté des inventeurs célèbres qui ont été présentés dans le présent historique, il y a de nombreux chercheurs qui étaient engagés dans le domaine de la synthèse vocale, mais qui sont tombés dans l’oubli. Pour faire leur connaissance, il suffit de regarder sur la plateforme des brevets Google ou dans la liste des auteurs de publications qui n’ont jamais été citées. Je rends donc également hommage à ces femmes et hommes qui n’ont pas réussi à obtenir la notoriété méritée. Un deuxième constat : je n’ai presque pas trouvé de pionnière dans le domaine de la synthèse vocale. S’il y a eu des femmes qui ont participé à des projets de recherche, leur nom figure toujours en dernière position dans les publications.
Il ne me reste plus qu’à établir la bibliographie des documents qui m’ont servi de source pour le présent historique et dont une partie n’a pas été référencée dans le texte.
8. Bibliographie
8.1. Outils et logiciels
- Track Draw, by Speech Perception Laboratory (1996)
- Multiple Arcade Machine Emulator (MAME) (1997)
- Multi Emulator Super System (MESS) (1998)
- GENSYN – Generate Synthesis Pararmeters for klatlk (1999)
- klatlk – Klatt Synthesis Program (1999)
- Synthesis of Speech, by Speech Research Lab (1999)
- Formant Synthesizer OVE-1 Demo, par Jonas Beskow KTH (2001)
- espeak-ng.js 1.49.1 Demo, par Eitan Isaacson (2015)
- A complete guide to chipspeech, David Viens, Plogue (2015)
- VocalTractLab, par Peter Birkholt (2017)
- Speak & Spell Emulation (US1979 version) (2018)
- MaryTTS Demo (DFKI Web Client) (2019)
8.2. Vidéos
- Speak & Spell Commercial, Texas Instruments (1980)
- Votrax Text to Speech Talking Computer, Intromix (2007)
- Speech Synthesis (1984)– Computer Chronicles Show; ckmogo (2008)
- Early Computer Speech Synthesis; ToneSpectra.com (2010)
- Donal Sherman orders a pizza (1974), John Eulenberg (2010)
- Voder (1939) – Early Speech Synthesis; Vintage CG (2011)
- TSI Speech+, Dale Hill (2011)
- Orgue à bouches van Kempelen, CFMI Lille (2012)
- Le chat de papa est mort, CFMI Lille (2012)
- Machine parlante de von Kempelen, Natahlie Marine Bernard (2012)
- Early Computer Graphics : The Talking Computer, AT&T (2012)
- Klatt’s Last Tapes – History of Speech Synthesis, Radio 4 (2013)
- The Speaking Machine, Art Republic (2013)
- Fun with SAM Speech Synthesizer, Wesley Burchell (2013)
- Pattern Playback Machine, early Haskins Labs video (2014)
- ChipSpeach, Plogue Art et Technologie (2014)
- Chrysler Electronic Voice Alerts 1984, Gary Thorpe (2014)
- Kempelen’s speaking machine, Fabian Brackhane (2015)
- The first speech synthesizer was born 1975, Plogue Art et Technologie (2015)
- Nachbau des KempelenschenSprachapparats, Deutsches Museum (2016)
- The Speech Chain-1963 Speech Synthesis educational film by Bell Telelphone Laboratories; Brian Roemmele (2016)
- The Voder: 1939, the worlds first electronic voice synthesizer; Brian Roemmele (2016)
- Forrest S. Mozer interview for Scene World Magazine (2016)
- The Evolution Of Speech Synthesis – Text To Speech; Gaming Addictionz (2017)
- 80speak.com introduces itself!, Connor Nishijima (2017)
- “80speak” Demonstration, Connor Nishijima (2017)
- AI Speech Synthesis – Testing out Lyrebird, Crypto Wizards (2018)
8.3. Livres
- Oeuvres complètes de Rivarol, précédées d’une notice sur sa vie (1808)
- Journal d’un bourgeois de Popincourt, par Henri Vial, Gaston Capon, Pierre Lefèvre de Beauvray (1902)
- Speech Analysis Synthesis and Perception, par J.L.Flanagan (1972)
- Auge & Ohr: Studien zur Erforschung der Sprache am Menschen 1700-1850, par Joachim Gessinger (1994)
- Concise history of the language sciences: from the Sumerians to the Cognitivists, par E.F.K. Koerner et R.E. Asher (1995)
- The Talking Machine, par Timothy C. Fabrizio et George F. Paul (1997) ; an illustrated compendium (1877 – 1929)
- Digital Formant Synthesis, par
- Madness in the Making : The Triumphant Rise & Ultimely Fall of America’s Show Inventors, par David Lindsay (p. 89, 170, 185, 190) (2005)
- Les créatures virtuelles, par Jean-Claude Heudin (2008)
- Le fil qui parle, par Paul Charbon (2008) : Du télégraphone au minifon
8.4. Articles
8.4.1. Têtes parlantes
- Talking Head, par David Lindsay (1997)
- The two heads of the Abbé, par Antonella Giannini (1999)
- Les têtes parlantes automates de l’abbé Mical, par Lutèce Créations (2019)
8.4.2. Machines parlantes
- The Speaking Automaton, Chambers Edinburg Journal 1846, p. 168 – 171
- Mimesis : Virtual Voices 1 and 2, par Remko Scha (1991)
- Why Talking Machines, par Louis Goldstein (2013)
- Des machines et des tubes, par Marie Lechner (2013)
- Ce que nous disent les premières machines parlantes, par Jean-Sylvain Liénard (2014)
- Preservation of French-speaking automatons 15and their pronunciations in 18th century France, par Yuko Tanaka (2014)
- Le canard digérateur, Wikipedia (2019)
8.4.3. Appareil vocal
- Cibles résonantes des voyelles orales, par Guerti Mhania (2005)
- Modellierung des Sprechapparats als akustisches Netzwerk, par Peter Birkholz (2015)
- The Virtual Laboratory, Max Planck Institute for the History of Science, Berlin (2019)
8.4.4. Orgues et Musique
- Die Lehre von den Tonempfindungen als physiologische Grundlage für die Theorie der Musik, par Hermann Helmholtz (1863)
- La Voix, l’Oreille et la Musique d’après les travaux du physicien allemand Helmholtz, Wikisource (1867)
- Registres de l’orgue par famille, par Jacques Gerbert (2000)
- Kann was natürlicher, als Vox humana, klingen ?, par Fabian Brackhane (2015
- 120 Years of Electronic Music
8.4.5 Kratzenstein et von Kempelen
- Le Mécanisme De La Parole suivi De La Description d’Une Machine Parlante et enrichie de XXVII planches, par Wolfgang von Kempelen (1791)
- Wolfgang von Kempelen’s speaking machine and its successors, par Hartmut Traunmüller (1997)
- Wolfgang von Kempelen on the Web, par Hartmut Traunmüller (2004)
- Von Kempelen et al. – Remarks on the history of articulatory-acoustic modelling, par Bernd Pompino-Marschall (2005)
- La machine parlante du baron Wolfgang von Kempelen, par Lutèce Créations (2014)
- Vokaltraktmodelle im 18. Jahrhundert: Kempelen vs. Kratzenstein, par Fabian Brackhane (2017)
- Wolfgang von Kempelen, Computer history (2019)
8.4.6. Willis, Wheatstone et Riesz
- Robert Willis : Digital Library (2016)
8.4.7. Faber
- Die Fabersche Sprechmaschine, mitgeteilt von Lehrer Schneider in Bauernwitz, Der katholische Jugendbildner, 1841, S. 270 -272 (1841)
- Ueber die Sprechmaschine des Herrn Faber, von Medicinal-Rathe Dr. Eduard Schmalz, Gehör und Spracharzte zu Dresden, Wochenschrift für die gesamte Heilkunde, No 49, 3. Dezember 1842
- Die Faber’sche Sprechmaschine, Gewerbeblatt für Sachsen, Vol. 8, 1843, S. 66-67 (1843)
- Sprechmaschine von Faber, Schlesisches Tonkünstler-Lexikon 1846, S. 317 – 318 (1846)
- P. T. Barnum’s $200.000 Challenge, Palmm Digital Collections (1873)
- Not Mr. Edison’s Talking Machine, par Arthur E. Zimmerman and Betty Minaker Pratt (2013)
- Biography of Joseph Faber Senior, phonozoic.net (2014)
- Daisy Bell – IBM 7094 (1961), Jiggy (2015)
- Joseph Faber’s Freakish Talking Head Haunts Uncanny Valley In 1846, par Paul Sorene (2016)
- Joseph Faber’s Marvelous Talking Machine, Euphonia, par Barbaro-Rose Sanwo (2016)
- Poster from P.T. BARNUM’S TRAVELING WORLD’S FAIR, emovieposter.com (2016)
- Text-To-Speech in 1846 Involved a Talking Robotic Head With Ringlets, par Addison Nugent (2016)
- EUPHONIA : la tête parlante de Joseph Faber, par Rosyvalerie (2017)
- Euphonia : script par Conor McShane (2019)
- Joseph Faber’s Euphonia, history-computer.com (2019)
8.4.8. Henry, Bell et Edison
- Joseph Henry : Inventor of the Telegraph?, par David Hochfelder (1992)
- Joseph Henry and the Telephone, par Frank Rives Millikan (1997)
- The Morse-Vail-Henry Telegraph, par R. Victor Jones (2004)
- Alexander Graham Bell, biographie par Jean-Serge Bernault (2012)
- History of the telephone, Wikipedia (2019)
8.4.9. Dudley
- Carrier Nature of Speech, par Homer Dudley in Bell System Technical Journal (1940)
- The Vocoder and other voice (digitizing) devices, ESD report (1964)
- A History of Vocoder Research at Lincoln Laboratory, par B. Gold (1990)
- Dudley Homer W.: A Tribute, par Manfred R. Schroeder (1981)
- The Vocoder, par Thomas Carney (2012)
- What is Voder, par SAS (2018)
8.4.10. Cooper, Fant, Lawrence et Holmes
- Linguistics up to date, par New Scientist (1957)
- Gunnar Fant 60 years, Department for Speech, Music and Hearing of KTH (1979)
- Half a century in phonetics and speech research, par Gunnar Fant (2000)
- Speech Synthesis and Recognition, par John Holmes et Wendy Holmes (2001)
- Speaker classification concepts: past, present and future, par David R. Hill (2007)
- The Gunnar Fant Legacy in the Study of Vocal Acoustics, par Björn Lindblom, Johan Sundberg, Peter Branderud, Hassan Djamshidpey et Svante Granqvist (2010)
8.4.11. Mozer et TSI Speak+
- The Development of the TSI Speech+ Speaking Calculator, Grant Still Shatto (2015)
- ANTIC Interview 101 – Forrest Mozer, pioneer in digitized speech (2015)
- TSI Speach+ & other speaking calculators, Vintage Calculators Web Museum (2019)
8.4.12. Gagnon et Votrax
- Patent US 3.908.085 for Voice Synthesizer, Richard Gagnon (1974)
- Votrax SC-01 Data Sheet, Votrax (1981)
- Articulate Automata: An Overview of Voice Synthesis, Kathryn Fons et Tim Gargagliano, Byte (1981)
- Detroit as Refrain, Paul Elliman (2013)
- SC-01A Speech Synthesizer and related IC’s, Dale Grover (2013)
- Votrax Type’n Talk, Rick Melick (2014)
- When a computer ordered a pizza, Klint Finley (2015)
- Richard Thomas Gagnon, Obituary (2017)
- Votrax International Inc, Smithonian History
8.4.13. TSI speak et Speak & Spell
- Texas Instruments – Early Press Releases, par Datamath Calculator Museum (2007)
- 30 Years Later, Richard Wiggins Talks Speak & Spell Development, par Benj Edwards (2008)
- Speak and Spell : a history, par Audrey Watters (2015)
- This old tech: The beloved Speak & Spell was a pioneer of popular computing, par Benj Edwards (2016)
- Chip Hall of Fame : Texas Instruments TMC0281 Speech Synthesizer, IEEE Spectrum (2017)
- The toy that talked back, Ernie Smith (2018)
8.4.14. Dennis Klatt
- Review of text-to-speech conversion for English, par Denis Klatt (1987)
- Overview of RLE Speech Research at MIT, RLE Currents, No 1, Vol 1, 1987
- Klatt record audio examples, par festvox.org (1987)
- Acoustics Today, search Klatt (1987)
- DECtalk Software: Text-to-Speech Technology and Implementation, par William I. Hallahan (1995)
- Project: DECTalk Text-to-Speech Synthesis by rule, Force Computers(1999)
- Klatt Synthesizer, by Tim Bunnell (1999)
- A brief history of DECTalk, by Edward Bruckert (2001)
- 80speak – Online DECTalk Speech Synthesis, par LixieLabs (2017)
- Professor Hawking’s Voice, by Peter Benie (2018)
- History of Professor Hawking’s voice synthesizer, par Jonathan Wood (2018)
8.4.15. Nouvelles Technologies
- Des ordinateurs parlent désormais le luxembourgeois pour aider les personnes atteintes de cécité ou dyslexie, uni.lu (2016)
- Expressive Speech Synthesis with Tacotron, Google AI Blog (2018)
8.4.16. Traitement des signaux
- La voix chez l’homme et chez les animaux, par Emile Blanchard (1876)
- La production de la parole, par Cyberphon (1997)
- Le traitement des signaux sonores, par équipe METISS (2005)
- Introduction à la compression audio, par Yvan Bonnassieux
- Du circuit à la voix. Comment sont formés les sons, et de quelles façons peut-on en reproduire un ? par Nicolas Assouad, Nicolas Gouraud, Adrian Lemaigre, Rime Vastra (2012)
- La carrière aventureuse de Johann Nepomuck Maelzel et son rôle dans la création du Métronome, par Paul Charbon (2016)
8.4.17. Synthèse de la parole
- Speech Processing, par Manfred R. Schroeder (1999)
- Codage de la parole à bas et très bas débit, par Geneviève Baudoin, J. Cernocký, P. Gournay, G. Chollet (2000)
- Formant Synthesis, par Gordon Reid (2001)
- Data driven speech synthesis, par Konstantin Tretjakov (2001)
- Synthèse Vocale et Reconnaisance de la Parole : Droites Gauches et Mondes Parallèles, par Thierry Dutoit, Laurent Couvreur, Fabrice Malfrère, Vincent Pagel, Christophe Ris (2002)
- Guide to the Smithsonian Speech Synthesis History Project, par Maxey H. David (2002)
- Die Geschichte der Sprachsynthese anhand einiger ausgewählter Beispiele, par Arne Hoxbergen (2005)
- Remarques sur [Lagrange,] Euler et Lambert à propos de la production des sons, par Norbert Schappacher (2007)
- Speech Synthesis, par Olov Engwall (KTH) (2008)
- History and Theoretical Basics of Hidden Markov Models, par Guy Leonard Kouemou (2011)
- Une voix et rien d’autre, par Mladen Dolar (2012)
- Synthèse de la parole à partir du texte, par Christophe d’Alessandro et Gaël Richard (2013)
- How speech synthesizers work, par Chris Woodford (2018)
- History of speech synthesis, par Ella (2018)
- History of Speech Synthesis in Phonetics Research, par Brad H. Story (2018)
- LPCNet : DSP-Boosted Neural Speech Synthesis, Jean-Marc Valin, Mozilla (2018)
- WaveNet : a generative model for raw Audio, Deepmind (2018)
- Software Automatic Mouth, Wikipedia (2019)
- Si l’histoire de la synthèse vocale m’était contée, ActuIA, (2019)
Protected: Artistes AI
Google PhotoScan pour numériser vos anciennes photos
Avec l’application Google PhotoScan, les photos du passé rencontrent le scanner du futur.
Pour numériser des anciennes photos de famille dans le passé, il fallait utiliser un scanner de bureau et un logicel de retouche photo pour recadrer les résultats et, le cas échéant, pour corriger des défauts. Si les photos étaient collées dans un album, le recours à un scanner plat était onéreux ou même impossible. Il restait la possibilité de reproduire les anciennes photos avec sa caméra ou son mobilophone. Dans ces cas on devait également utiliser un logiciel de retouche pour éliminer des reflets éventuels et pour corriger la perspective, suite à l’inclinaison inévitable de l’appareil photo ou du mobilophone. Dans tous les cas la procédure était lourde et prenait beaucoup de temps.
Fin 2016, Google présentait son application PhotoScan pour smartphone et tablette, permettant de numériser en un temps record toutes ses anciennes photos. Cette application intelligente ne nécessite que peu de travail, les algorithmes de Google se chargent de gommer automatiquement les défauts des photos argentiques et de redonner des couleurs vives pour disposer d’une version numérique et propre des clichés, sans aucun reflet.
La version actuelle de PhotoScan est 1.5, elle a été publiée le 14 décembre 2017. Cette app est disponible dans le PlayStore pour Android et dans l’AppStore pour iOS.
En l’absence de reflets indésirables sur les photos à reproduire, la procédure est simple et rapide. On démarre l’application PhotoScan sur son mobilophone (ou tablette), on désactive la fonctionnalité de suppression des reflets et on pousse sur le bouton rond.
Numériser une ancienne photo avec PhotoScan est simple comme Bonjour
Les photos numérisées sont enregistrées sur votre appareil lors de la numérisation. Le recadrage se fait automatiquement, avec détection des bords. La photo résultante est droite et rectangulaire, avec correction de la perspective. Il y a en outre un outil intégré, avec loupe, pour faire glisser les bords et les coins aux fins d’ajuster le recadrage automatique de la photo numérisée, le cas échéant. Une rotation intelligente est également assurée et les photos restent dans le bon sens, quelle que soit leur orientation au moment de la numérisation.
La dimension la plus large des photos numérisées avec Google Scan sur iPhone X est de 4.096 pixels. Chaque photo est enregistrée en deux exemplaires : la photo telle que vue sur l’écran au début de la numérisation et la photo reconstituée. Le nom du fichier d’une photo numérisée est défini au hasard avec une séquence de quatre lettres majuscules et de quatre chiffres, par exemple RZMM2336.JPG ou MQLB9372.JPG. Une lettre E est ajoutée au milieu du nom du fichier pour les photos reconstituées (RZMME2336.JPG et MQLBE9372.JPG.)
Les images qui suivent montrent la qualité d’anciennes photos numérisées avec GoogleScan.
A gauche la photo dans l’album telle qu’elle est affichée sur l’écran du mobile. A droite la photo résultante de la numérisation intelligente, en haute résolution, avec recadrage, rotation et correction automatique.
En haut la photo dans l’album telle qu’elle est affichée sur l’écran du mobile. En bas la photo résultante de la numérisation intelligente, en haute résolution, avec recadrage et correction automatique.
Sur les images qui suivent, la qualité des photos numérisées avec Google Scan peut être comparée avec des photos digitalisées moyennant un scanner de bureau standard.
Les photos en haut ont été numérisées avec un scanner de bureau. Les photos en bas ont été numérisées avec GoogleScan sur iPhone X.
La photo à gauche a été numérisée avec un scanner de bureau. La photo à droite a été numérisée avec GoogleScan sur iPhone X.
Si la photo à reproduire présente des reflets à cause d’une lumière directe ou indirecte, la procédure est un peu plus longue, mais également très simple d’utilisation. L’application nous indique quoi faire. La marche à suivre est basique : il faut placer son image dans le cadre, prendre la photo, déplacer ensuite son smartphone (sans incliner l’appareil) tout en visant les quatre points situés à chaque coin de l’image. Grâce aux quatre clichés complémentaires prises, GoogleScan supprimer les reflets habituels d’une photo imprimée sur papier brillant et produit une photo numérisée avec une meilleure qualité.
Pour éliminer les reflets sur la photo ancienne, il faut bouger l’applareil (si possible sans inclinaison) pour faire passer le cercle ouvert au mileu sur les quatre cercles blancs dans les coins de la photo. Les quatres clichés additionnelles sont pris automatiquement en cas d’accord.
L’application PhotoScan permet de sauvegarder aisément les photos numérisées sur la plateforme Google Photos pour les stocker en lieu sûr, les rechercher et les organiser. Sur cette plateforme on peut animer les photos, appliquer des filtres, faire des retouches avancées et envoyer des liens aux amis et membres de la famille pour partager les photos favoris.
GAFAM AI
La présente contribution est la suite de mon article récent Le web intelligent. AI est l’abbréviation de Artificial Intelligence, GAFAM est l’acronyme de Google, Apple, Facebook, Amazon et Microsoft. On appele ces cinq entreprises les géants du Web.
Dans l’article précité, on a passé en revue les produits commerciaux d’intelligence artificielle de Google et Amazon. Abstraction faite de Siri, Apple n’a pas encore lancé ses propres services AI pour le public, mais l’entreprise a publié sa première publication scientifique sur l’intelligence artificielle le 22 décembre 2016 (Learning from Simulated and Unsupervised Images through Adversarial Training).
Facebook publie depuis quelques années déjà des articles scientifiques sur l’intelligence artificielle et dispose de son propre site web Facebook Research. Parmi les activités de recherche on trouve Applied Machine Learning, Computer Vision, Data Science, Human Computer Interaction & UX, Natural Language Processing & Speech, Facebook AI Research (FAIR). Facebook n’offre pas encore de services AI en ligne, mais quelques logiciels qui accompagnent ses publications scientifiques sont disponibles en téléchargement sur son site web de recherche.
Parmi les entreprises GAFAM, Microsoft est le pionnier de la recherche technologique. Avec plus de 10.000 publications scientifiques et plus de 800 chercheurs internes dans ses laboratoires, Microsoft est le “leader” incontesté des services d’intelligence artificielle, appelés Microsoft Cognitive Services.
Microsoft a démarré ses services AI en 2015 et présente actuellement une panoplie impressionnante de produits commerciaux afférents. Rien que dans le domaine de la vision, les cinq services en ligne suivants sont à la disposition des développeurs:
Nous allons tester les trois premiers services avec les mêmes photos que celles utilisées pour les tests de Google Cloud Vision et Amazon Rekognition.
Microsoft Computer Vision
Parmi les données fournies par le service Computer Vision, les informations principales sont:
- une description succincte de la photo
- des étiquettes (tags) concernant le contenu
- une catégorie
- le sexe et l’âge des personnes
tags: indoor, child, baby, sitting, boy, young, toddler, room, high
Au sujet de la photo de Charles et Capucine ci-dessus, la description fournie est “a ltitle boy eating a piece of cake”. La catégorie est “others”, le sexe et l’âge (male et 0 ans pour Charles, female et 3 ans pour Capucine) sont indiqués correctement. Les étiquettes attribuées à la photo sont toutes correctes. Une meilleure description serait toutefois: “a baby boy and a toddler girl are eating a piece of cake”.
En ce qui concerne la photo ci-dessous, la description “person sitting on a bench in a park” est fausse. Le sexe (female) de Charles est également faux, l’âge (1 an), les étiquettes et la catégorie (outdoor) sont correctes.
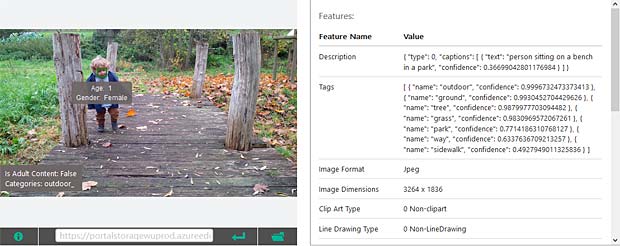
tags: outdoor, ground, tree, grass, park, way, sidewalk
La prochaine photo s’appelle “a little girl sitting at a table with a cake”. La petite fille est en réalité le petit garçon Charles. Google Vision et Amazon Rekognition avaient le même problème de reconnaître les jouets. La catégorie (people-young) et les étiquettes sont OK. Le visage n’est pas reconnu par l’algorithme de Microsoft, ce qui explique l’absence des informations au sujet du sexe et de l’âge.
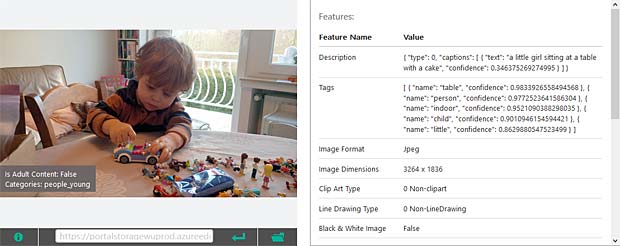
tags: table, person, indoor, child, little
La première photo de Thomas ci-après est décrite comme “a baby sitting in front of a cake”. Décidément le service Computer Vision de Microsoft favorise les gâteaux. Rien à critiquer au sujet du sexe (male), âge (0 ans), catégorie (people-young) et étiquettes. Même la fenêtre à l’arrière-plan est reconnue correctement.
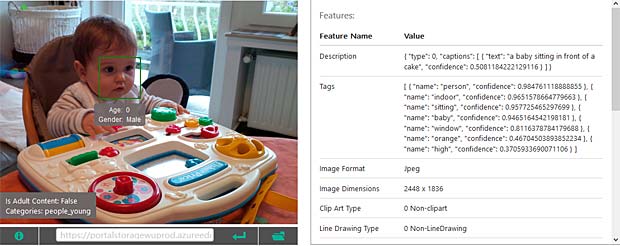
tags: person, indoor, sitting, baby, window, orange, high
La prochaine photo est intitulée “a baby sitting on a table”. Catégorie (people-young), sexe (male), âge (1 an) et étiquettes sont également correctes, abstraction faite du tag “cabinet” qui n’est pas approprié.

tags: cabinet, indoor, person, table, sitting, boy, little, baby, orange, toddler
La dernière photo de Thomas ci-après s’énonce “a young boy laying in the snow”. La catégorie est “people”, l’âge (2 ans) est correcte. Ce qui n’est pas cohérent, c’est l’indication du sexe féminin pour une personne libellée comme petit garçon. Ce qui dérange en outre, c’est l’étiquette “bed”.

tags: snow, person, outdoor, little, boy, child, yound, laying, bed, toddler
Malgré les quelques erreurs et incohérences, il semble que l’application Computer Vision de Microsoft soit plus performante que Google Vision et Amazon Rekognition.
Microsoft Emotion
Contrairement aux services AI de Google et Amazon, Microsoft propose un service spécifique pour la reconnaissance des émotions dans les visages.
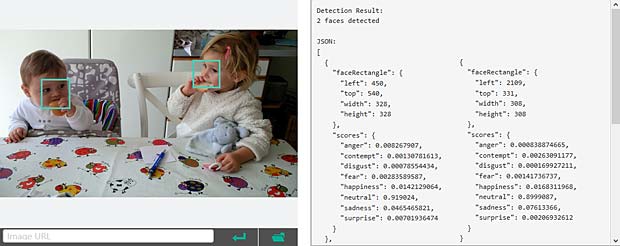
emotions: neutral, neutral
Je partage les avis de “visage neutre” pour Charles et Capucine sur la photo ci-dessus et de “joie” sur le visage de Charles sur la photo ci-dessous.
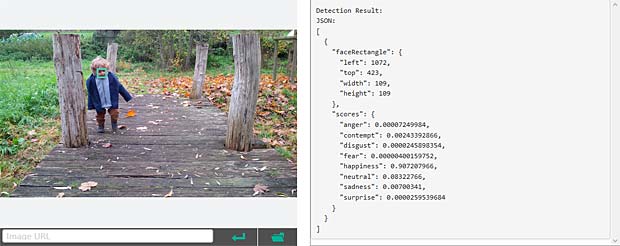
emotion: happiness
La troisième photo de Charles, où le visage n’est pas reconnu, n’est pas affichée dans l’application “Emotion” de Microsoft.
visage non détecté
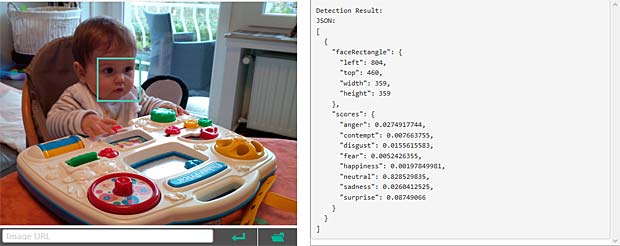
emotion: neutral
Sur la photo en haut Thomas affiche effectivement un visage “neutre”, tandis que sur la photo en bas on décèle une légère surprise.
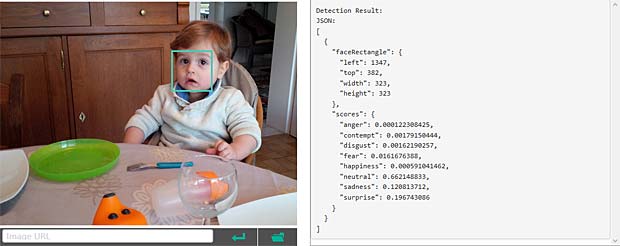
emotions: neutral, surprise
Microsoft Computer Vision est le seul service qui interprète correctement l’émotion de Thomas sur la photo qui suit:”sadness”.
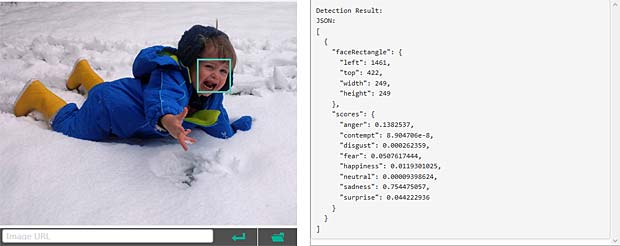
emtion: sadness
Microsoft Face
La comparaison de visages est également un service spécifique dans la famille des produits AI de Microsoft. La comparaison des jumeaux Charles et Thomas est difficile pour les humains et on pardonne à l’application Computer Vision de prétendre que les deux personnes sont identiques, avec une très grande certitude.

Charles et Thomas : même personne
On pardonne moins que Computer Vision nous dit que Capucine et Charles sont la même personne, même s’il y a une petite ressemblance.

Capucine et Charles: même personne
C’est toutefois incompréhensible que Charles et Astor sont identifiés comme les mêmes personnes,

Charles et Astor: même personne
tandis que Capucine qui souffle des bougies sur un gâteau n’est pas reconnue comme Capucine.
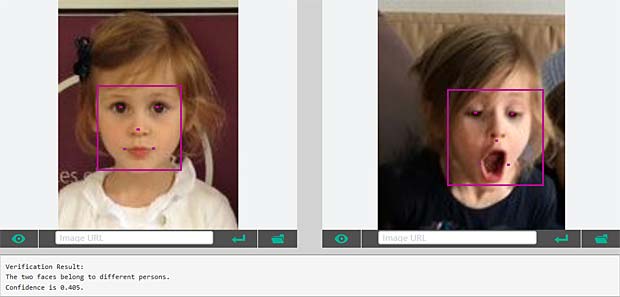
Capucine et Capucine: personnes différentes
Marco n’est pas reconnu non plus comme même personne sur deux photos ayant un écart d’âge de 40 ans. Décidément le service “Microsoft Face” doit encore faire beaucoup de séances de “deep learning” pour se perfectionner. Heureusement les outils afférents pour parfaire la reconnaissance des visages fait partie du service en ligne “Face” de Microsoft.
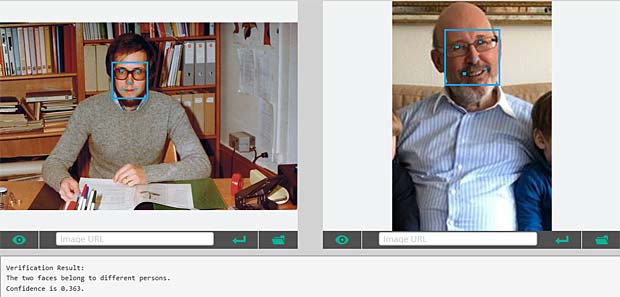
Marco et Marco: 40 ans d’écart > personnes différentes
Google Vision n’offre pas encore un service public de reconnaissance des visages. Si on compare l’application Microsoft Face avec le service de reconnaissance faciale d’Amazon, il faut dire que ce dernier a plusieurs longueurs d’avance. Les services Microsoft Cognition offrent toutefois des options de “training” pour parfaire la reconnaissance des visages, ce qui manque encore pour Amazon Rekognition.
Le web intelligent
Dernière mise à jour: 19 mars 2017
Chronologie Internet
Il y a presque 4 ans, j’avais publié sur mon blog une proposition de diviser la chronologie du web (timeline) en neuf époques. J’avais opté pour le nom de web intelligent (web 3.5) pour caractériser la période de début 2015 à mi 2017.
Pour moi, le web intelligent a les compétences suivantes:
- il parle notre langue
- il lit notre écriture
- il comprend notre langage et reconnaît notre voix
- il reconnaît notre visage et décode nos émotions
- il interprète des images et scènes vidéo
- il a des connaissances vastes sur tous les sujets
- il prend des décisions autonomes
- il est capable d’apprendre afin de parfaire ses compétences
Les technologies qui sont à la base de ces compétences existent depuis des années, voire des décennies. Ils ont fait l’objet de recherches, de tests, de prototypes, d’applications innovantes et de produits commerciaux, mais le plus souvent d’une façon isolée, pour une seule compétence.
Le GPS nous parle dans la voiture, Siri et Alexa répondent à nos questions sur le mobile, Google Photo et Facebook reconnaissent les visages sur nos photos, Wikipedia sait tout (ou presque), des outils d’aide à la décision sont omniprésents et les réseaux neuraux permettent aux machines d’apprendre en profondeur (deep learning).
Ce qui a changé en 2016, c’est le fait que toutes ces technologies ont été assemblées par Google et par Amazon Web Services (AWS) dans des produits commerciaux d’intelligence artificielle qui sont maintenant à la disposition des développeurs du monde entier.
Le web 3.5 est donc devenu réalité.
Google Cloud Platform
Google est bien connu pour son moteur de recherche, sa plateforme vidéo Youtube et ses services de traduction. Depuis 2011, Google offre aux programmeurs et sociétés d’héberger leurs propres applications sur la même infrastructure que celle qu’elle utilise en interne. Ce service est appelé Google Cloud Platform et se compose d’une famille de produits, chacun comportant une interface web, un outil de lignes de commande, et une interface de programmation applicative REST. Parmi ces produits on distingue:
- Google App Engine
- Google Storage
- Goggle Compute Engine
- Google Translate
L’ensemble des produits et services est décrit sur la page web cloud.google.com.
En mars 2016, Google a annoncé le lancement de la famille Cloud Machine Learning service mainstream. Les services suivants font partie, entre autres, de cette famille:
- Cloud ML : Large Scale Machine Learning Service
- Cloud Natural Language API : Powerful Text Analysis
- Cloud Speech API : Powerful Speech Recognition in 80 languages
- Cloud Translate API : Fast, Dynamic Translation
- Cloud Vision API : Powerful Image Analysis
Google Cloud Vision
De prime abord, je me suis intéressé pour le nouveau service Cloud Vision. Dans le passé j’avais déjà effectué des tests avec différentes applications de reconnaissance faciale et de lecture de textes. Les contributions afférentes sont disponibles sur mon blog.
Pour faire des tests, j’ai pris au hasard quelques photos de mes petits-enfants.
Les résultats de Google Vision sont affichés dans plusieurs onglets:
- Faces : reconnaissance de visages et d’émotions
- Labels : reconnaissance de scènes et d’objets
- Text : lecture de caractères et de textes
- Colors : classification des couleurs dominantes
- Safe Search : contenus avec nudité, violence, haine ou sujets médicaux
- JSON Response : ensemble détaillé des données en format JSON
Les résultats ont été assemblés dans une seule image, par copie-collage, pour donner une meilleure vue globale.
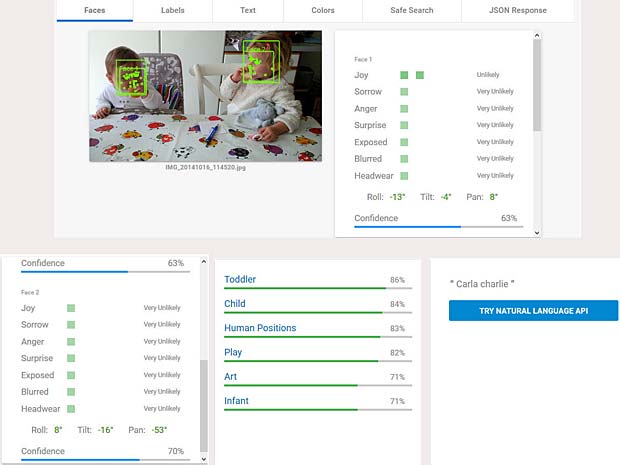 Google Vision ne fournit pas un service de reconnaissance des personnes comme dans Google Photo, mais se limite à détecter les visages et à interpréter les émotions. Dans la figure ci-dessus les informations pour les deux visages sont indiquées en haut à droite (Charles) et en bas à gauche (Capucine). Les étiquettes (label) pour la scène sont affichées en bas au milieu, le texte reconnu se trouve en bas à droite.
Les termes reconnus “Carla” et “Charlie” sont les noms de vaches qui figurent sur la nappe de la table, comme on peut le voir sur l’agrandissement ci-dessous.

Un exemple de l’onglet “JSON Response” est présenté ci-après. Tous les détails de l’analyse sont fournis dans cette structure JSON.
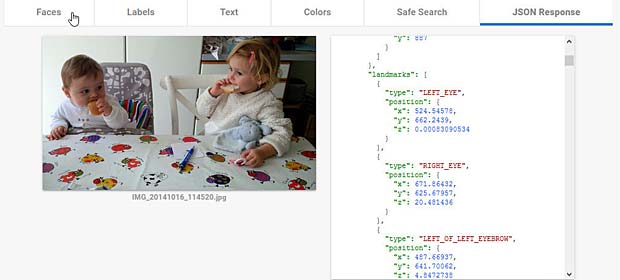
En ce qui concerne l’analyse proprement dite, Google Vision ne détecte pas d’émotions sur les visages des deux enfants, sauf une légère surprise sur le visage de Charles. Hormis la reconnaissance de personnes (toddler, child), Il n’y a guère d’informations sur le contexte.
Pour les images suivantes, seuls les résultats “Faces” et “Labels” sont présentés dans les figures montées.
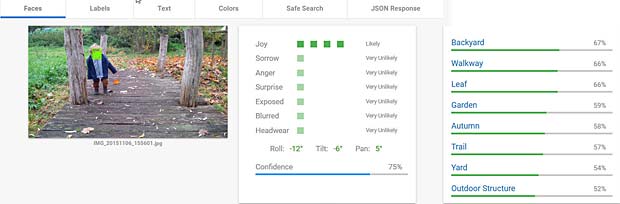 Google Vision voit de la joie dans le visage de Charles qui se trouve dehors, dans une sorte de jardin, avec des feuilles, en automne. Bonne interprétation.
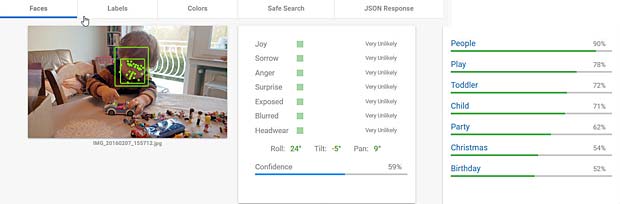 Google Vision estime que Charles fête son anniversaire à Noël. En réalité il joue en février 2016 avec du Lego. Echec.
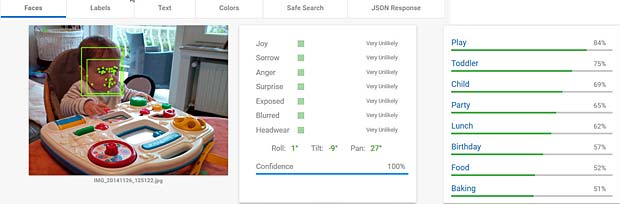 L’activity-Center Fisher-Prize de Thomas fait penser Google Vision à un anniversaire et à de la nourriture.
Google Vision considère que Thomas est un peu surpris et combine les activités jouer et manger. Bien.
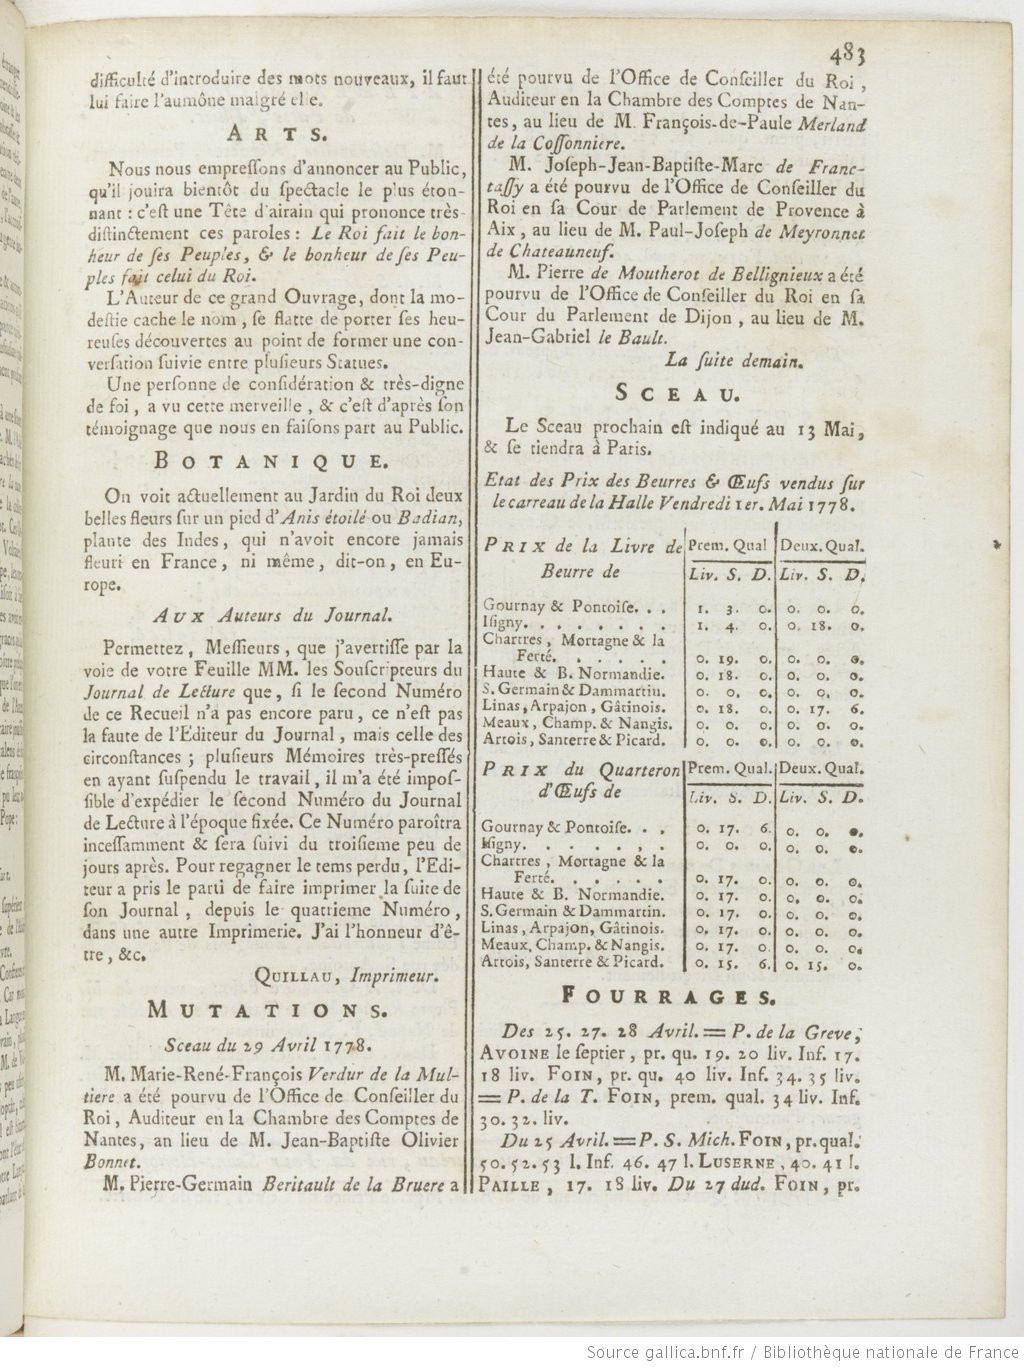
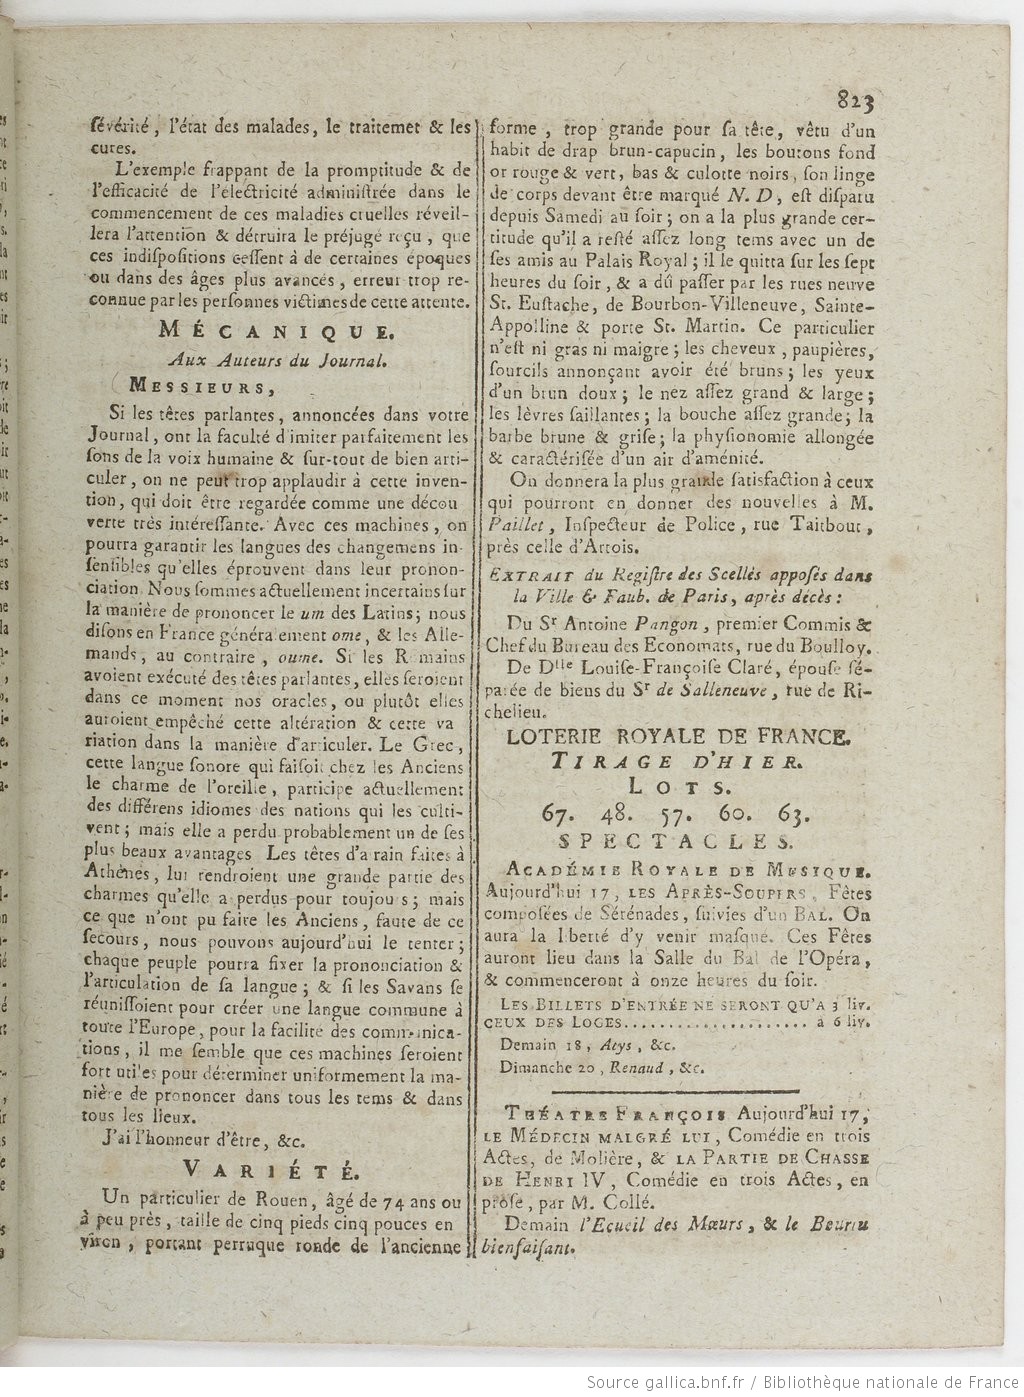
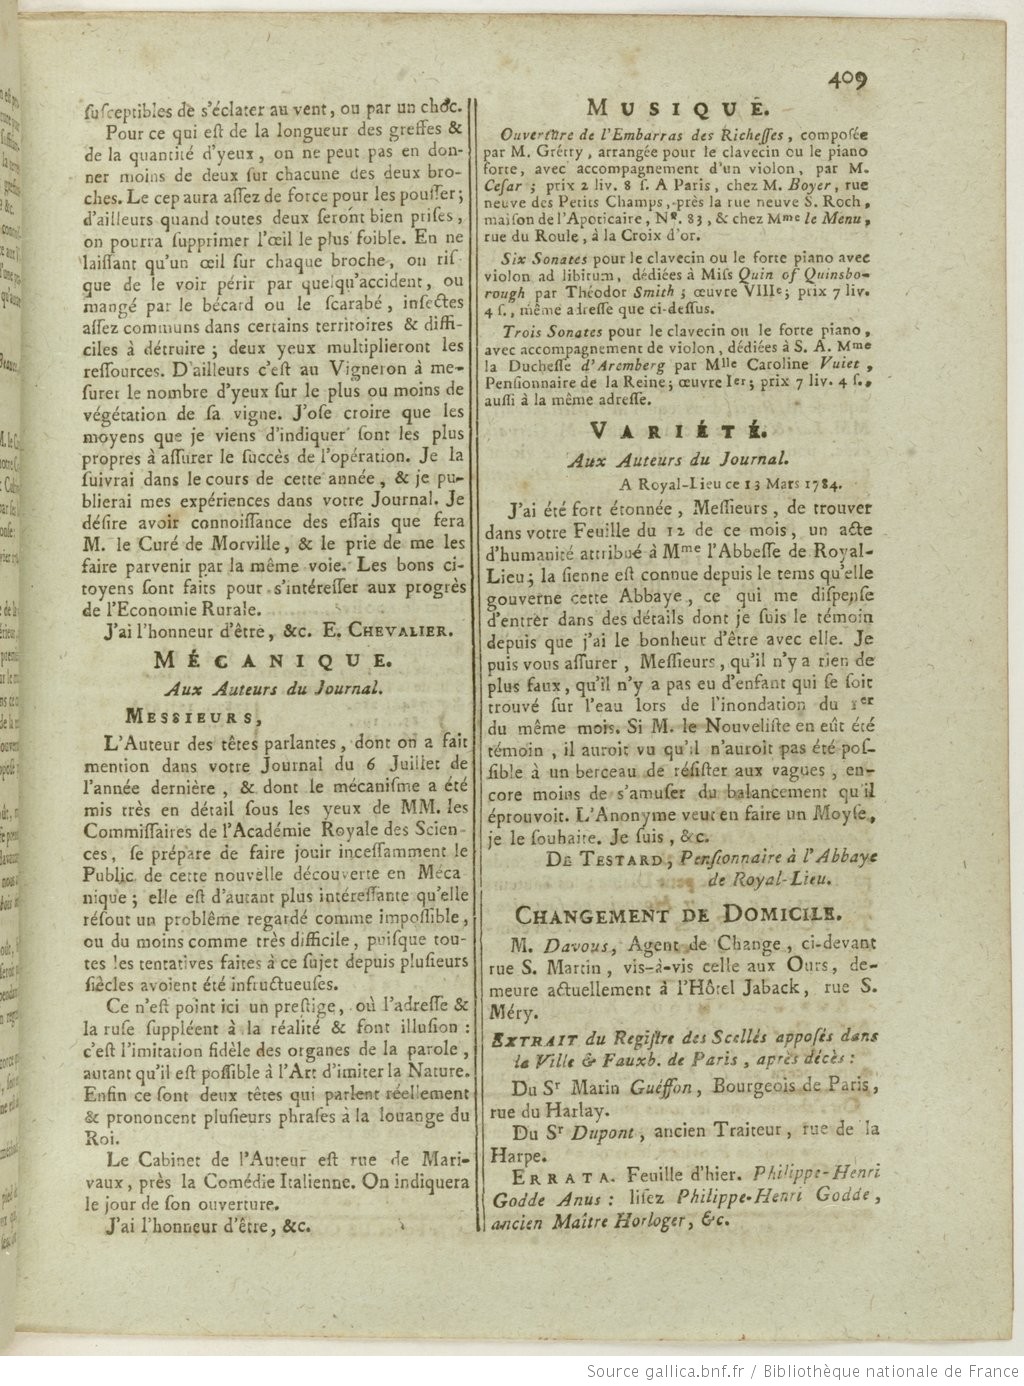
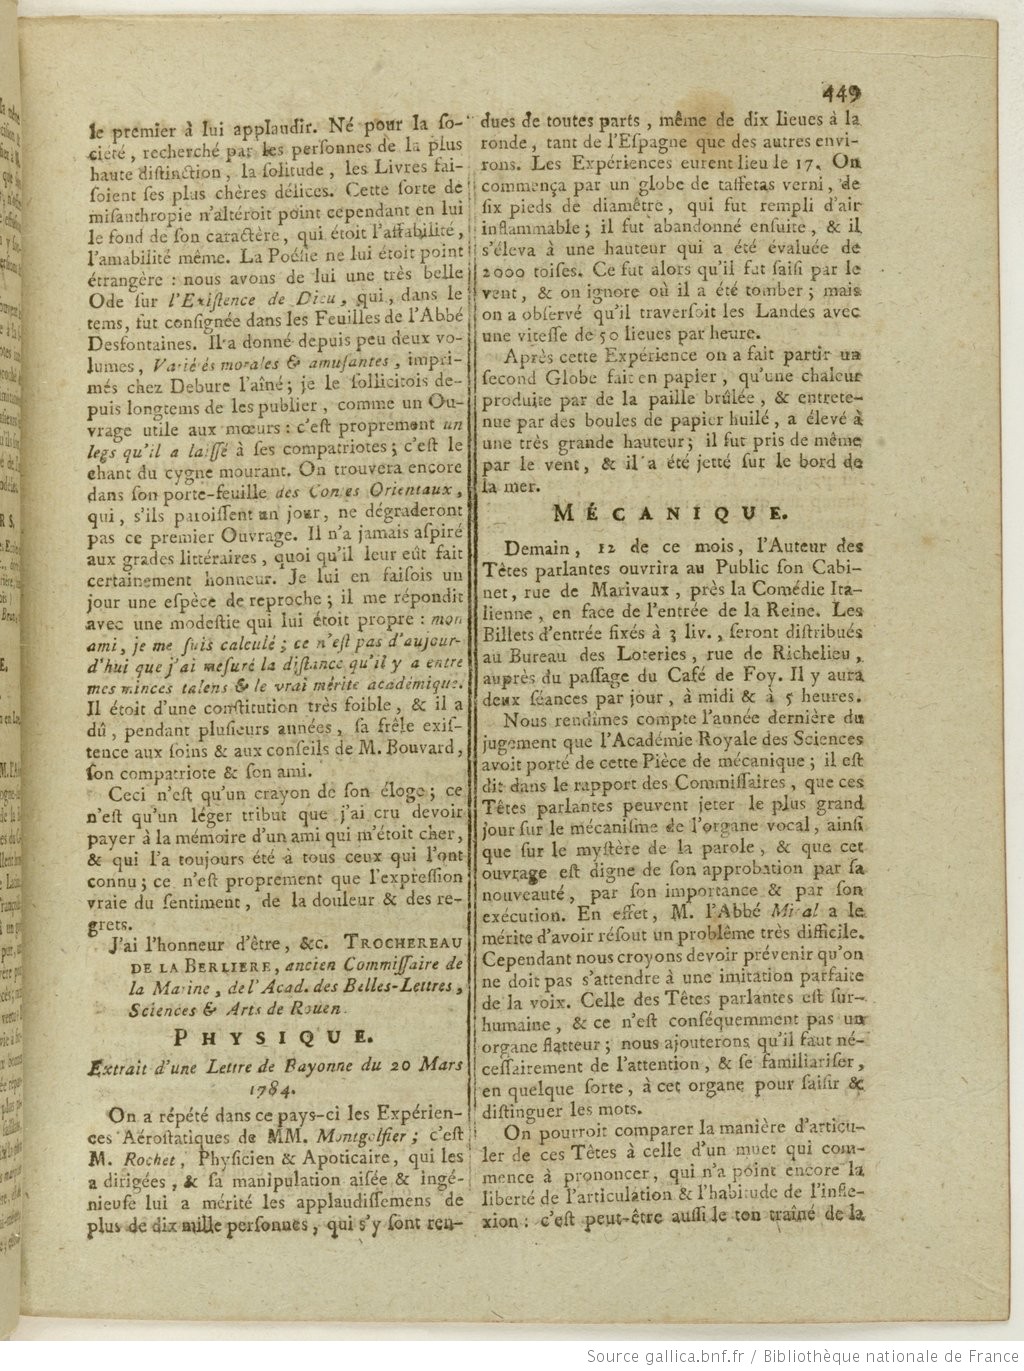
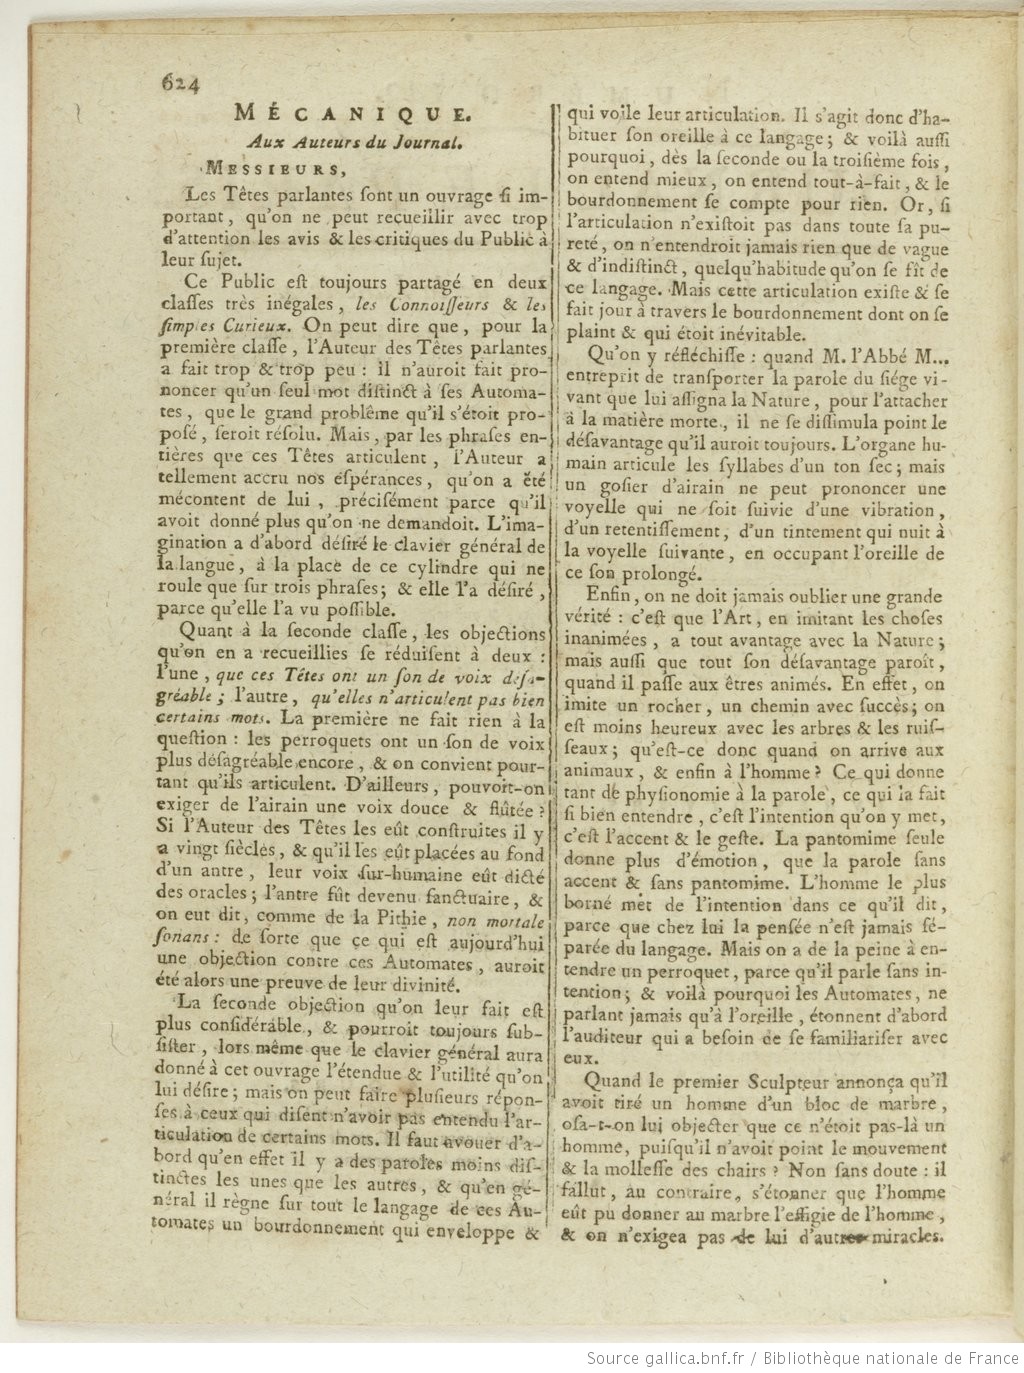
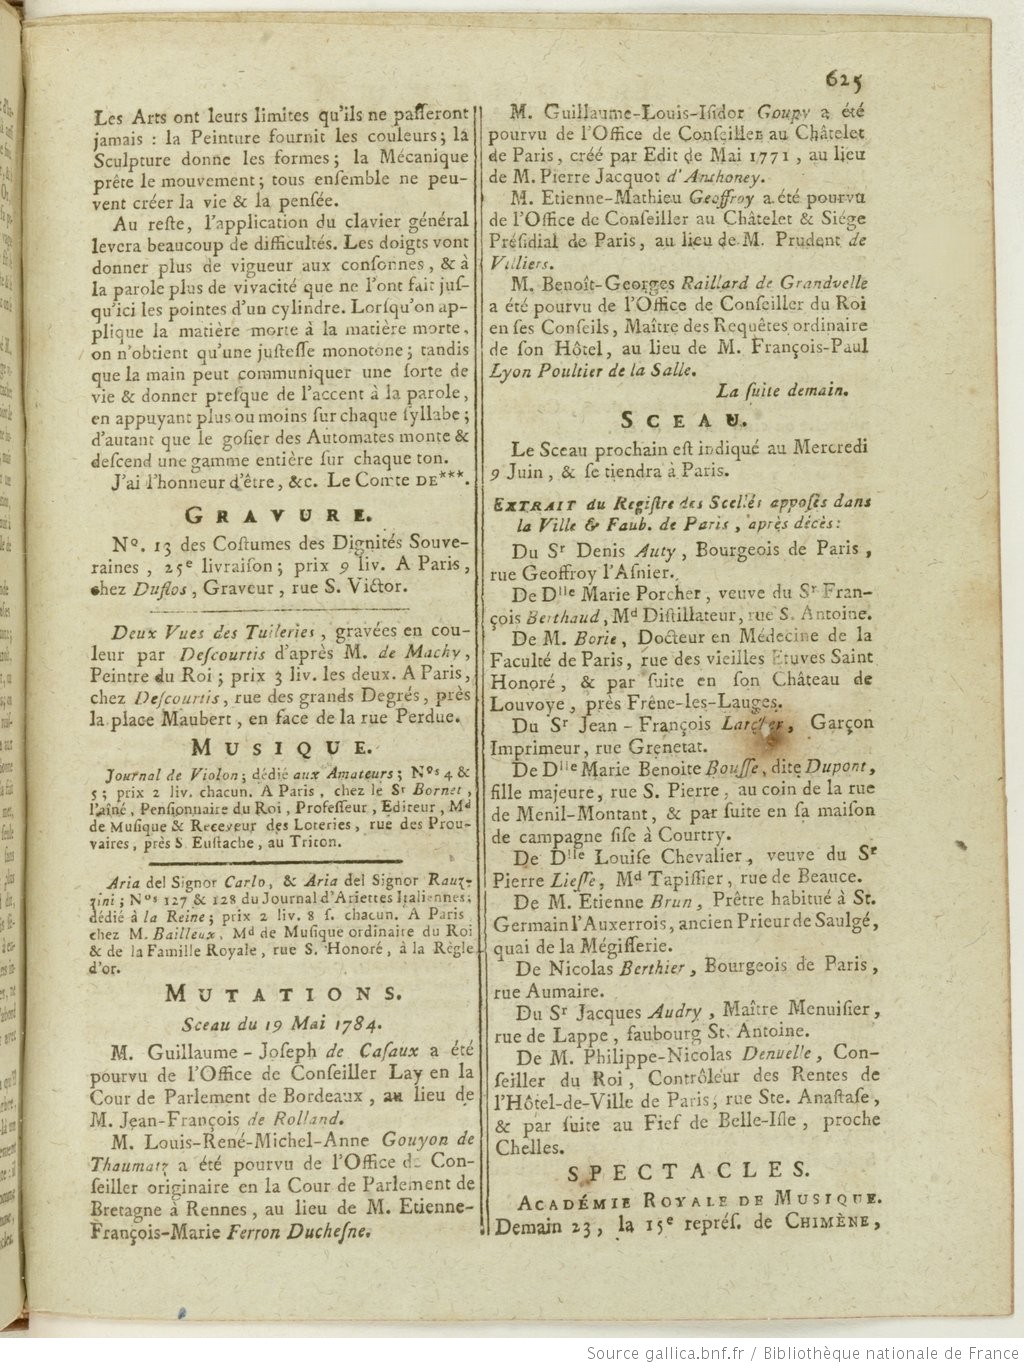
Thomas semble être en colère et se trouve dans la neige, en hiver et il a froid. Analyse correcte.
Amazon Web Services
Tout le monde connaît Amazon en tant que fournisseur en ligne de livres et d’autres objets non périssables, mais peu de personnes savent que Amazon est un des plus grand fournisseurs mondiaux de services informatiques sous le nom de Amazon Web Services (AWS). Tout comme Google, Amazon profite de l’infrastructure nécessaire pour ses propres besoins pour offrir de la capacité et des services à des tiers. Lancé en 2006, AWS se classe aujourd’hui au premier rang des fournisseurs Cloud avec une part de marché de 31%, devant Microsoft (11%) et IBM (7%).
J’utilise les services d’AWS depuis octobre 2008.
Le 30 novembre 2016, Werner Vogels, le CTO (Chief Technological Officer) de Amazon, annonçait sur son blog All Things Distributed le lancement des nouveaux services d’intelligence artificielle (AmazonAI) de AWS.
Amazon AI
Le but d’Amazon AI est d’apporter une intelligence artificielle puissante à tous les développeurs. La gamme des services Amazon AI se compose de:
- Amazon Lex : concevoir des interfaces conversationnelles ayant recours à la voix et au texte, via les mêmes technologies d’apprentissage approfondi que celles utilisées par Alexa
- Amazon Rekognition : reconnaissance d’image basée sur l’apprentissage approfondi
- Amazon Polly : convertir un texte en voix numérique
- Amazon Machine Learning : un service d’apprentissage automatique évolutif pour les développeurs
Chez Amazon AI, je me suis également intéressé d’abord pour Amazon Rekognition. Du premier coup j’ai vu des ressemblances avec la technologie Orbeus ReKognition que j’avais exploré en 2014. Dans la suite j’ai trouvé sur le net un article de Bloomberg relatant que Amazon a acquis en automne 2015 la startup Orbeus Inc., mais sans en faire une annonce officielle.
Amazon Rekognition ne fournit pas seulement des informations sur les émotions détectées sur les visages, mais également des renseignements sur le sexe et sur des accessoires comme lunettes, barbes, moustaches. Dans la détection des scènes et objets on reçoit en général plus d’étiquettes qu’avec Google Vision. Amazon Rekognition n’offre toutefois pas une reconnaissance intégrée de textes.
Les résultats des tests effectués avec les mêmes six photos de mes petits-enfants sont présentés ci-après. On peut donc les comparer avec ceux fournis par Google Vision.
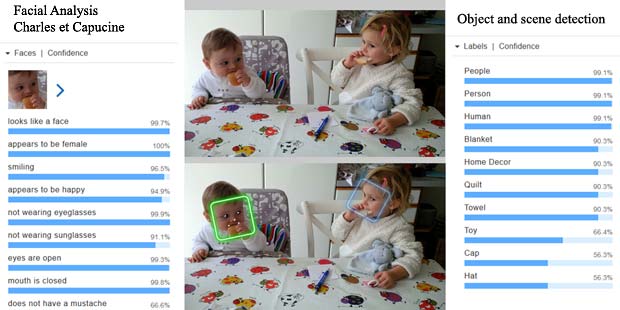
Charles est identifié comme une fille, ce qui n’est pas correct. Le décor est reconnu correctement comme maison et même le Dudu de Capucine est associé correctement à une courtepointe (quilt, towel).
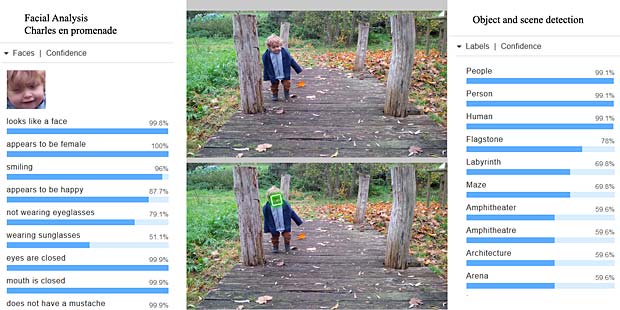
La scène est considérée comme un labyrinthe, une arène ou un amphithéâtre. Il n’y a pas de notion de nature ou de bois. Google a fait mieux. Amazon AI est toutefois d’accord avec Google Vision que Charles sourit.
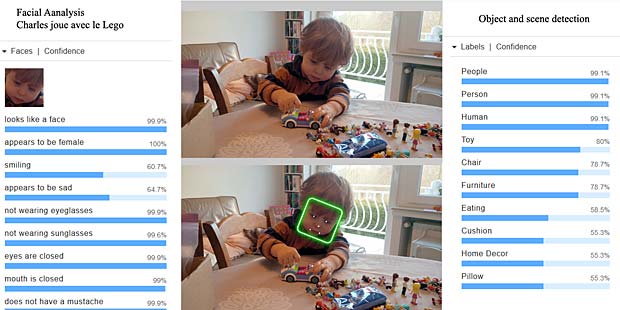
Le système reconnaît des personnes, des jouets, une chaise et un coussin dans un décor de maison. Il confond toutefois des jouets avec de la nourriture. Google Vision n’a pas fait mieux.

Le centre d’activités Fisher-Price de Thomas est identifié comme un gâteau d’anniversaire, ou un dessert, en tout cas quelque chose pour manger. Google Vision a fait les mêmes réflexions.
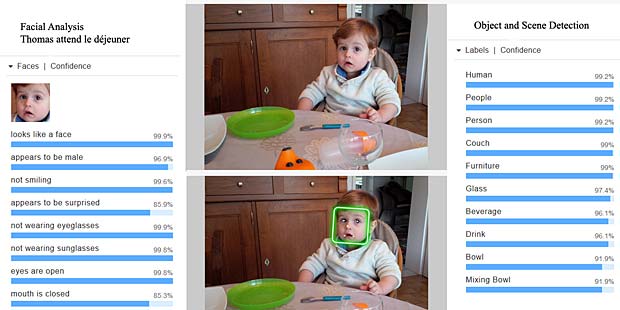
Dans cette scène, le système détecte correctement qu’il s’agit d’objets pour boire et manger. Thomas, plus âgé que sur la précédente photo, est reconnu maintenant comme un garçon qui ne rit pas, mais qui paraît surpris.
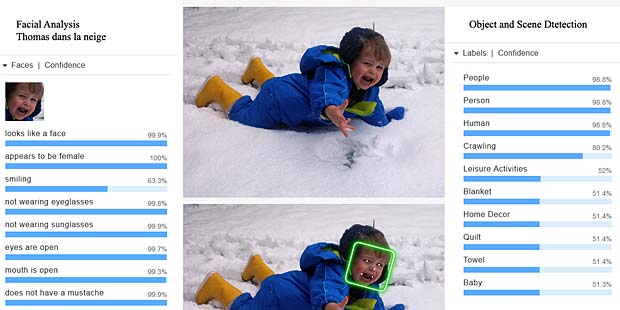
La scène n’est pas reconnue comme activité dans la neige et le système interprète le pleur de Thomas comme un grand sourire. Echec complet.
Amazon Face Comparison
Le service Amazon Rekognition comprend l’application Face Comparison (comparaison faciale) qui est très performante. A partir d’une photo avec un visage de référence, le service Face Comparison fournit des taux de ressemblance des visages qui figurent sur une photo de comparaison. La série des figures ci-dessous montre quelques exemples:
Thomas est reconnu avec une fiabilité de 93%; similitude avec Charles (83%) et Capucine (76%).
Charles n’est pas reconnu, mais il y a similitude de 74,9% avec Thomas et de 55,1% avec Capucine.
Capucine est reconnue avec une fiabilité de 91%. Il n’y a pas de ressemblance avec les autres.
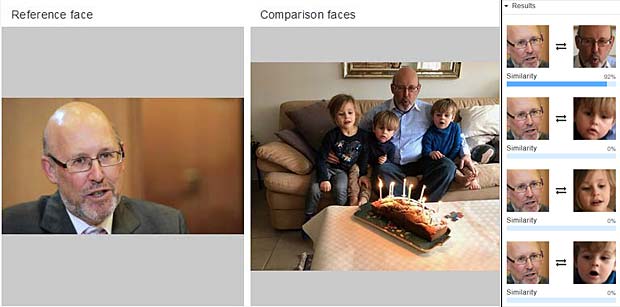
Marco est reconnu avec une fiabilité de 92%. Il n’y a pas de similitude détectée avec les enfants.
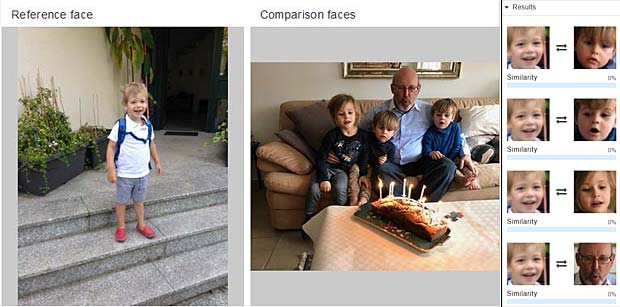
Astor, qui ne figure pas sur la photo à droite, ne ressemble à personne sur cette photo
Amazon fournit également un service de reconnaissance faciale. Il s’agit d’un processus d’identification et de vérification de l’identité d’une personne, en recherchant son visage dans un répertoire d’images de visages. Un répertoire d’images de visages est un index de recherche de vecteurs de caractéristiques faciales. AWS offre plusieurs interfaces (API) pour gérer un tel répertoire et pour ajouter ou supprimer des visages de référence dans le répertoire.
En ce temps Google Vision ne supporte pas encore la reconnaissance des visages dans son API public. Il n’y a donc pas moyen de comparer les performances avec Amazon Rekognition.
Dessins de Capucine
Pour pousser Google Vision et Amazon Rekognition aux limites, j’ai soumis deux dessins récents de ma petite-fille Capucine (4 ans et demi) et une des premières ébauches d’écriture de son nom aux deux systèmes.
Dessins et texte de Capucine à l’âge de 4 ans et demi
Les résultats fournis par Google Vision et Amazon Rekognition ont été assemblés chaque fois dans une seule image.
 Le dessin du bonhomme est reconnu par Google Vision (résultats au milieu) comme cartoon et oeuvre d’art, tandis que Amazon Rekognition voit une signature ou un insecte. Aucun des deux systèmes reconnaît une figure humaine.
 Les visages avec des boucles d’oreille qui ornent le contour de la main de Capucine ne sont pas identifiés comme tels par aucun des systèmes. Ce sont des lignes, des dessins, des formes ou diagrammes. Amazon Rekognition est au moins d’avis qu’il s’agit de l’art.
 En ce qui concerne le nom de Capucine, Google Vision estime qu’il s’agit d’un texte, mais n’est pas en mesure de le lire. L’OCR (optical character recognition) ne fait pas encore partie du produit Amazon Rekognition. Ce système détecte toutefois qu’il s’agit de textes, de caractères, d’une signature ou d’un autographe.
Conclusions
Les performances des deux systèmes Google Vision et Amazon Rekognition sont impressionnantes. Globalement Google Vision semble être plus fiable dans ses analyses en comparaison avec Amazon Rekognition, abstraction faite de la reconnaissance faciale d’Amazon qui est unique.
Bien sûr il y a encore un besoin d’amélioration pour les deux systèmes. Les services Machine Learning des deux fournisseurs permettent de mieux adapter la reconnaissance d’objets et de scènes à son propre environnement, en formant les systèmes moyennant un échantillon d’images et de photos d’apprentissage, avec des étiquettes (labels) sélectionnées manuellement et des étiquettes corrigées en cas d’erreur.
Google profite d’ailleurs sur son site de démonstration d’une variante de son système reCAPTCHA pour exclure les robots à l’utilisation de sa plateforme Cloud. Les réponses fournies par les humains sont utilisées pour parfaire Google Vision.
Google CAPTCHA: Completely Automated Public Turing test to tell Computers and Humans Apart