Last update : September 17, 2015
AdHoc Wi-Fi Networks
Sometimes it’s useful to create a WLAN (wireless network) between two or more Wi-Fi-enabled computers without using an Wi-Fi router. These computer-to-computer networks are usually referred to as AdHoc wireless networks.
Create an ad-hoc Wi-Fi network on Mac OSX
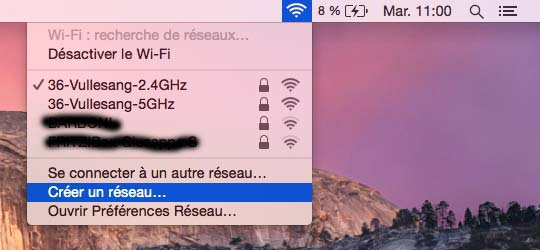
On a Mac OSX (Yosemite 10.10.5) it’s easy to set up such a network. Choose Create Network from the Wi-Fi status icon in the menu bar. Enter a name (in my case : radiologic-open) for the new network and select the channel (default channel = 11). You will notice that there is no password protection to secure the network. A WEP (Wired Equivalent Encryption) algorithm was however available in previous versions of the OSX system. WEP was Wi-Fi’s first encryption standard and was almost intentionally designed to be weak due to issues related to the US export policies about encryption. WEP was deprecated in 2003 and replaced by WPA2 (Wi-Fi Protected Access) by the Wi-Fi Alliance.
In Yosemite, Apple killed WEP once for all, without replacing it by another protection method in AdHoc mode.
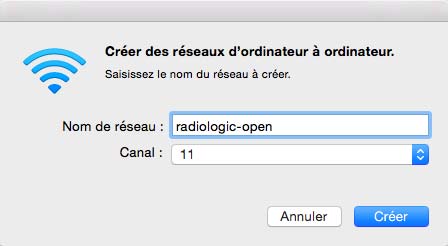
Chose name and channel for the AdHoc network
If the icon isn’t in the menu bar, choose Apple menu > System Preferences, then click Network (réseau). Click Wi-Fi and select the Show Wi-Fi status in menu bar checkbox.

Mac OSX System Preferences
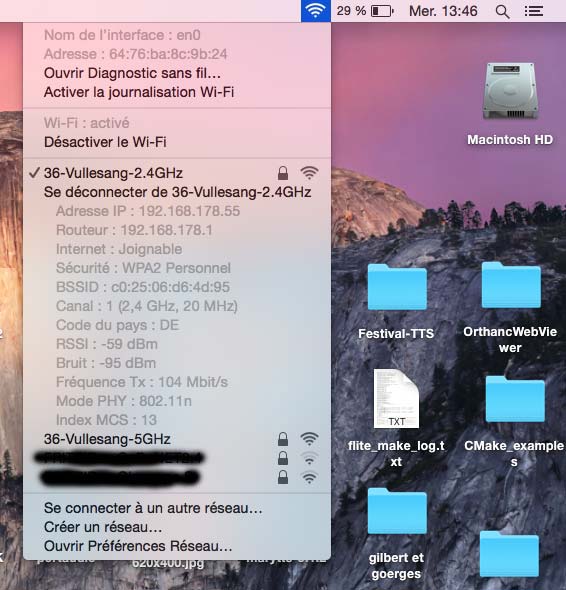
The Wi-Fi status menu shows the established connection with the radiologic-open network. The menu allows an easy logout and reconnection to another Wi-Fi network. An automatic logout occurs when the Mac screen is powered off.
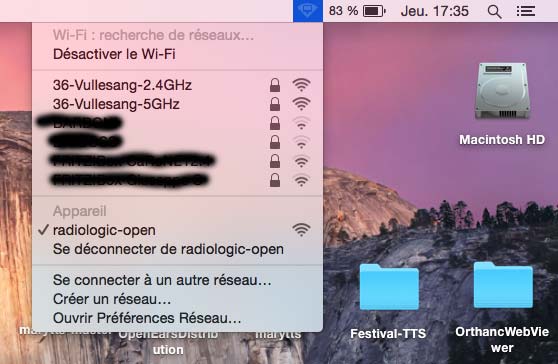
Wi-Fi status menu shows the AdHoc network active
Infrastructure Wi-Fi networks
There exist a second possibility to set up a Wi-Fi network on Mac OSX. The computer is configured as a software Wi-Fi base station. This allows to share an Internet connection and offers a password protection, but it has another inconvenience. You need a working wired Ethernet connection between your Mac and a hub, even if the hub is not connected to the Internet. The next picture shows my test setup: my MacBookAir is connected via a Ethernet-Thunderbolt interface to an ancient 10 Mbit/s Ethernet hub.

MacBookAir connected with Thunderbolt-Ethernet interface to hub
First you need to configure the Ethernet-Thunderbold interface. Go to Network in System Preferences and select the automatic configuration. The interface gets a self-assigned IP address in the range 169.254.x.x.
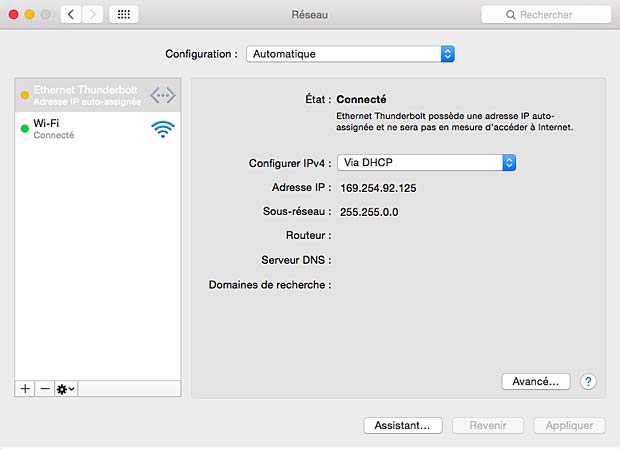
Ethernet-Thunderbolt automatic configuration
In the next step go to the Sharing Preference Pane in the System Preferences. Select Ethernet-Thunderbold as source port and Wi-Fi as destination port. Select Wi-Fi options to enter a name (in my case : radiologic-secure) of the network, to select a channel and to define a password (minimum 8 characters; numbers are not recognized on BlackBerry and Android).
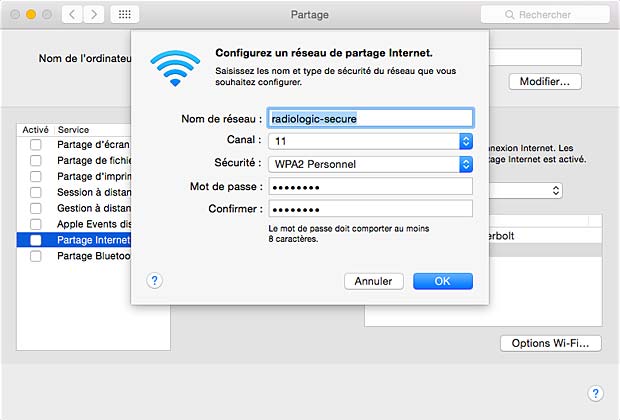
Internet Sharing Wi-Fi network configuration
Finally check the Internet sharing checkbox and confirm the settings to activate the connection.
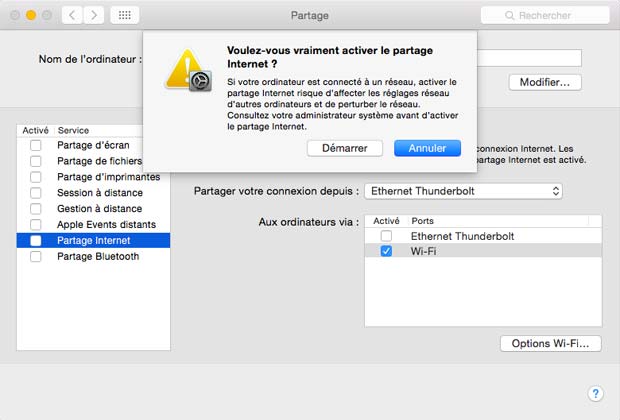
Activate the Internet sharing
The resulting pane is shown below.
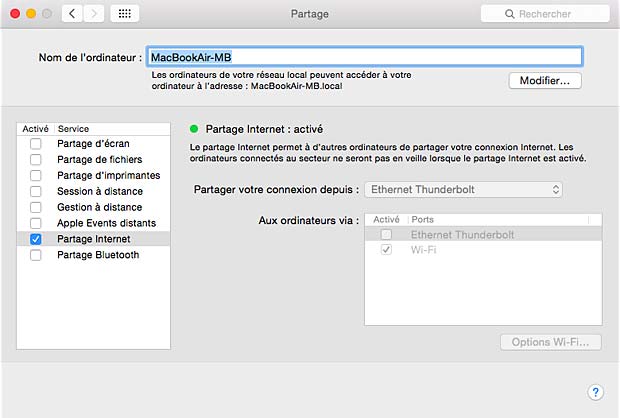
Activated Internet sharing pane
The Wi-Fi status is updated automatically. To log out, desactivate the Wi-Fi connection in the corresponding menu. An automatic logout occurs when the Mac screen is powered off.
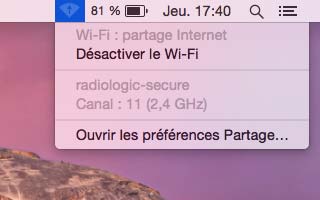
Wi-Fi status menu showing Internet sharing
The following table shows which of my devices are capable to connect to the Mac OSX AdHoc and Infrastructure networks.
| Device | Wi-Fi AdHoc | Wi-Fi infrastructure |
| iPad | OK | OK |
| iPhone | OK | OK |
| BlackBerry | network not shown | network joined, but no access to host |
| Samsung Tablet (Android 4.2.2) | network not in range | network joined, but no access to host |
| Laptop Vista | no connection | network joined, but no access to host |
| Desktop Windows 8.1 | network not shown | OK |
| Laptop Debian | no connection | OK |
Wi-Fi Diagnostic
To detect the reasons why some devices don’t connect to the Mac OSX Wi-Fi AdHoc or Infrastructure networks, you can use a WLAN analyser. Mac OS X Yosemite has an in-built Wi-Fi scanner to help you find the best Wi-Fi channel. When you hold down the option key ⌥ (next to the CTRL key) and select the Wi-Fi icon in the menu bar, a secret dropdown menu opens.
Secret Wi-Fi dropdown menu in Mac OSX Yosemite
Open Wireless Diagnostics and click it. After you have gotten to the page and have opened up the Wireless Diagnostics window, go to the top left of your menu bar and click on Window where you find several options: Informations, history, scan, performance, detection, … Some results are shown below.
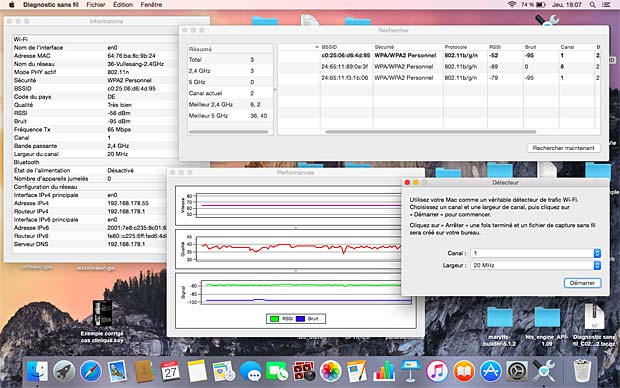
Mac OSX Wi-Fi Analyser
Another WLAN tool is available on Windows computers. When you enter the command
netsh wlan show networks mode=bssidin the command window, you will get the following results :
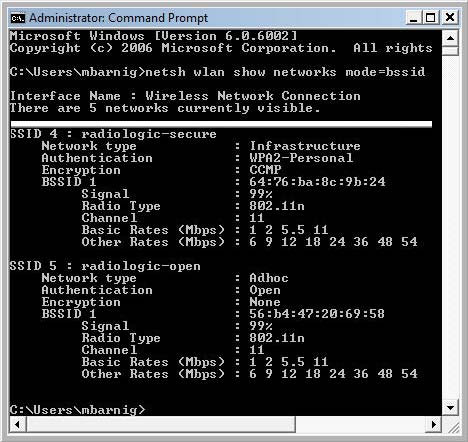
Microsoft Wi-Fi Analyser
A third WLAN tool is integrated in my Wi-Fi router FritzBox 7390. Various wireless networks in my neighborhood are shown, but nor the channels used by the Mac OSX nor the names of these networks are listed. I don’t know why ?
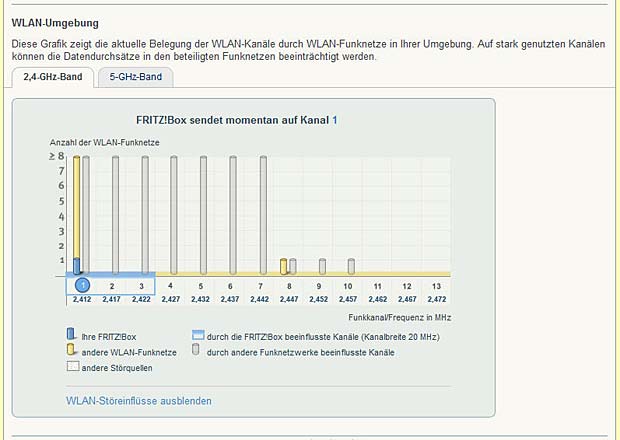
Wi-Fi channels used in proximity of the Fritzbox
There are also several external software tools for Wi-Fi-analysis available, for example Acrylic Wi-Fi Free or Acrylic Wi-Fi Professional. The main window (Access points, Signal strength) of Acrylic is shown hereafter :
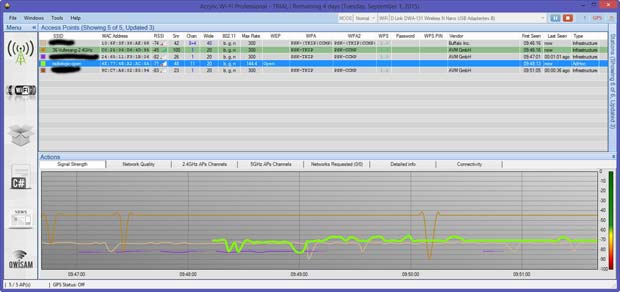
Acrlylic Wi-Fi Analyser
Some additional windows (stations, packet viewer, 2,4 GHz APs channels, detailed info) are shown below :
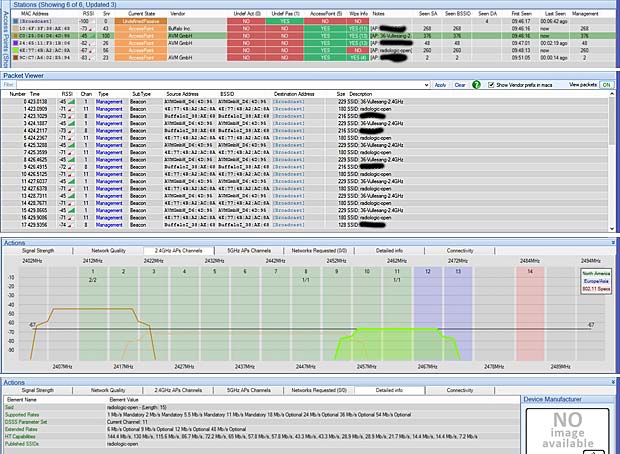
Various Acrylic results
Wi-Fi Assessment
Several methodologies are available dealing with safety aspects of wireless networks, for example :
Links
The following list shows links to websites providing additional informations about Wi-Fi networks, related to Mac OSX.
- Welcome Wi-Fi Changes under Yosemite’s Hood, by Glenn Fleishman
- Take Control of Your Apple Wi-Fi Network, by Glenn Fleishman
- HTG Explains: What’s the Difference Between Ad-Hoc and Infrastructure Mode?, by Chris Hoffman
- HTG Explains: What is Wi-Fi Direct and How Does It Work?, by Chris Hoffman
- Mac OS X: About Multicast DNS
- Programmatically create Ad-Hoc network OS X, StackOverflow