
Last update : September 18, 2015
Xcode Project
This topic refers to my recent post about iOS Development and provides more detailed informations about iOS Xcode 6.3 projects. An Xcode project is the source for an iOS app; it’s the entire collecton of files and settings needed to construct the app. An iOS app is based on event-driven programming.
To create a new project in Xcode, the menu File -> New -> Project leads to a dialog window to chose a project template.
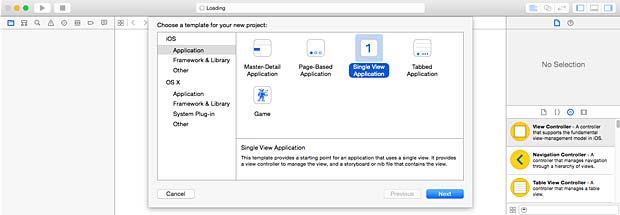
Template selection for a new Xcode project
The Single View Application in the iOS templates is a good starting point to create a simple app, for example the classic HelloWorld demo.
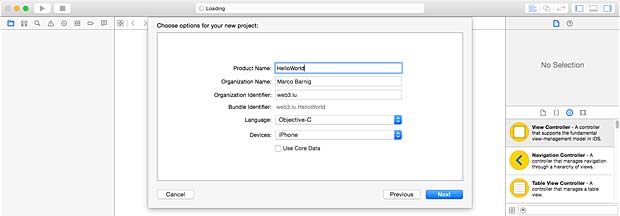
Xcode HelloWorld Demo Project
The name of the app (HelloWorld) is entered as Product Name. Spaces are legal in an app name, we could also name the project Hello World. Other punctuations in the product name can however lead to problems. The product name is used by Xcode to fill in the blank in several places, including some filenames.
My name is entered as Organization Name and my website domain name web3.lu is used as Organization Identifier. The unique bundle Identifier is automatically set to web3.lu.HelloWorld by the system.
The selected language is Objective-C, the other possibility is Swift. This choice is not binding, you can mix Objective-C and Swift code files. The selected device is iPhone, other possibilities are iPad or universal for both iPhone and iPad. The flag “Use Core Data” remains unchecked in a simple project.
Clicking the next button shows a file selection window where you can select or create a location (an Xcode workspace folder) and place the project under version control in a Git repository, which is however design overkill for a small tutorial project. Clicking the create button generates the skeleton of a simple app, with precompiled files and settings, based on the selected template. If you have not yet an Apple Development Account, a warning message says “no signing identity found”.
Xcode Project Window
The different files and parameters of an Xcode project can be classified as :
- source files that are to be compiled
- .storyboard or .xib files, graphically describing interface objects
- resources such as icons, images, sounds, …
- settings : instructions to the compiler and linker
- frameworks with system classes
This is a lot of embodied information that is presented in the Xcode IDE Project Window in graphical form. This window can be configured in the following parts to let you access, edit and navigate your code and to get reports about the progress of building and debugging an app :
- Menu Bar
- Tool Bar
- Left-hand Sidebar : Navigator Pane
- Right-hand Sidebar : Utilities Pane
- Middle main area : Editor Pane, or simply “Editor”
- Middle bottom area : Debugger Pane
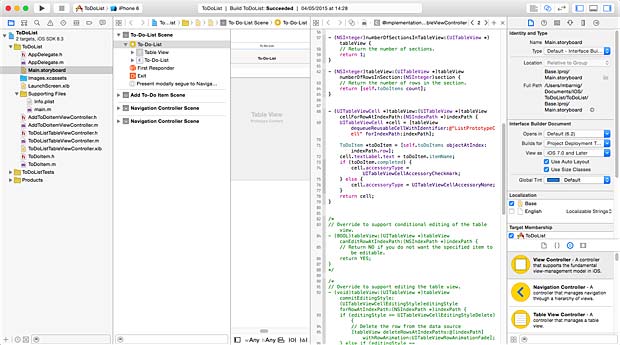
Xcode Project Window
A project widow is powerful and elaborate. The different panes and subviews can be shown or hidden inside the View Menu with the corresponding submenus. The width and height of the panes can be changed by dragging the edges. Keyboard shortcuts can be associated to panes to show, hide or switch them easily. Usually all these parts are not displayed at the same time, except very briefly in rather an extreme manner. By control-clicking a area in the Xcode project window, a shortcut menu appears to select help articles.
Menu Bar
The Menu Bar features the following menus :
- Xcode
- File
- Edit
- View
- Find
- Navigate
- Editor
- Product
- Debug
- Source Control
- Window
- Help
Xcode IDE Menubar
Toolbar
The toolbar features the following parts :
- a build / run and stop button
- a scheme and destination selector (pop-up menu)
- an activity viewer (report field)
- three icons to select the standard, assistant or version editor
- three icons to show / hide the navigator, utilities or debug areas
Xcode IDE Toolbar
Navigator Pane
 The primary mechanism of the navigator pane at left-hand is for controlling what you see in the main area of the project window. You select something in the Navigator pane, and that thing is displayed in the editor of the project window. The Navigator pane itself can display eight different sets of information; thus, there are actually eight navigators represented by the eight icons across its top.
- Project Navigator : basic navigation through the files of a project
- Symbol (Hierarchical) Navigator : a symbol is typically the name of a class or method
- Find (Search) Navigator : to find text globally, even in frameworks
- Issue Navigator : needed when the code has issues
- Test Navigator : list test files and run individual test methods
- Debug Navigator : to track possible misbehavior of the app
- Breakpoint Navigator : lists all the breakpoints
- Report (Log) Navigator : lists the recent major actions, such as building or running
At the bottom of the navigator pane is a filter which lets you limit what files are shown. Below the search filed is the current search scope.
Utilities Pane
The utilities pane at right-hand contains inspectors in the top half that provide information about the current selection or its settings; in some cases, these inspectors let you change those settings. There are four main cases :
- a code file is edited : you can toggle between File Inspector and Quick Help.
- a storyboard file is edited : in addition to the File Inspector and the Quick Help tabs, the following additional inspectors are available : Identity, Attributes, Size and Connections.
- an asset catalog is edited : in addition to the File Inspector and the Quick Help tabs, the Attribute Inspector lets you define which variants of an image are listed.
- the view hierarchy is being debugged : in addition to the File Inspector and the Quick Help tabs, the Object Inspector and the Size Inspector are available.
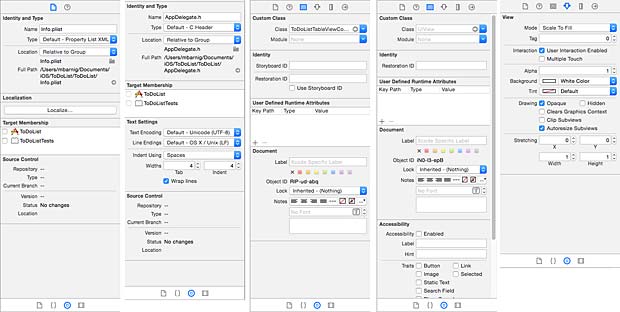
Xcode IDE Inspectors (5 examples)
In the bottom half the utilities pane contains four libraries that function as a source of objects you may need while editing your project :
- File Template Library
- Code Snippet Library
- Object Library
- Media Library
You can toggle between these four libraries. The object library is the most important. Press spacebar to see help pop-ups describing a library item.
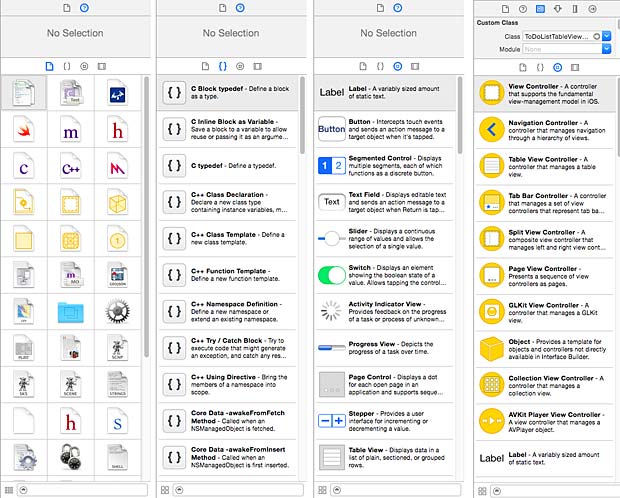
Xcode IDE libraries (4 examples)
Editor
In the middle of the project window is the editor. This is where you get actual work done, reading and writing your code or designing your interface in a .storyboard or .xib file. The editor is the core of the project window. You can hide the navigator pane, the utilities pane, and the debug pane, but there is no such thing as a project window without an editor.
The editor provides its own form of navigation, the jump bar across the top which show you hierarchically what file is currently being edited. The jump bar allows you to switch to a different file and it displays also a pop-up menu, which has also a filter field.
Xcode IDE Editor jumpbar
To edit more than one file simultaneously, or to obtain multiple views of a single file, you can split the editor window using assistants, tabs and secondary windows. The menus View -> Navigators and File -> Tab or File -> Window allow to activate the splitting. You can determine how assistant panes are to be arranged with the Menu View -> Assistant Editor submenu. The assistant pane bears a special relationship to the primary editor pane (tracking).
Xcode IDE Editor
Debugger
The debug navigator displays the call stacks of a paused app. You can debug Swift or C-based code as well as OpenGL frames. The debug navigator opens automatically whenever you pause your application (by choosing menu Debug -> Pause), or if it hits a breakpoint.
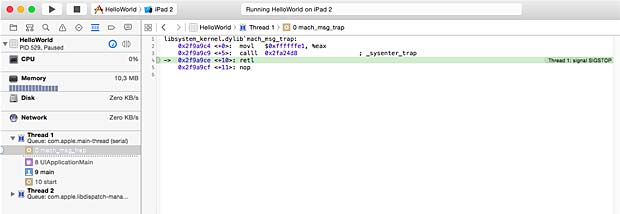
Xcode IDE Debugger
The debug navigator shows threads with the following icons :
- No icon means the thread is running normally
- A yellow status icon means that the thread is blocked and waiting on a lock or condition
- A red status icon means that you suspended the thread. A suspended thread does not execute code when you resume your application
- A gray icon means that thread or block is part of the recorded backtrace and is not currently executing
Anatomy of an Xcode Project
The first item in the Project Navigator represents the project itself. The most important file (archive, folder) in the project folder is HelloWorld.xcodeproj. All the Xcode knowledge about the project is stored in this file.
Based on the iOS SDK 8.3, a project HelloWorld has two targets :
HelloWorld and HelloWorldTests.
A target is a collection of parts along with rules and settings for how to build a product from them. The test target is a special executable whose purpose is to test the app’s code.
The HelloWorld target includes the following files :
- AppDelegate class with .h and .m files
- ViewController class with .h and .m files
- Main.storyboard file
- Images.xcassets folder with icons (asset catalog)
- LaunchScreen.xib file
- Info.plist file
- a subfolder Supporting Files with a main.m file and an Info.plist file
The HelloWorldTests target includes the following files :
- HelloWorldTests.m implementation file
- a subfolder Supporting Files with an Info.plist file
It’s important to know that groups (like the group Supporting Files) in the project navigator don’t necessarily correspond to folders in the project directory. The Supporting Files group is just a way to clump some items together in the project navigator to locate them easily. To make a new group, use the Menu File -> New -> Group.
The LaunchScreen.xib file is not necessary and can be deleted if a launch screen picture is included in the asset catalog.
The two products which will be created in the project are HelloWorld.app and HelloWorldTests.xctest.
The project and targets are specified by the following parameter sets :
- General
- Capabilities
- Info
- Build Settings
- Build Phases
- Build Rules
You can add more targets to a project, for example a custom framework to factor common code into a single locus or an application extension (examples : content for the notification center, photo editing interfaces, …).
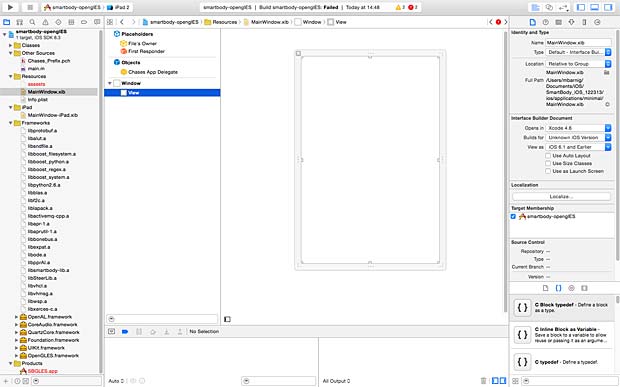
The anatomy of a Xcode project changed with Xcode 4.2. Prior to this version, an iOS Xcode Project included the following items :
- a folder xxx.xcodeproj
- a file main.m
- a file xxx_Prefix.ch
- a file xxx-Info.plist
- a file MainWindow.xib
- a folder classes with .m and .h files
- a folder resources with pictures and data
Build a project (Phases, Settings, Configurations)
To build a project is to compile its code and assemble the compiled code, together with various resources, into the app. To run a project is to launch the built app, in the Simulator or on a connected device. Running the app automatically build it first if necessary.
Click at the tab Build Phase at the top of the target editor window to view the stages by which the app is built. The build phases are both a report to the developer and a set of instructions to the Xcode IDE. If you change the build phases, you change the build process.

Xcode IDE Build Phases
There are four build phases :
- Target Dependencies
- Compile Sources
- Link Binary with Libraries
- Copy Bundle Resources (copying doesn’t mean making an identical copy, certain types of files are treated in special ways)
You can add build phases with the menu Editor -> Add Build Phase, for example Add Run Script Build Phase to run a custom shell script late in the build process. To check the option “Show environment variables in build log” is then a useful choice.
Another aspect of how a target knows how to build the app is Build Settings. By clciking the tab Build Settings at the top of the target editor window you will find a long list of settings :
- Architectures
- Build Locations
- Build Options
- Code Signing
- Deployment
- Kernel Module
- Linking
- Packaging
- Search Paths
- Testing
- Versioning
- Apple LLVM 6.1 (Code generation, Custom Compiler Flags, Language, Language – C++, Language – Modules, Language – Objective C, Preprocessing, Warning Policies, Warnings – All languages, Warnings – C++, Warnings – Objective C, Warnings – Objective C and ARC)
- Asset Catalog Compiler – Options
- Interface Builder Storyboard Compiler – Options
- Interface Builder XIB Compiler – Options
- OSACompile – Build Options
- Static Analyzer (Analysis Policy, Generic Issues, Issues – Objective C, Issues – Security)
- User Defined
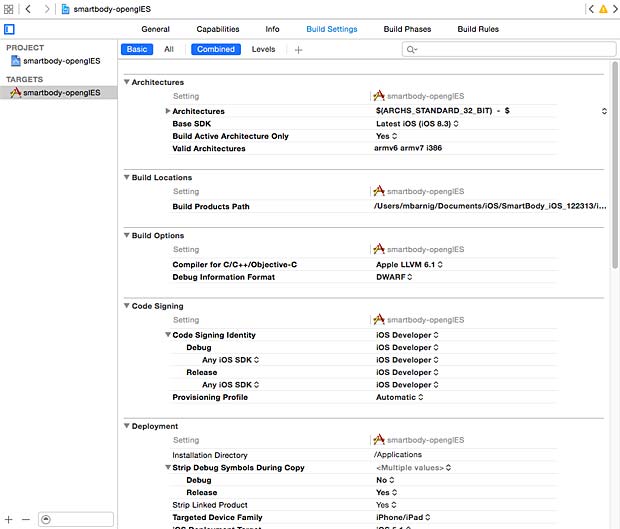
Xcode IDE Build Settings
You can define what and how build settings are displayed by selecting Basic / All or Combined / Levels. There are multiple lists of build setting values, though only one such list applies when a particular build is performed. Each list is called a configuration. By default there are two configurations :
- Debug : used through the development process
- Release : used for late-stage and performance testing, before submitting the app to the Apple App Store
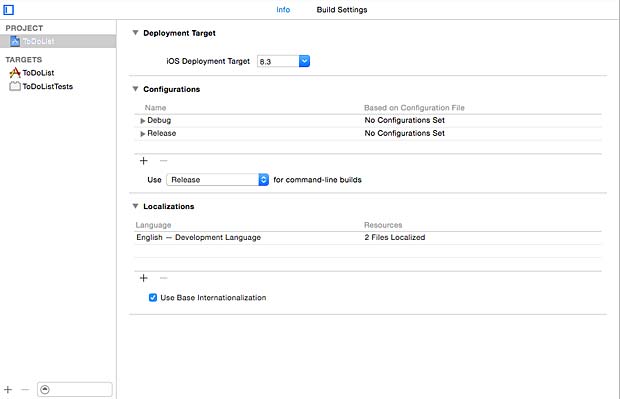
Xcode IDE Configurations
The defaults of the build settings are usually acceptable and need not be changed.
Schemes and Destinations
 To tell the Xcode IDE which configuration to use during a particular build is determined by a scheme. A scheme unites a target with a build configuration. A new project commes by default with a single scheme named after the project.
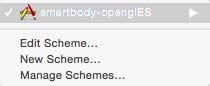
The menu Product -> Scheme -> Edit Scheme shows the current scheme. You can also show the scheme by using the scheme pop-up menu in the Project Window Toolbar.
A scheme has the following actions :
- Build
- Run
- Test
- Profile
- Analyze
- Archive
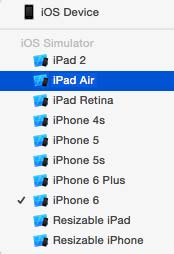
Xcode IDE destinations
Hierarchically appended to each scheme listed in the scheme pop-up menu are the destinations. A destination is a machine that can run the app. This can be a real device connected to the Mac computer running the Xcode IDE or a virtual device simulated in the Simulator.
The menu Window -> Devices allow you to download and install additionaliOS SDK’s and to manage the devices to appear as destinations in the scheme popu-up menu.
Xcode Flow and Hierarchy
Most of the work in an app is done by the UIApplicationMain function which is automatically called in the project’s main.m source file within an autorelease pool (memory management with Automatic Reference Counting : ARC) . An application object is created and a run loop is launched that delivers input events to the app.
The other files in an Xcode project do the following tasks :
- AppDelegate class with AppDelegate.h (header) and AppDelegate.m (implementation) files. This class creates an AppDelegate object as an entry point to the application. When the AppDelegate object notices that the application is launched it creates the ViewController object.
- ViewController class with ViewController.h and ViewController.m files. This class is responsible for controlling and managing a view. The generated ViewController object is responsible for setting up the view described in Main.storyboard and showing it on the screen to the user.
- Main.storyboard file is the view that the ViewController class is managing. The Main.storyboard file is created and modified with a visual designer, called “Interface Builder”, in the Xcode IDE.
The implementation file AppDelegate.m contains skeletons of important predefined methods :
- application didFinishLaunchingWithOptions
- applicationWillResignActive
- applicationDidEnterBackground
- applicationWillEnterForeground
- applicationDidBecomeActive
- applicationWillTerminate
You can add additional code to these methods that you want to be executed when the methods are called.
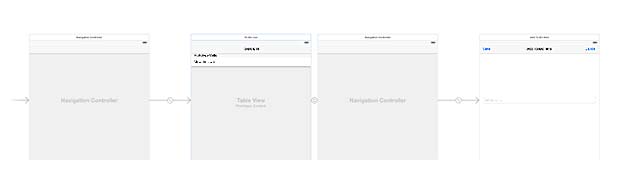
Xcode Storyboard, Screen, Scene, Canvas, View
An Xcode storyboard is the visual representation of the app’s user interface, showing screens of content and the transitions between them. The background of the storyboard is the canvas.
In a single view application, the storyboard contains only one scene. The arrow that points to the left of the scene on the canvas is the storyboard entry point, which means that this scene is loaded first when the app starts. If you have more than one scene, you can zoom the canvas in and out with the menu Editor -> Canvas -> Zoom to see the whole content.
Xcode scene entry point
To adapt the generic scene in the canvas to real devices in different orientations, you must create an adaptive interface with the AutoLayout engine. The four icons Align, Pin, Resolve Issues and Resize Behavior allow to fix and manage constraints to adapt the interface. Use the assistant editor in the preview mode with the wAny and hAny icons to check the adapted interface.
Xcode IDE AutoLayout engine tools
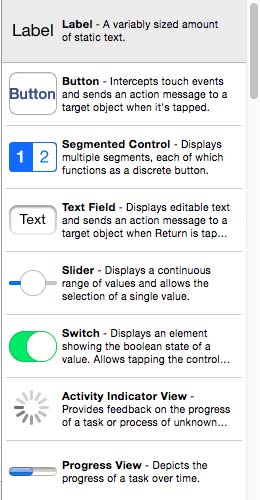
Xcode IDE Interface Elements
The library of objects provides UI elements (views, buttons, text labels, gesture controllers, …) to arrange the user interface. The size of UI elements can be modified by dragging its resize handles (small white squares) on the canvas.
The UIScreen object represents the physical iPhone or iPad screen. The UIWindow object provides drawing support for the screen. UIView objects are attached to the UIWindow object and draw their contents when directed to do so by the window. The visual interface of an app is essentially a set of UIView objects (views), which are themselves managed by UIViewController objects. UIViewController objects interact with views to determine what’s displayed by the views, handle any interactions with the user, and perform the logic of a program.
The views have following properties :
- Views represent a single item (button, slider, image, text field, …) on the user interface, cover a specific area on the screen and can be configured to respond to touch events.
- Views can be nested inside other views, which lead to the notion of a view hierarchy. They are referred as subviews (childs) or superviews (parents). Subviews are drawn and positioned relative to their superview. At the top is the window object.
- Views are not the place where the bulk of a program logic resides.
UIKit views are grouped in the following general categories :
- Content : image, text, …
- Collections : group of views
- Controls : buttons, sliders, switches, …
- Bars : toolbar, navigation, tabs, …
- Input : search, info, …
- Containers : scroll, …
- Modal : alerts, action sheets, …
The storyboard is not the only way to program an interface, you can also use .xib files or custom code. Storyboard and .xib files are converted to a bundle of NIB files at compilation.
Anatomy of an App
An app file is a special kind of folder called a package, and a special kind of package called a bundle. Use the Finder to locate the HelloWorld.app on the Mac computer. By default it is located inside a build folder in the user directory at Library/Developer/Xcode/DerivedData/.
Right clicking on the filename HelloWorld.app opens a pop-up menu with the submenu “Show Package Contents“. The following items are inside the bundle :
- HelloWorld (exec)
- PkgInfo
- Info.plist
- Folder Base.lproj including LaunchScreen.nib and Main.storyboardc
Bilingual Targets
It is legal for a target to be a bilingual target that contains both Objective-C and Swift code. To assure communication between the two languages, Xcode provides bridging headers.
Links
Additional informations about Xcode projects are available at the websites with the following links :
- Programming iOS 6 (Chapter 6 : Anatomy of an Xcode Project), by Matt Neuburg
- Integrate Objective C file in Swift iOS, by Hardik Trivedi