
Last update : March 20, 2016
Referring to my first post about the Raspberry Pi, I am pleased to provide an update about my ongoing projects, with a special focus on a wireless headless operation. Headless means running it without a mouse, keyboard and monitor, via network connections. Wireless means using a WLAN connection with a WiFi dongle.
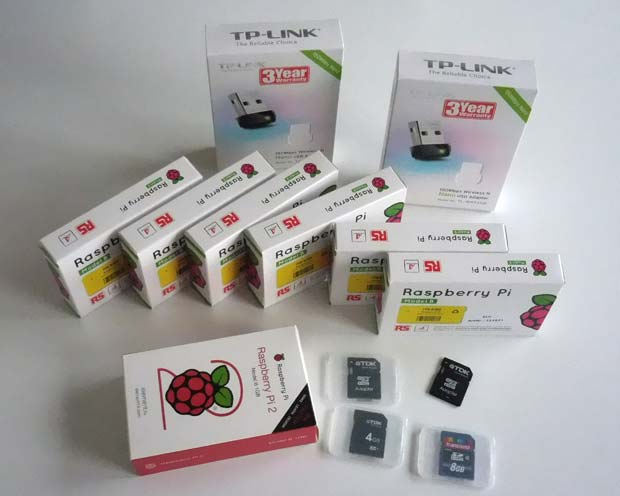
Raspberry Pi’s with SDcards and WiFi dongles
Raspbian Jessie
A new Raspbian (the Raspberry Pi Foundation’s official supported operating system) version, based on Debian Jessie, was launched on November 21, 2015. Updates were released on February 9, February 26 and March 18, 2016. I upgraded my Raspberry Pi computers to the February 26 version (kernel 4.1.18+ on RPi 1 models; kernel 4.1.18-v7+ on RPi 2 and 3 models). I used the same procedure as last time : writing the downloaded Raspbian image with the Win32DiskImager tool on my Windows computer to 8GB and 16GB SDcards. The current version of this tool is 0.9.5, released on March 19, 2014.

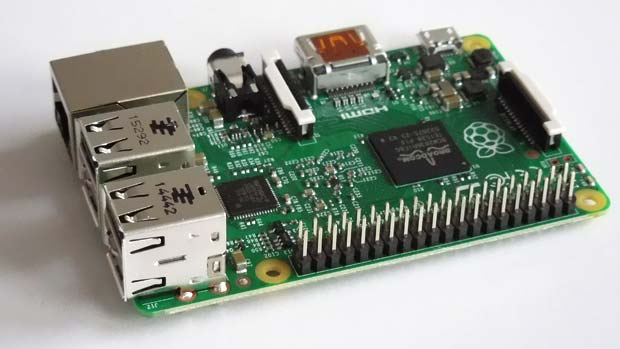
Raspberry Pi model B
It was not possible to overwrite the old Raspbian image on my Raspberry Pi SDcards with the new one. Reformatting the used SDcards with the usual tools (diskpart, SDCard Formatter 4, …) was not successful. Windows sees only the 56 MB FAT32 partition, but not the much larger Linux partition. It was not possible to recover the lost space. After some trials and errors, I finally reformatted the SDcards in my Nikon camera. It worked like a charm. Writing the new Raspbian image to the new formatted SDcards was then no problem.
Raspberry Pi model 2
Configuring Raspbian
After the first booting of the Raspberry Pi computer, the new desktop appears.
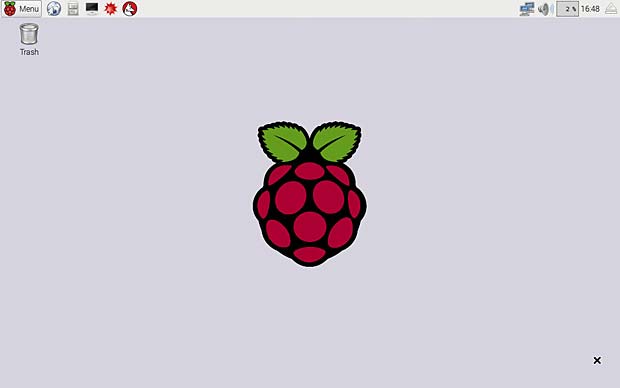
Raspbian Jessie Desktop
The desktop contains only one icon : the Trash. The Raspberry logo is shown in the center. The menu is in the left upper corner, some icons are in the right upper corner. It’s possible to reconfigure the menu list. One new icon is the network configuration tool based on Roy Marples‘s dhcpcd and dhcpcd-ui packages.
The configuration panel allows to expand the filesystem.
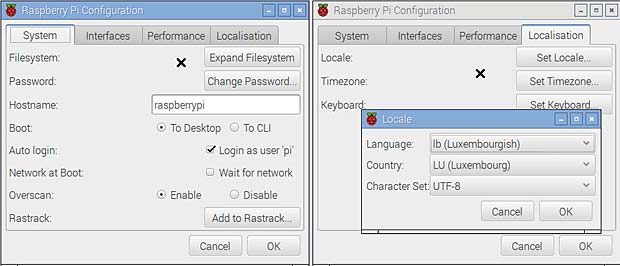
Raspberry Pi Configuration
After expanding and rebooting the system, the File Manager (PCManFM 1.2.3) shows a free space of 3,6 GB on my 8GB SDcard, compared to a free space of 98,1 MB before the expansion. The Raspbian Jessie version allows to set the locale to “lb” for Luxembourg in the localisation tab, and Luxembourg is also included as country in the timezone list. The french-swiss keyboard used in Luxembourg figures now, as expected, among the Switzerland keyboards.
The computer was recognized by my Fritzbox router and the IP address 192.168.178.62 was assigned by the DHCP server.
Updating and checking the Raspbian version
The file /etc/apt/sources.list contains the following source (one line) :
deb http://mirrordirector.raspian.org/raspian/
jessie main contrib non-free rpi
I replaced mirrordirector by archive to avoid numerous download fails. To download the source code of packages with apt-get source, the following line should be un-commented in the sources.list file (one line) :
deb-src http://archive.raspian.org/raspian/
jessie main contrib non-free rpi
Raspbian Jessie is based on Linux version 8. A lite version without the GUI is separately available. I preferred to install the full version and to remove some large packages like Wolfram, Office and some games with the following command :
sudo apt-get remove --purge wolfram-engine libreoffice* minecraft-pi \
python-minecraftpi python3-minecraftpi
The files /usr/share/raspi-ui-overrides/applications/wolfram-mathematica.desktop and ../wolfram-language.desktop must be deleted to remove the related empty icons in the task bar.
To install the additional packages needed for the headless operation I entered the command :
sudo apt-get update
sudo apt-get install x11vnc hostapd dnsmasq lighttpd haveged
Lists of the resulting installed packages for my project are provided at the following links :
- edited with the command dpkg –get-selections
- edited with the command apt –installed list
- edited with the command aptitude search ‘~i!~M’
The default Raspbian terminal application is LXTerminal.
To upgrade all Debian packages to the latest version, I launched the well known commands
sudo apt-get update
sudo apt-get upgrade
in the terminal window. Two packages were upgraded. To show the installed versions, we can use the following commands :
- uname – a > kernel
- lsb_release -a > distribution
- /opt/vc/bin/vcgencmd version > firmware
- cat /proc/version
- cat /proc/cpuinfo > CPU
- cat /proc/meminfo > memory
- cat /proc/partitions > partitions
- cat /etc/debian_version
- cat /etc/issue
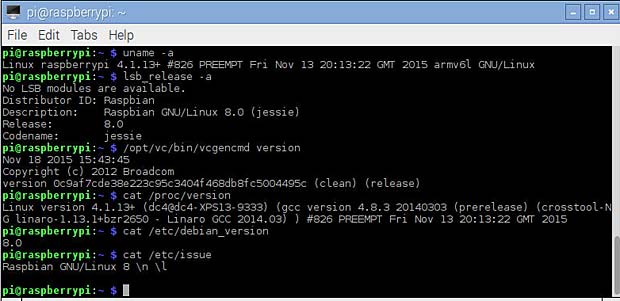
Show Raspban versions and system informations
The command dmesg (display message or driver message) prints the message buffer of the kernel. An error “bcm2708_fb soc.fb: Unknown ioctl 0x40187a22” is listed.
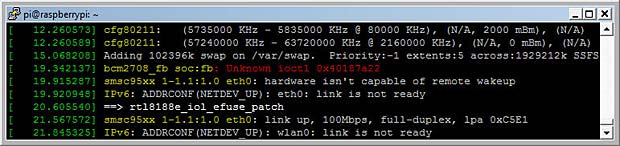
display the Raspberry Pi kernel message buffer
Remote Control
There are several methods available to remotely control a headless Raspberry Pi computer. The most common are :
- Secure Shell (SSH)
- Remote Desktop (RDP)
- Tight-VNC
- X11-VNC
SSH
An SSH client is a software program which uses the secure shell protocol to connect to a remote computer. SSH provides a secure channel over an unsecured network in a client-server architecture. There are numerous SSH clients available for the different operating systems. For Windows an often used SSH program is PuTTY. PuTTY is a free and open-source terminal emulator, serial console and network file transfer application which was written and is maintained primarily by Simon Tatham.
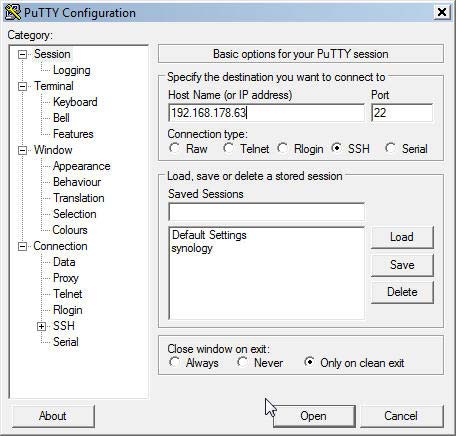
Secure Shell Terminal PuTTY for Windows
The following security alert is displayed by the PuTTY terminal at the first connection to a new server.
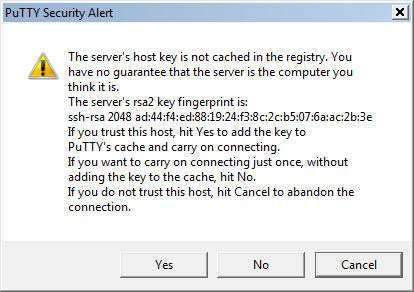
PuTTY security alert
The next figure shows the welcome message sent by the Raspberry Pi after a successful login. The default user name is pi and the default password is raspberry.These parameters can be changed in the Raspbian configuration.
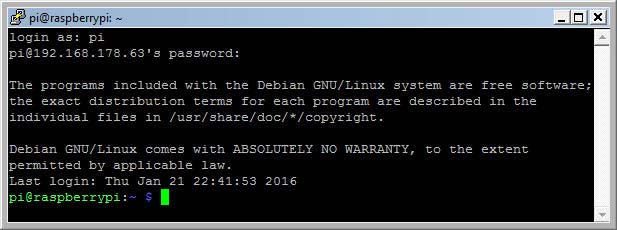
PuTTY welcome message
The Apple Mac computers have an integrated secure shell in the standard terminal program. A connection can be established with the following command :
ssh username@server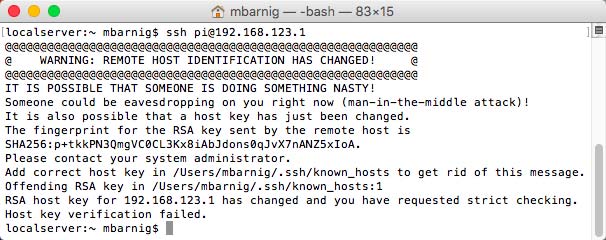
Secure shell in a MacBook Air
I use the WebSSH app for my iOS devices and the JuiceSSH app for my Android tablets.
RDP
Remote Desktop Protocol (RDP) is a proprietary protocol developed by Microsoft, which provides a user with a graphical interface to connect to another computer over a network connection. The user employs RDP-client software for this purpose, while the other computer must run RDP-server software.
To install the remote desktop server application XRDP (version 0.6.1-2) on Raspberry Pi, I launched the command
sudo apt-get install xrdpThe next figure shows the Remote Desktop Connection Panel on Windows :
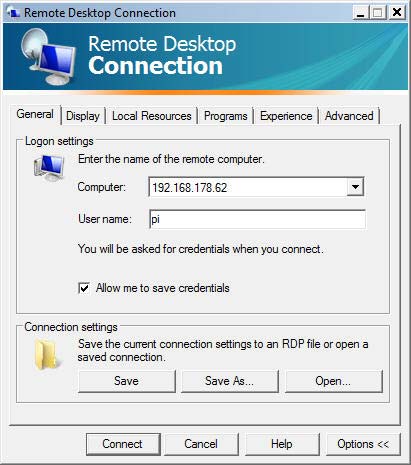
XRDP Logon settings
RDP Clients exist not only for Windows and Windows Mobile, but also for OS X (version 8.0.24) , Linux, iOS (version 8.1.17) and Android.
The problem with european keyboards explained in my former Raspberry Pi contribution persist and is even more difficult to solve on tablets. For this reason I discarded the RDP solution for my future projects.
Tight-VNC
Tight-VNC is a cross-platform free and open-source remote desktop software application that uses and extends the remote framebuffer (RFB) protocol of Virtual Network Computing (VNC) to control another computer’s screen remotely. It was created by Constantin Kaplinsky.
Most tutorials about remote desktops refer to the Tight-VNC-Server as favorite solution. One disadvantage of this application is that it uses only virtual desktops, which is not optimal for a headless operation of a computer. Therefore I discarded the Tight-VNC-Server for my projects, but i use the Tight-VNC-Client on Windows as viewer to work with an X11-VNC-Server.
X11-VNC
X11-VNC allows remote access from a remote client to a computer hosting an X Window (X11) session and the x11vnc server software, continuously polling the X server’s frame buffer for changes. X11-VNC does not create an extra display for remote control. Instead, it uses the existing X11-display shown on the monitor in real time.
To install an X11-VNC-server on Raspberry Pi, we enter the command
sudo apt-get install x11vncTo start the server the first time we use the command
x11vnc -usepw -forever -display :0A password (= raspberry) is defined at this first launch, verified and saved in the /home/pi/.vnc/ directory. The window 0 refers to the visible desktop and is related to the port number 5900. Additional virtual desktops can be configured with the display numbers 1, 2, 3 … and are associated with the port numbers 5901, 5902, 5903 … To launch the VNC-server automatically when the Raspberry Pi boots, we create an auto-start file
/home/pi/.config/autostart/x11vnc.desktopwith the following content :
[Desktop Entry]
Type=Application
Name=X11VNC
Exec=x11vnc -usepw -forever -display :0
StartupNotify=false
A VNC viewer is installed at a remote computer to access the Raspberry Pi desktop. I use the free Tight-VNC-Viewer for Windows (version 2.7.10 released on July 24, 2013) and the RealVNC viewer for iOS (version 2.4.1 released on December 2, 2015). A VNC viewer is also available for Android (version 2.0.0.016450 released on February 11, 2016) and other operating systems. A VNC client is integrated in OS X an can be opened in Safari with the command
vnc://IP address:port numberThe VNC-server takes the display size from the resolution of the connected HDMI monitor. In case of headless operation, the display size on the VNC viewer is very small. To adapt the display size to the iPad (my preferred VNC viewer), I uncommented and modified the following lines in the configuration file /boot/config.txt.
hdmi_force_hotplug=1
hdmi_group=2
hdmi_mode=16
hdmi_drive=2
For security reasons I configured the VNC-server to be only accessible in the local network.
WLAN Adapters
To set up a WiFi connection to access the Raspberry Pi wirelessly, we need a WiFi dongle. I use the following 150Mbps Wireless N Nano USB adapters for my Raspberry Pi projects :
- Official Raspberry Dongle
- Racksoy Mini Stick
- D-Link DWA-131
- TP-Link TL-WN725N
The Raspberry Pi 3 model has an onboard WiFi chip. The command lsusb shows the ID of the dongles, here for the official Raspberry WiFi adapter.

lsusb result for Raspberry dongle : Bus 001 Device 004 = Broadcom Corp. ID 0a5c:bd1e
The command lsmod shows which loadable kernel modules are currently loaded.
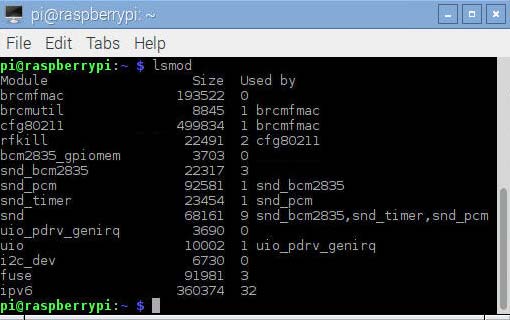
lsmod result for the Raspberry WiFi dongle
The modules related to the Broadcom WiFi dongle are brcmfmac, brcmutil and cfg80211. Detailed informations about these modules are obtained with the command modinfo modulename :
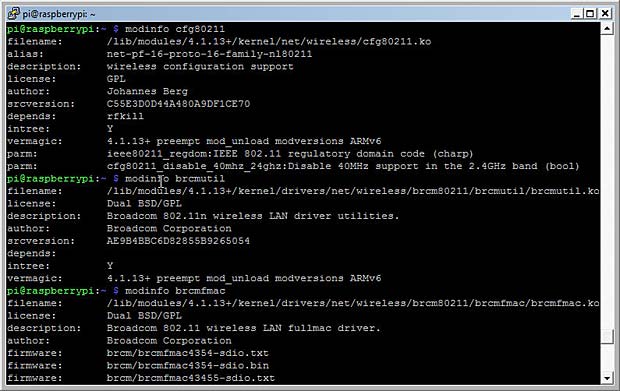
modinfo results for the Raspberry WiFi dongle
The associated preinstalled drivers and utilities are
/lib/modules/4.1.18+/kernel/drivers/net/wireless/brcm80211/brcmfmac/brcmfmac.ko
/lib/modules/4.1.18+/kernel/drivers/net/wireless/brcm80211/brcmutil/brcmutil.ko
/lib/modules/4.1.18+/kernel/net/wireless/cfg80211.ko
In the case of a RPi 2 or 3 device, the module is /4.1.18-V7+/.
The command iw list shows the features of the installed WiFi dongle.
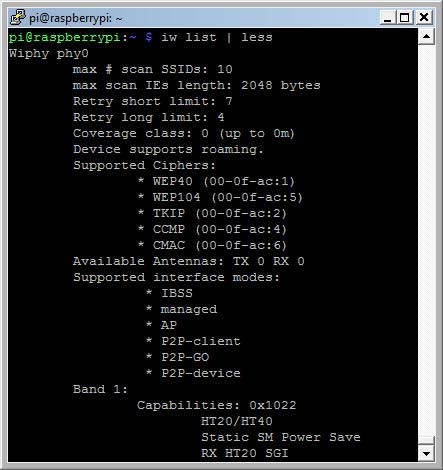
iw list results for the Raspberry WiFi dongle
Among the listed features, the supported interface modes are the most important. The support of AP means that the WiFi dongle can be used as WLAN access point.
The command dmesg (display message or driver message) prints the message buffer of the kernel. The result shows an issue with the brcmfmac driver for the official Raspberry WiFi dongle.
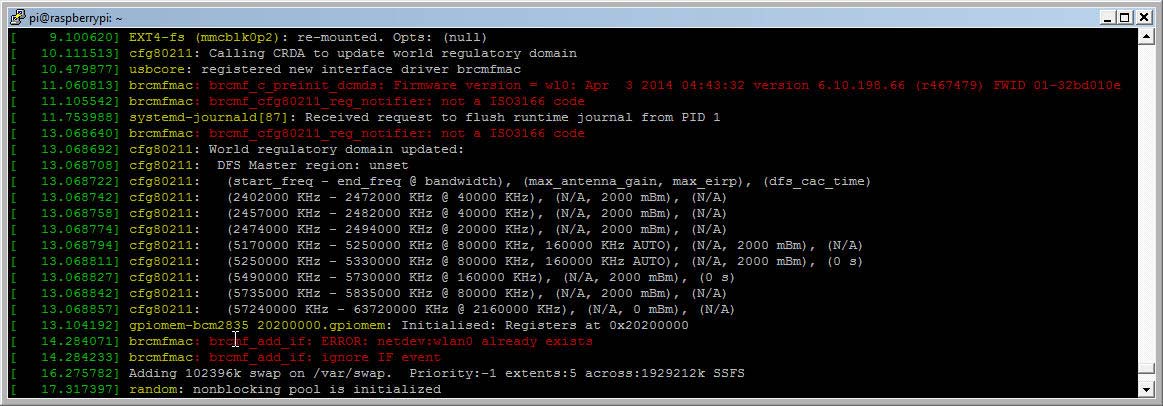
brcmfmac errors issued by dmesg command
[ 11.060813] brcmfmac: brcmf_c_preinit_dcmds:
Firmware version = wl0: Apr 3 2014 04:43:32
version 6.10.198.66 (r467479) FWID 01-32bd010e
[ 11.105542] brcmfmac: brcmf_cfg80211_reg_notifier: not a ISO3166 code
[ 14.284071] brcmfmac: brcmf_add_if: ERROR: netdev:wlan0 already exists
[ 14.284233] brcmfmac: brcmf_add_if: ignore IF event
Nevertheless the official WiFi dongle seems to work as expected.
Running the commands lsusb, lsmod and iwlist for the other 3 WiFi dongles and the onboard WiFi chip allows me to dress the following table :
| Dongle | Chipset | ID | WPA driver | AP support |
| D-Link DWA-131 | Realtek RTL8192CU | 2001:330d | 8192cu.ko | yes |
| TP-Link TL-WN725N | Realtek RTL8188EUS | 0bda:8179 | 8188eu.ko | yes |
| Raspberry WiFi | Broadcom BCM43143 | 0a5c:bd1e | brcmfmac.ko | yes |
| Racksoy Mini Stick | Ralink RT5370 | 148f:5370 | rt2800usb.ko | yes |
| RPI 3 onboard chip | Broadcom BCM43438 | ————- | brcmfmac.ko | yes |
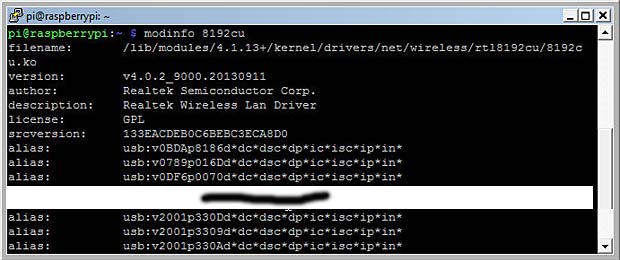
lsusb result for the Wifi dongle D-LINK DWA-131 (module 8192cu)
The command modinfo 8192cu confirms that the dongle with ID 2001:330d is supported by the preinstalled driver 8192.ko located at
/lib/modules/4.1.18+/kernel/drivers/net/wireless/rtl8192cu/8192cu.koThe WiFi dongles Raspberry, Racksoy and D-Link DWA-131 work out of the box in my Raspberry Pi. The following figure shows the Raspian Desktop with the activated Wifi icon. The two pasted message panels show the informations displayed when the mouse hovers the WiFi icon : the first case with additional wired Ethernet connection, the second case without Ethernet connection.
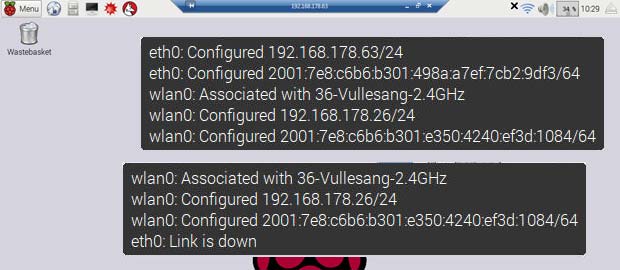
Raspbian WiFi information panel
The next figure shows the information displayed in my Fritzbox gateway concerning the WLAN and the Ethernet connections of the Raspberry Pi :

Raspberry Pi connections listed in the Fritzbox home-network panel
The fourth WiFi dongle (TP-Link TL-WN725N) uses the Realtek rtl8188EUS chip. Out of the box, the dongle worked, but with a very low signal indicator, although the Raspberry Pi was near my WLAN gateway. The lsmod command shows a driver r8188eu among the currently loaded kernel modules. This driver r8188eu.ko is located in the folder
/lib/modules/4.1.18+/kernel/drivers/staging/rtl8188eu/The Linux Staging tree is used to hold stand-alone drivers and filesystems that are not ready to be merged into the main portion of the Linux kernel tree, at this point in time, for various technical reasons. The correct driver named 8188eu.ko is not included in the Raspbian Jessie version. TP-Link and Realtek provide source files to compile the driver for specific Linux distributions. An installation guide is included in the zip-compressed driver file. Precompiled drivers for the Raspberry Pi are provided by the community. I used such a precompiled driver for my Linux version 4.1.18+, available at the following link :
https://dl.dropboxusercontent.com/u/80256631/8188eu-20160219.tar.gzThe precompiled package with the 8188eu.ko driver contains a script install.sh to automatize the installation process. I preferred to do it manually. I installed the included driver 8188eu.ko into a new created folder rtl8188 inside the wireless driver directory with the commands
sudo install -p -m 644 8188eu.ko
/lib/modules/4.1.18+/kernel/drivers/net/wireless/rtl818x/rtl8188
sudo depmod 4.1.18+
Finally I copied the included file 8188eu.conf, blacklisting the staging driver r8188 to the directory
/etc/modprobe.d/modprobe is a Linux program used to add a loadable kernel module to the Linux kernel or to remove a module from the kernel.
After rebooting the dongle works as expected. For practical reasons I linked copies of the files 8188eu.ko and 8188eu.conf in the present post.
WPA_Supplicant
To connect the Raspberry to a remote WLAN Access Point, a software must run to provide WPA key negotiation with a WPA Authenticator and EAP authentication with an Authentication Server. The most common program for these tasks is wpa_supplicant, a free IEEE 802.11i software implementation developed by Jouni Malinen. In computer networking, a supplicant is an entity at one end of a point-to-point LAN segment that seeks to be authenticated by an authenticator attached to the other end of that link.
wpa_supplicant is a daemon and only one instance of it may run on a machine, all other modifications of security settings are made with the text-based frontend application wpa_cli. wpa_cli is used to query current status, change configuration, trigger events, and request interactive user input. wpa_supplicant is pre-installed in Raspbian Jessie.
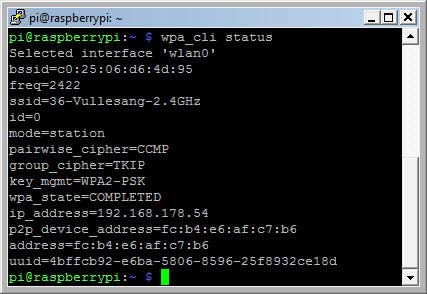
wpa_cli status
wpa_cli works two ways: interactive and non-interactive
A list of some useful wpa_cli commands is shown below :
- wpa_cli status
- wpa_cli terminate
The following command can be used to restart the WiFi connection :
sudo /etc/init.d/networking restartThe wpa configuration file located at /etc/wpa_supplicant/wpa_supplicant.conf has the following content :
ctrl_interface=DIR=/var/run/wpa_supplicant GROUP=netdev
update_config=1
network={
ssid="36-Vullesang-2.4GHz"
psk="secretkey"
key_mgmt=WPA-PSK
}
Hostapd
To use a WiFi dongle in AP mode on Rasperry, you need hostapd or a similar application. wpa_supplicant allows basic AP configuration, but does not include support for most of the AP parameters. Comparing the hostapd.conf with the wpa_supplicant.conf example provides a picture of the difference.
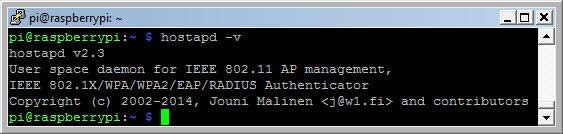
The hostapd module is not pre-installed in Raspbian Jessie. The installation is done as usually with the command
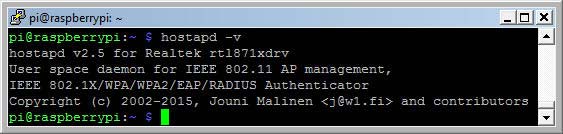
sudo apt-get install hostapdThe version check after the successful installation shows version number 2.3.
hostapd version check
hostapd is developed and maintained by the author of wpa_supplicant, Jouni Malinen from Finland.
I edited the related configuration file
/etc/hostapd/hostapd.confas follows for an open network :
# WLAN Router Configuration
interface=wlan0
# driver= autoselected
ssid=radiologic
ignore_broadcast_ssid=0
channel=6
hw_mode=g
wmm_enabled=1
auth_algs=1
To protect and encrypt the network, the following parameters are added to the hostapd.conf file :
# WLAN Encryption
wpa=2
rsn_preauth=1
rsn_preauth_interfaces=wlan0
wpa_key_mgmt=WPA-PSK
rsn_pairwise=CCMP
wpa_passphrase=123456789
Here is a link to my hostapd.conf file. Some explanations about the different configuration parameters used are listed below :
- # : lines starting with an hash are considered as comments
- interface : name of the interface to listen on
- driver : usually detected by the system; in case of failure the name of the driver corresponding to the used dongle must be specified (nl80211, rtl871xdrv, …)
- ssid : name of the network seen by other devices
- ignore_broadcast_ssid : define if the network name is visible (broadcasted) or hidden
- channel : WiFi channel used by the network; valid channels range from 1 to 11 or from 1 to 14, depending on the location
- hw_mode : wireless mode : A, B and G are available; these are the last characters of the IEEE 802.11 standard. The most common is G (2,4 GHz).
- wmm_enabled : WiFi multimedia to enhance quality of service (QoS)
- auth_algs : specification of the authentication algorithm; 1 = OSA
- country_code : used to set regulatory domain (transmit power, available channels)
- ieee80211d : set the regulatory limits based on the country code
- ieee80211n : optional activation of the IEEE 802.11n standard
- wpa : security settings: 1=wpa; 2=wpa2; 3=wpa & wpa2
- rsn_preauth :pre-authentication to speed up roaming
- rsn_preauth_interfaces : list of interfaces from which pre-authentication frames are accepted
- wpa_key_mgmt : management of the wpa2 WLAN keys; WPA-PSK or WPA-EA
- rsn_pairwise : encryption algorithm for wpa2; new CCMP or old TKIP
- wpa_pairwise : encryption algorithm for wpa
- wpa_passphrase : password specified for the network
- logger-syslog : instructions about error logging
- max_num_sta : maximal number of clients accepted by the WLAN
- deny_mac_file : prevent connections from devices with a MAC address specified in a file
The complete list of hostapd parameters is available at the website of the developer.
The Raspberry WiFi dongle works out of the box with the default hostapd driver nl80211. The Racksoy WiFi dongle works with the autoselected driver rt2800.
Hostapd supporting driver rtl871xdrv
The two other WiFi dongles D-Link DWA-131 and TP-Link TL-WN725N are not supported by the standard hostapd module with the included drivers. Both dongles use Realtek chipsets needing a specific driver, named rtl871xdrv. There are numerous posts and tutorials available at the web dealing with this problem, but only few provide correct and relevant solutions related to the current Raspbian Jessie version.
After some Trial and Error, I ended up with the following procedure :
- download the version 2.5 of the hostapd source https://w1.fi/releases/hostapd-2.5.tar.gz from the website https://w1.fi/hostapd/ of Jouni Malinen
- extract the archive at /home/pi/hostapd-2.5/
- clone the github repository https://github.com/pritambaral/hostapd-rtl871xdrv at /home/pi/hostapd-rtl871xdrv/ with the command
sudo git clone https://github.com/pritambaral/hostapd-rtl871xdrv - install the modules libnl1, libnl-dev and libssl-dev with the command
sudo apt-get install libnl1 libnl-dev libssl-dev - change directory to /home/pi/hostapd-2.5/
- apply the patch code with the command
sudo patch -Np1 -i /home/pi/hostapd-rtl871xdrv/rtlxdrv.patch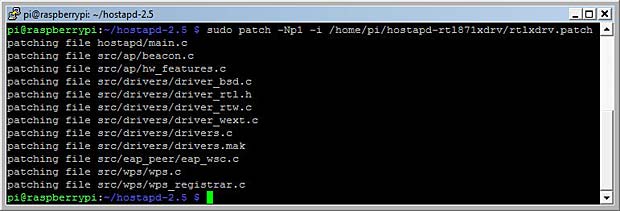
Patching the hostapd source files
- enable the driver in the file .config with the commands
cd hostapd cp defconfig .config echo CONFIG_DRIVER_RTW=y >> .config - compile the hostapd module, inside the hostapd folder, with the following command
sudo make install - check the new installed hostapd version
hostapd version 2.5 for Realtek rtl871xdrv
The last step is to change the driver name as rtl871xdrv in the hostapd.conf file and to reboot the Raspberry Pi with a Realtek WiFi dongle. After terminating wpa_cli and starting hostapd, we get the confirmation that the Realtek dongles are now working.
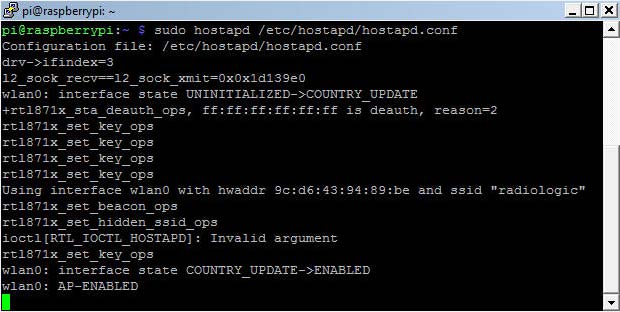
hostapd launch with driver rtl871xdrv
Running Hostapd
Depending on the used WiFi dongle, we use the native hostapd version 2.3 or the new compiled version 2.5. Before associating hostapd with the wlan0 interface, we have to disassociate this interface with wpa_supplicant by entering the command
sudo wpa_cli terminateTo start the WLAN-Host, we run the command
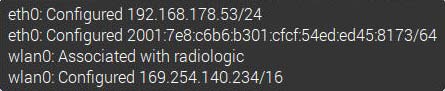
sudo hostapd /etc/hostapd/hostapd.confAdding the optional parameter -dd (after hostapd) in the above command provides a detailed report about the process, which can be very helpful in case of problems. After a few moments the WiFi-panel in the Raspian desktop shows that the wlan0 interface is ssociated with the SSID “radiologic”. The interface is configured as AdHoc network with an self-assigned IP address in the range 169.254.0.0/16.
WiFi panel when hostapd is started
I used an iPad as WLAN client to test the WLAN-Host. The SSID “radiologic” is displayed in the list of available WiFi networks as secured WLAN. After entering the defined password “123456789”, the connection is established. The next figure shows the related messages displayed in the Raspbian terminal window.
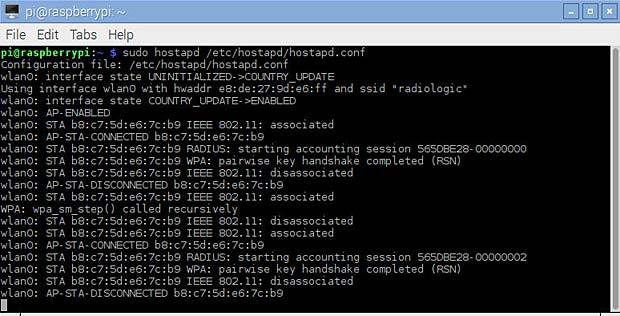
WLAN-Host messages for two connections and disconnections with an iPad
hostapd can be terminated by pressing simultaneously the keys “Ctrl” and “c” .
To start hostapd at boot, we need to do some additional tasks. First we must uncomment and complete the parameter DAEMON_CONF in the file /etc/default/hostapd as follows :
DAEMON_CONF="/etc/hostapd/hostapd.conf"We need to insert the same parameter in the init file /etc/init.d/hostapd.
Next we enable starting of hostapd at booting with the command
sudo systemctl enable hostapd
Enable autostart of hostapd at booting
The new systemctl command synchronizes the booting process with the old legacy sysvinit command using update-rc.d. After a reboot we can check the status of the hostapd service with the command
service hostapd statusor
systemctl status hostapd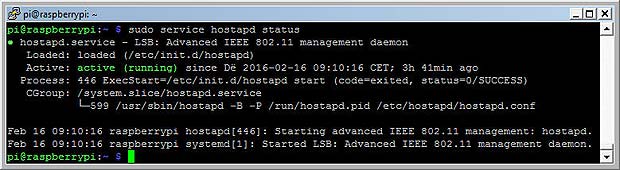
Show status of the hostapd service
The following commands are used to stop, start, restart or disable hostapd :
sudo systemctl stop hostapd
sudo systemctl start hostapd
sudo systemctl restart hostapd
sudo systemctl disable hostapd
Hostapd needs random data to encrypt the WLAN. In computing, the randomness of data is called entropy. When the entropy is too low, “Add randomness” messages are displayed.

Raspberry messages related to randomness (entropy)
The entropy level can be checked with the command
cat /proc/sys/kernel/random/entropy_avail
When the returned value is less than 1.000, the entropy is unsufficient for secure cryptographic processes, which is often the case in small systems like the Raspberry Pi. Fortunately there is a solution : HArdware Volatile Entropy Gathering and Expansion (HAVEGE).
The HAVEGE project is an attempt to provide an easy-to-use, unpredictable random number generator based upon an adaptation of the HAVEGE algorithm. The havege module is installed with the command
sudo apt-get install havegedAnother critical point related to hostapd is the power-save feature of most WiFi dongles. While this is a strong advantage when the WiFi dongle is in infrastructure mode (outbound) where the device is reactivated by the user, this is a great risk in AP mode when the computer works headless. In power-save mode, the WiFi dongle is no longer accessible by an external client and the only solution is to reboot the computer by unplugging and re-plugging the power supply.
We can check the status of power management with iwconfig.
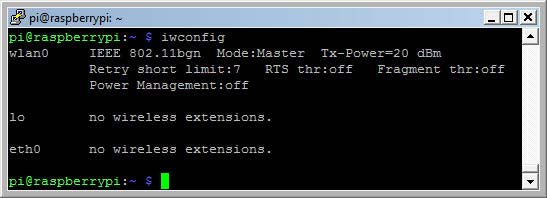
Check the power management status of the WiFi dongle with iwconfig
To prevent the Wifi dongle from entering the power-save mode, we can add the command
wireless-power offin the /etc/network/interfaces file.
Another possibility is to create configurations files in the directory /etc/modprobe.d/.
Examples for Realtek drivers :
8188eu.conf
options 8188eu rtw_power_mgnt=08192cu.conf
options 8192cu rtw_power_mgnt=0Networking setup
Until now, the WiFi adapter has an auto-assigned IP address and the clients don’t receive an IP address when connecting to the WLAN, which is not a workable solution. We need a static IP address for wlan0 and a DHCP-server to attribute IP addresses to the WLAN clients.
Many tutorials about Raspberry Pi deal with static IP addresses to simplify the access to the RPI when the routing is managed by a DHCP-server. Most of them refer to the legacy ifupdown configuration file /etc/network/interfaces, which is obsolete with Raspbian Jessie using the DHCP-client dhcpcd developed by Roy Marples. The network configuration should be done in the file /etc/dhcpcd.conf. If a static IP address is required for the eth0 interface, a more simple way is to set it in the router of the local network. In my specific case this is a Fritzbox 7390. The best way however is to use the hostname of the Raspberry Pi to access it in the local network. The default hostname is raspberrypi. The hostname can be easily changed in the raspi configuration. The hostname is saved in the files /etc/hosts and /etc/hostnames.
The default configuration of /etc/network/interfaces to be used with dhcpcd is shown below:
# interfaces(5) file used by ifup(8) and ifdown(8)
# Please note that this file is written to be used with dhcpcd
# For static IP, consult /etc/dhcpcd.conf and 'man dhcpcd.conf'
# Include files from /etc/network/interfaces.d:
source-directory /etc/network/interfaces.d
auto lo
iface lo inet loopback
iface eth0 inet manual
allow-hotplug wlan0
iface wlan0 inet manual
wpa-conf /etc/wpa_supplicant/wpa_supplicant.conf
The content of the default configuration of the /etc/dhcpcd file is the following :
# A sample configuration for dhcpcd.
# See dhcpcd.conf(5) for details.
# Allow users of this group to interact with dhcpcd via the control socket.
#controlgroup wheel
# Inform the DHCP server of our hostname for DDNS.
hostname
# Use the hardware address of the interface for the Client ID.
clientid
# or
# Use the same DUID + IAID as set in DHCPv6 for DHCPv4 ClientID as per RFC4361.
#duid
# Persist interface configuration when dhcpcd exits.
persistent
# Rapid commit support.
# Safe to enable by default because it requires the equivalent option set
# on the server to actually work.
option rapid_commit
# A list of options to request from the DHCP server.
option domain_name_servers, domain_name, domain_search, host_name
option classless_static_routes
# Most distributions have NTP support.
option ntp_servers
# Respect the network MTU.
# Some interface drivers reset when changing the MTU so disabled by default.
#option interface_mtu
# A ServerID is required by RFC2131.
require dhcp_server_identifier
# Generate Stable Private IPv6 Addresses instead of hardware based ones
slaac private
# A hook script is provided to lookup the hostname if not set by the DHCP
# server, but it should not be run by default.
nohook lookup-hostname
The lo interface (loopback) serves communication with localhost and is started automatically at boot. The IP address for the eth0 interface is requested by dhcpcd and provided by the LAN-router. The configuration for the wlan0 interface is provided by the /etc/wpa_supplicant/wpa_supplicant.conf file.
The status of the dhcpcd client is requested with the command
sudo systemctl status dhcpcd
Status of the dhcpcd client
For the headless operation of the Raspberry Pi with a WLAN Access Point I use a minimal network configuration :
/etc/network/interfaces
# Legacy interface (ifupdown) file used with dhcpcd
auto lo
iface lo inet loopback
iface eth0 inet manual
/etc/dhcpcd.conf
# DHCPCD configuration
hostname
clientid
persistent
option rapid_commit
option domain_name_servers, domain_name, domain_search, host_name
option classless_static_routes
option ntp_servers
require dhcp_server_identifier
slaac private
nohook lookup-hostname
interface wlan0
inform 192.168.123.1
static routers=192.168.123.1
A static IP address (192.168.123.1) can be attributed to wlan0 by means of the WiFi Network Panel opened by right clicking the WiFi icon in the task bar.
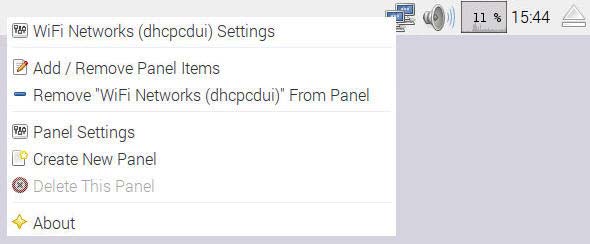
WiFi Popup Menu to manage panels
The data inserted in the WiFi Networks Settings are saved in the /etc/dhcpcd.conf file as shown above.
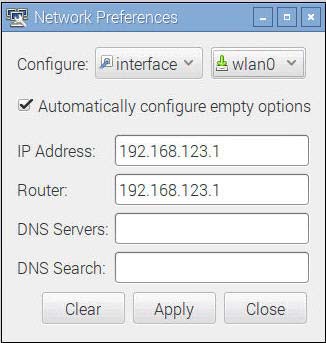
Network preferences wlan0 interface options
DNSMASQ
One piece of the puzzle is still missing : a Dynamic Host Configuration Protocol (DHCP) Server to provide IP addresses to the WLAN clients. There are several dhcp-server packages available for Raspbian. I selected dnsmasq, a very useful module to set up a complete WLAN router. dnsmasq is a Domain Name System (DNS) forwarder and a DHCP-server for small computer networks, which are easily configurable, with low usage of system resources.
dnsmasq is installed with the command
sudo apt-get install dnsmasqThe configuration is done in the file /etc/dnsmasq.conf. Here is a link to the content of the default dnsmasq.conf file. My minimal configuration is the following :
# DNSMASQ Configuration
interface=wlan0
no-dhcp-interface=eth0
dhcp-range=192.168.123.2,192.168.123.99,12h
The DHCP-server is restricted to the wlan0 interface, the eth0 interface is excluded. The range of IP addresses to attribute to the WLAN clients is bounded by 2 and 99 in the sub-network 192.168.123.0. The lease time is 12 hours.
dnsmasq is managed with the same type of commands as hostapd :
sudo systemctl start dnsmasq
sudo systemctl stop dnsmasq
sudo systemctl restart dnsmasq
sudo systemctl enable dnsmasq
sudo systemctl disable dnsmasq
sudo systemctl status dnsmasq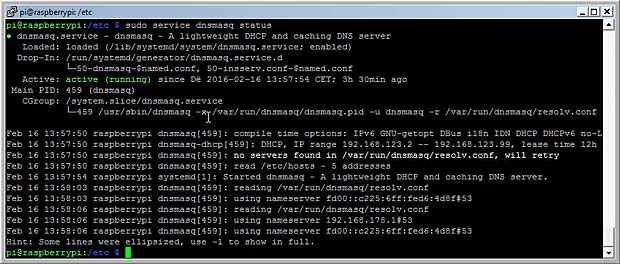
Status of the dnsmasq server
To test the correct access with WLAN clients to the Raspberry Pi, we will use the installed web-server lighttpd. The configuration files for the web-server are located in the directory /etc/lighttpd/. The web pages are located in the folder /var/www/html/. By entering the URL
http://192.168.123.1in a browser after logging into the radiologic WLAN, we can display the index web page. A screenshot of the default html index page is shown hereafter :
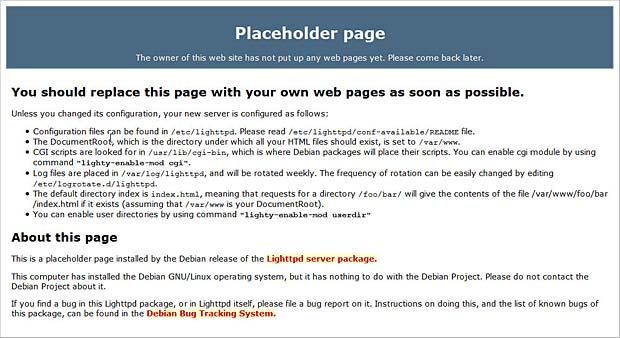
Default web page of the lighttpd web server
I replaced this page with the following minimal html script :
<!DOCTYPE HTML>
<html>
<head>
<meta http-equiv="Content-Type" content="text/html; charset=utf-8">
<title>Welcome Page</title>
<style type="text/css">
h1, h3 {text-align:center}
</style>
</head>
<body>
<h1>Welcome</h1>
<h3> to the Rasperry Pi WLAN</h3>
</body>
</html>
The following photo shows the result on various mobile devices accessing the radiologic WLAN.

iPad, iPhone, Samsung, LG and Blackberry mobile devices connected to the RPi WLAN
Currently the clients can only access the embedded web server. If we want that the WLAN clients have access to the global Internet or to other services, we need to add more network configuration parameters or specific applications. This will be a topic of further contributions.
Service Management
As a last step we check that all programs are running without errors and that the performance of the system is correct. First we need to understand the boot process.
Debian separates the legacy boot process (based on System V init) into seven runlevels labeled as 0, 1, 2, 3, 4, 5, 6 and S. For each runlevel a file rcx.d (x = 0, 1, 2, …) exist in the directory /etc/ containing symbolic links to targets located in /etc/init.d/. The runlevels are defined as follows :
- 0 : (halt) stop all services and make the system ready for shutdown
- 1 : (minimal mode) stop all services and put the system in single-user rescue mode
- 2 – 4 : multiuser network enabled text mode
- 5 : multiuser network enabled graphical mode
- 6 : (reboot) stop all services, make the system ready for reboot
- S : (single) these scripts are executed once
When we enable a service to auto-start, we are adding it to a runlevel.
Default Debian installation does not make any difference between runlevels 2-5. Number 2 is the default runlevel at start. In a normal boot the levels progress up to 5. Runlevels S and 1 are used for maintenance. Runlevels can be edited manually by editing control scripts in /etc/init.d and symbolic links in /etc/rc0.d … /etc/rc6.d. The runlevel can also be changed at runtime with the command telinit [runlevel 2-5]. The current runlevel is indicated with the command runlevel.
Looking at the list of the services included in the /etc/init.d/ folder, we discover among others the installed programs dnsmasq, dhcpcd, haveged, hostapd and lighttpd.
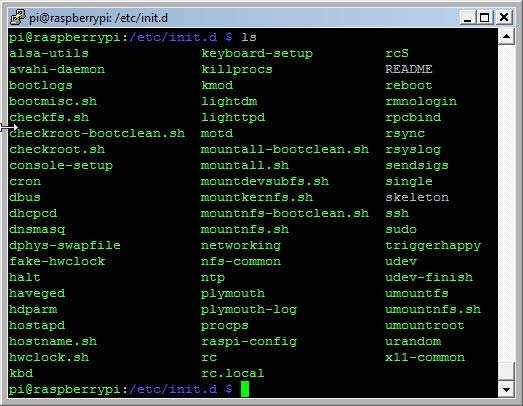
Content of the folder /etc/init.d/
Here is an extract from the init.d README file :
BEGIN INIT INFO
# Provides: skeleton
# Required-Start: $remote_fs $syslog
# Required-Stop: $remote_fs $syslog
# Should-Start: $portmap
# Should-Stop: $portmap
# X-Start-Before: nis
# X-Stop-After: nis
# Default-Start: 2 3 4 5
# Default-Stop: 0 1 6
# X-Interactive: true
# Short-Description: Example initscript
# Description: This file should be used to construct scripts to be
# placed in /etc/init.d.
### END INIT INFO
For each program defined as script in the /etc/init.d/ folder we can specify the runlevels for start and stop and the dependencies with other programs. The next figure shows a real example of an init-script related to the dnsmasq service :
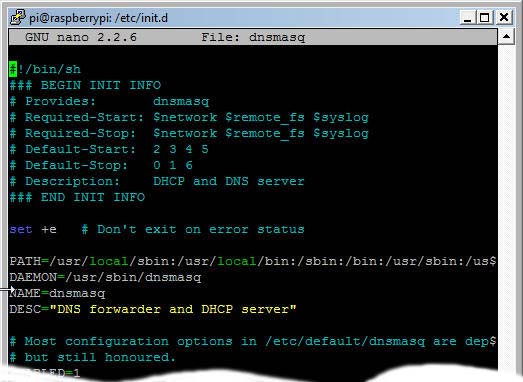
init script related to dnsmasq in the /etc/init.d/ folder
We see that the virtual boot facilities $network, $remote_fs and $syslog must be started or stopped before the dnsmasq service. Creating init scripts manually is an error-prone task. For this reason the legacy System V (SysV) init program has now been replaced by new init systems. Raspbian Jessie is using systemd as service manager. We have already seen the related tool systemctl to start, stop, enable and disable programs.
In systemd, the targets of most actions are units, which are resources that systemd knows how to manage. Units are categorized by the type of resource they represent and they are defined with unit files. The systemd files are located in the directories /lib/systemd/system/ and /etc/systemd/system/.
Some useful systemd commands are listed below :
systemctl is-active application.service
systemctl is-enabled application.service
systemctl is-failed application.service
systemctl list-units
systemctl list-units --all
systemctl cat application.service
systemctl list-dependencies application.service
systemctl show application.service
sudo systemctl mask application.service
sudo systemctl unmask application.service
sudo systemctl edit application.service
systemctl get-default
For most commands the .service suffix can be omitted. Some real commands concerning hostapd are shown in the next figure :
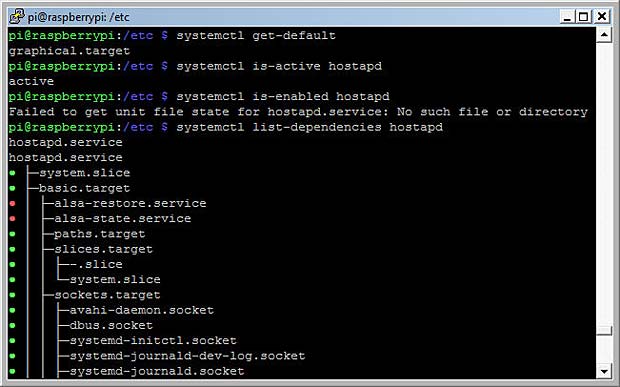
Results of some systemctl commands for hostapd
systemd has some great built-in tools to check and tune the boot time. The commands
systemd-analyze
systemd-analyze blame
will print the boot time respectively print the list of the most time-consuming services in decreasing order.
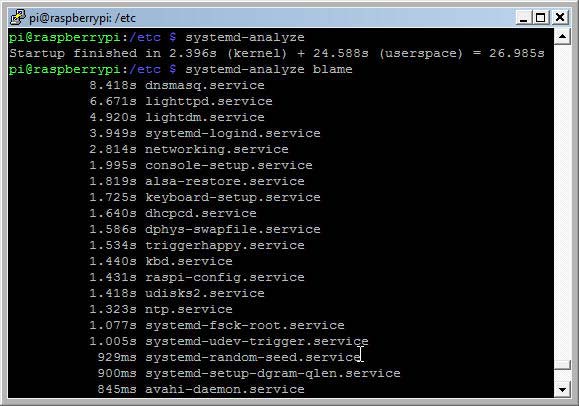
systemd-analyze results
The command
systemd-analyze plot > init_plot.svgcreates an xml svg file which can be rendered in a browser. It displays in a graphical way when all the services start.

init_plot.svg file rendered in browser; click to enlarge
systemd has also a powerful tool to view and manipulate system logs named journald. The related configuration file is located in /etc/systemd/journald.conf. Some useful commands are :
journalctl
journalctl --all
journalctl --since=yesterday
journald provides various filters using time constraints. Logs can be viewed in UTC or local time at will. The following journald commands deal with time and date.
timedatectl list-timezones
sudo timedatectl set-timezone zone
timedatectl status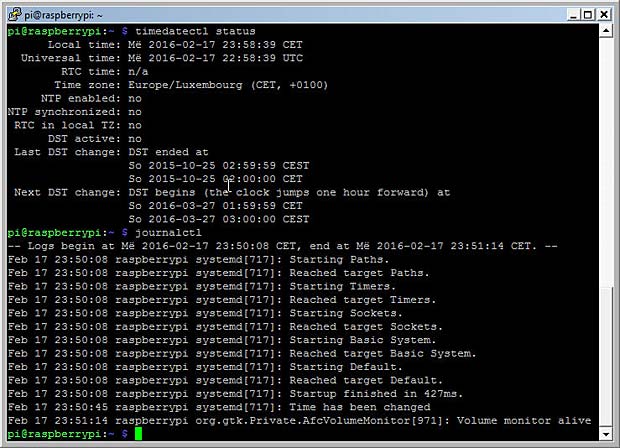
systemd tools : timedatectl and journalctl
journald provides other filter options than time constraints : units, users, groups, processes, pathes, priorities, … The journal display can be customized in various formats. The amount of space occupied by the journal on the SD card can be shown with the the command
journalctl --disk-usageBackup and Cloning
When a bad shutdown has corrupted the file system, the Raspberry Pi can be a frustrating experience. It’s therefore useful to wait for the complete shut down of the RPi before unplugging the power supply. To shutdown or reboot the Raspberry Pi, we can use the menu “Shutdown” in the VNC-desktop
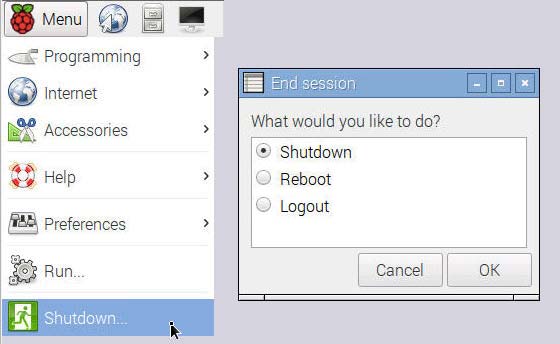
End Raspberry session with shutdown, reboot or logout
or the commands
sudo shutdown
sudo reboot
It’s also important to make at regular times a backup of the Raspberry Pi SDcard. Backups are possible on Windows 7 systems (or later) with the Win32DiskImager tool. First an image of the source card is saved to a file on the Windows PC. In an second step this image is copied to a backup SDcard. Backup’s can also be done with the Raspberry Pi itself by using an SDcard reader with USB interface.
Cloning a SDcard is the same procedure as doing a backup, but the goal is different. Cloning allows to distribute a complete mirror of a working RPi system with operating system, applications and data. This way it’s easy to copy and multiply an existing solution.
Sometimes a cloned image file can’t be copied to an SDcard with the same capacity, because SDcards can vary a little bit in size. There are several tutorials on the net how to solve this problem by shrinking the image file, for example one by Andrew Aokley, another one on the Wonky Gibbon Ramblings Blog.
I used the following procedure on my Debian computer :
df -h
cd /home/mbarnig/Desktop/
sudo dd if=/dev/sdb2 of=myimage.img bs=4M
sudo dd if=myimage.img of=/dev/sdb2 bs=4M conv=notrunc,noerror
Links
The following list provides links to websites with additional informations about the Raspberry Pi :
- Just Enough Raspberry Pi ; Learnpub pdf by Sam King
- Raspberry Pi: Aufgaben und Übungen; Elektronik Kompendium
- How to use systemd for system administration on Debian, by Ferdinand Thommes